Pages

Monday, October 31, 2016

Moroccan Flair

I love the way some of the stamps in the Paisley set go perfectly with this DSP. I got the idea for the first card from fellow Demo, Dawn Olchefske. It's a great way to use up scraps of Designer Series Paper. The double sided designs are just perfect for this folding technique. The second one I didn't fold the squares correctly, but decided to use it anyway. lol
The four pieces of Designer Series Paper are 2 x 2 5/8 inches. Then you just fold the corners ¾ inch from the edge.  After stamping the greeting, cut with 1 ¾”  Circle Punch.


Product List

Tuesday, October 25, 2016

NEW Stitched Shapes Framelits


Not only are stitches a classic trend, they illustrate the quality, precision, and extra care taken when creating a piece. Giving a stitched gift shows just how much you value that relationship. Now you have the opportunity to purchase Stitched Shapes Framelits ahead of their official release in the 2017-2018 annual catalog and get 25% off coordinating stamp sets. With Stitched Shapes Framelits you can make paper stitches in seconds, turning any project into one that is stitched from the heart. And there’s more great news…although the 25% off stamps sets ends November 30, you will still be able to get the Stitched Shapes Framelits after that date. 

Details
 Stitched Shapes Framelits available beginning
November 1, 2016
November 1-30, 2016: select stamp sets 25% off
 Promotion Deadline (25% off select stamp sets): 


Monday, October 24, 2016

Fairy Garden

This is a Fairy Garden I made for the Silent Auction at St. John's Apple Fest. The United Methodist Women put the Apple Fest on every year, with proceeds benefiting three different charities. This year it will be on Nov. 5th from 8-2.

This Fairy Garden comes complete with Felicity Fairy
and some Fairy Notes. Much like Elf on the Shelf,
Felicity pops up around your home whenever someone
does something kind or shows an act of love. Felicity
uses the Fairy Notes to communicate with members
of the family.

This magical Fairy Garden also contains a wishing well,
No need for coins, as fairies can hear what you tell.


Tuesday, October 18, 2016

Sharing Treats & Stamping This Christmas Season


This Christmas season you’ll see people sharing treats with their neighbors, coworkers, friends, and family. You can do it in style by making some festive projects like this Candy Cane bag! When the package looks this cute, it doesn’t even matter what’s inside.  It's such fun and so rewarding to spread some holiday cheer by sharing a little hand-stamped something with the people around you. 
Jar of Cheer Stamp Set; Whisper White and Vellum Cardstock; Basic Gray Classic Stampin’ Pad®; VersaMark® Pad; Real Red Glitter Stampin’ Emboss® Powder; Candy Cane Lane Baker’s Twine; Candy Cane Lane Designer Washi Tape; Big Shot™; Everyday Jar Framelits™ Dies; Gift Bag Punch Board; Handheld Stapler

Saturday, October 15, 2016

Fairy Special

I just got this stamp set called Fairy Celebration. It's so fun, and perfect to go with the fairy garden I'm making for a charity fundraiser at church.

Friday, October 14, 2016

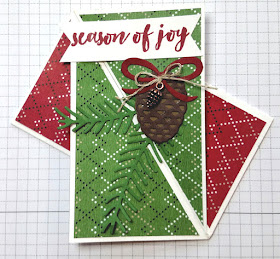
Twist Gate Fold Card

I love this Twist Gate Fold. I found a tutorial for it on Split Coast Stampers. I used the Warmth & Cheer designer series paper stack, Christmas Pines Bundle and the Copper Pinecones all from the Holiday catalog.
Card Front
inside

Triple Fold Card

This is the perfect card style in which to use designer series paper that's on sale now!


To Make:

  1. The base is made with a piece of 12″ x 12″ card stock, trimmed to 12″ x 5 ½”   
  2. To create the folds, score the long 12″ side at 4 ¼, 7 ¼, and 10 ¼ inches.
  3. Line each panel with designer series paper alternating the patterns: 1 ½  x 5 ¼,  2 ¾ x 5 ¼,  and 4 x 5 ¼ inches.
  4. The belly band is made of two strips of 11″ x 1″ card stock, they are alternated just a bit so one strip peeks out under the other one.  A pretty piece of Ribbon and a die cut finish off the band.
inside second fold
inside third fold
Product List

Thursday, October 13, 2016

New Baby!

As I mentioned the other day, I'm making a Correspondence Basket for the Silent Auction at Our Church Apple Fest this year. The United Methodist Women do this to rais money for three charities each year. Some wonderful ladies have been helping me by bringing items to put in it. At this point I've just been putting items in the basket, I don't really have a flair for arranging and dressing up the presentation, but other ladies of St. John's do, so they will rearrange it and make it look gorgeous!

I didn't have any cards for a new baby yet and decided to make some. You will never believe what this carriage is made from... the Santa Sleigh Thinlits! A very talented Australian Demo came up with this. I wish I had the new Layering Circles Framelits, as they would have made the wheels perfectly. As it is my front wheel is a bit wider due to the punches and old Circle Framelits I had to work with. Hmmm.... vintage carriage.... maybe the larger wheel is supposed to be wider! lol
Here is what I used to make them. I then found designer series papers in yellows and mint.


2 full sleighs in white
1 decorative sleigh in color
1 large and 1 small wheel spoke strips in white
word window punch white
small wheel 1” and 1 ¼” in white
large wheel 2nd and 3rd smallest circle framelits in white


Product List

Tuesday, October 11, 2016

Silicone Craft Mat

I love my Silicone Craft Sheet!!
see thorough quality (see last bullet)


The inky techniques demonstrated atop the Ranger teflon mat, etc. can all be done on top of the Stampin’ Up! Silicone Craft Mat. You can also scribble mono multi glue onto the silicone sheets, and lay your intricate die cut onto the glue and then adhere to your project.

The Stampin’ Up! Silicone Craft Mat is better because:

  • The thickness & silicone layer itself provides better protection to the underlying surface. (set the glue gun on top, and no heat will be transferred to the surface below).
  • Our Silicone mats lay FLAT. We don't have to tape down the corners.

  • Our Silicone mats don't scoot around ... they stay in place while you're working.
  • You can see through our Silicone mats: When gluing several layers, punch a circle from cardstock and glue all of the smaller items onto the circle. When assembling the assortment of die cuts, slip your card front under the Silicone matt so you can “see” how big to build it. (see illustration above.) I got this tip from fellow Demo, Patty Bennett.
    finished card

Product List