Pages

Friday, January 29, 2021

The Garden Gate Z Fold


All Measurements in Inches

Soft Sea Foam Card Base: 11 x 4-1/4 scored at 2-3/4 and 5-1/2

Forever Greenery Designer Series Paper: (cut two 4 x 2-1/2) and (one 5-1/4 x 4)

Window Sheet: 10 x 1 scored at 6-1/4 & 4

Whisper White for fence, flowers and door cut outs

Pear Pizzazz for vine

Diecut two fences and arbor pieces and 3 just fences

Diecut one doorway

Stamp and die cut:

  • 2 rose vines

  • cat

  • bird

  • 2 medium flower clusters

  • 1 small flower cluster

  • 1 of each plain vines


Grace's Gate

 This was a bit time consuming, but so much fun to make! I can just imagine the recipients face when they open it, which makes me so happy!! I made an index to show what all comes with this bundle pictured after the card. I cased this card from last year's Spring Catalog. White card base, Seaside Spray layer, Gray Granite Layer that's embossed with Brick and Mortar 3D embossing folder. I used white craft ink and a blending brush to add some white wash. The images were all colored with Stampin' Blends. The dies do the work of creating the arbor and gate.


Friends Are Like Seashells

Such a fun set right? I've posted some directions on how to use this bundle before HERE. Today I want to show you some more pictures that will explain how you can use these wonderful coordinating products!! You can click on any of the pictures to enlarge them.
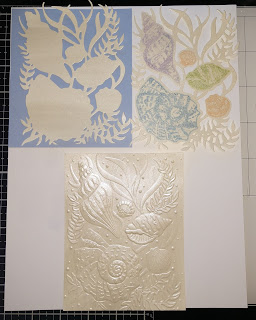
I've stamped all the stamps from the set and put the die that fits over top. There are also some watercolor splash stamps that you can use to color in your images. Then, for the big die, I numbered the spaces to show you where the 5 shells fit.
The first image here is the diecut. The second image shows how I stamped the shells on the correct places in some pretty pastel colors. You can then line that up in the embossing folder for a totally WOW addition of 3D texture. The bottom image is just the embossing folder which is gorgeous just as it is.

 
I made a wreath out of some jute twine I had in my stash, then added Pearl Basic Jewels, some Braided Burlap Trim that I pulled apart, shells that have been stamped, diecut and embossed, and a greeting. All of those pieces were mounted on the embossed layer. I really LOVE this card.


Product List

Thursday, January 21, 2021

Three Projects From the January to June Mini Catalog


Stamps

Art Gallery

Paper

Fine Art Floral DSP, Golden Garden Designer Specialty Acetate, Flirty Flamingo, Petal Pink, Basic White, Flirty Flamingo, Petal Pink, So Saffron, Mossy Meadow, Bumble Bee

Ink

Flirty Flamingo

Embellishments

White Ribbon or Very Vanilla Metallic Edge

Tools

Floral Gallery Dies

  1. Petal Pink card base: cut 8-1/2 x 5-1/2 score at 4-1/4

  2. Flirty Flamingo cardstock layer: 4 x 5-1/4

  3. DSP layer: 3-3/4 x 5

  4. Acetate layer: 3-3/4 x 5 line up over DSP layer and adhere with just a couple glue dots

  5. Tie ribbon around the acetate/DSP layer then adhere to Flirty Flamingo layer, then affix to card front

  6. Add a stamped message and diecut

Stamps

Art Gallery Bundle

Card Stock

Fine Art Floral DSP, Mossy Meadow, Gold Foil Paper, Thick Basic White, Flirty Flamingo

Ink

Flirty Flamingo, Mossy Meadow, Poppy Parade

Embellishments

White Ribbon, Forever Greenery Trim Combo Pack

Tools

Painted Texture 3D Embossing Folder

  1. Basic White Thick card base cut 8-1/2 x 5-1/2 score at 4-1/4

  2. Basic White layer embossed with Painted Texture EF 4 x 5-1/4

  3. Flirty Flamingo 3 x 4-3/8

  4. Gold Foil 2-7/8 x 4-1/4

  5. DSP 6 squares 1-1/4 x 1-1/4

  6. Mossy Meadow die cut text 3 x 3-1/2


Stamps

Friends Are Like Seashells bundle

Card Stock

Pearlescent Paper, Thick Basic White

Ink

Blushing Bride, Mango Melody

Embellishments

Stampin' Dimensionals

Tools

Seashell 3D Embossing Folder, Blending Brushes

  1. Thick Basic White card base: cut 4-1/4 x 11 score @ 5-1/2

  2. Use Blending Brush (or sponges) to apply Mango Melody and Blushing Bride ink to card front

  3. Diecut shells from Pearlescent paper, them emboss with Seashell EF

  4. Apply diecut to card front with Dimensionals or adhere with glue

  5. Stamp greeting in Mango Melody ink

  6. Flag one end of greeting piece stamp message


Wednesday, January 20, 2021

Card Ministry

 We have busy creating for Card Ministry at St. John's. 

Stamp Set: Mountain Air

Stamp Set: Rooted in Nature. Used my new blending brushes on the background!

Used outline of South Carolina. Cut out map image, placed on white cardstock, stamped trees over top. Tree stamps from Mountain Air.


Sensational Seashells

 This card is made with the Friends are like seashells bundle and the coordinating Seashells 3D embossing folder. I've never worked with a set like this before, it's amazing! 

You diecut FIRST, then line up the stamps on the shape. Since the stamps are clear it's easy to do with a stamp block, or if you prefer, you can use your Stamparatus. After you diecut and stamp the shells, you place the diecut inside the embossing folder, line it up and run it through the machine. WOW! lots of texture and 3Dness! lol Super, super cool!

I used the Pearlescent paper, Basic White and Blushing Bride. Oh! I forgot to tell you about the background. This card is cased from page 40 in the catalog, but I don't have the coordinating DSP yet, so I got out my new favorite tools, the blending brushes and swiped color on my white background. Voila, instant printed paper. The blending brushes are so thick, and dense that the color goes on sooooo smoothly.

The background I created with blending brushes, Petal Pink and Blushing Bride inks.

Step One: Diecut from Pearlescent Paper

Step Two: Place diecut in embossing folder, line up image

Step Three: Close folder and run through machine.

Step Four: diecut and embossed image!!

Plain diecut embosed image on the left. On the right, is an image that has also been stamped. You stamp it BEFORE embossing. It's easy to line up the clear stamps because you can see through them, or use Stamparatus:)

Product List