Pages

Wednesday, December 21, 2022

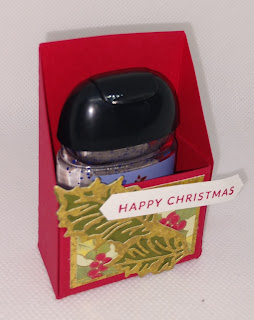
Hand Sanitizer Gift


Supplies:

 Cardstock cut 4 x 5-1/2

 Cardstock cut 1-3/4 x 1-1/4

 DSP 1-5/8 x 1-1/8

 Adhesive of your choice

 Scrap whisper white cardstock for sentiment

  Ribbon for decorating

  Cello bag for wrapping if desired

Instructions:

  1.  Take the 4 x 5-1/2 piece of cardstock on the short side and score it at 1 inch and 3 inches

  2.  On the long side of the cardstock score at 3 inches and 4 inches

  3.  Use a bone folder to fold the scored lines. 

  4.  Now take your cardstock and find the two horizontal score lines you will then take your scissors and cut some tabs. So there will be two square tabs on each side. Only cut the slits to score line that goes length wise.  

  5. Put adhesive on the two top tabs- on the outside of those tabs and attach the bottom to the outside to make a pocket for the hand sanitizer to sit.

  6. Now you will want to cut the sides in a angle. You can draw a line from the top corner all the way down to the lower corner at a angle if you want it to be perfect then cut it.  Or just cut at a angle on both sides. 

  7. Adhere the cardstock panel and the DSP panel to the front.

  8. You can decorate the front and add a sentiment. You can also then add a cellophane bag with ribbon to give it as a gift.

Sunday, December 11, 2022

Back To The Basics

EVEN IF YOU'VE BEEN STAMPING A WHILE. If you get those pesky halos around  your stamped image, you need this refresher. 

Demonstrators find that a lot of stampers like to use more ink than they actually need! 

So Let's get Back to the Basics:

  1. For the best results, turn your stamp over and hold the inkpad in your hand. This gives you more control over the amount of ink and where you lay it. Tap, tap, tap, lightly on the stamp with the inkpad a few times while moving around to cover the rubber completely.When printing your stamp, you'll find that steady, even pressure will give you the cleanest imprint.

  2. Tapping lightly on the stamp is key to avoid over-inking your stamp.

  3. If you take care not to put ink where you don't want it, it will make your life much easier. Rocking your stamp will give you edge prints, smudges or echo your print. Too  much pressure causes some of the same problems.

  4. For a much more crisp, clear image, use a Stampin' Pierce Mat when stamping with Photopolymer stamps.

Card Layering Templates

A great tool for measuring layers for cards.

https://scmagnolia.blogspot.com/2020/06/card-layering-templates.html


It's essential to have the right adhesive. You can't adhere ribbon to your card with liquid glue, however Glue Dots are perfect. Small embellishments can only be adhered to a card with Liquid Glue or Glue Dots. When making 3D items or a fancy fold card, you need extra hold, so Tear & Tape is the perfect choice. Using die cuts means you need a Fine Tip Glue Pen. Which of these should you have in your Tool Kit? All of them, because they each have uses that you will quickly see that you can't do without. If you are new to stamping, check the starred items in the list below for the must haves for when you are just starting out.


Stamping Tool Kit

Scissors

Adhesives:

  • Tape Runner

  • Glue Dots

  • Tear & Tape

  • Fine Tip Glue Bottle filled with Multipurpose Liquid Glue  

  • Dimensionals

Pencil

Bone Folder

Stampin' Pierce Mat

Paper-Piercing Tool (otherwise known as “pokey tool”

Baby Wipes

For your Stampin' Up! Shopping Convenience:

Item

Order Number

Price

Catalog Page

Paper Snips Scissors

103579

$11.00

155

Stampin' Seal tape runner

152813

$8.00

127

Mini Glue Dots

103683

$5.25

127

Tear & Tape

154031

$7.00

127

Multipurpose Liquid Glue

110755

$4.00

127

Stampin' Dimensionals

104430

$4.25

127

Bone Folder

102300

$7.00

155

Stampin' Pierce Mat

126199

$5.00

149

Take Your Pick Tool

144107

$10.00

155


Saturday, November 19, 2022

Fall Classes

Fall classes featured these cards:

    Materials:

Ranunculus Romance stamp set

Ranunculus Dies

Tailor Made Tags Dies

Deckled Rectangles Dies

Cardstocks: Basic White, Basic Black, Daffodil Delight

Inks: Daffodil Delight, Pear Pizzazz, Smoky Slate, Basic Gray

Black Bakers Twine

Black & White Gingham Ribbon

Blending Brush

Blender Pen

Sponge Daubers

Stamparatus


    Preparations:

8-1/2 x 5-1/2 scored @ 4-1/4 Thick Basic White for card base

5-1/4 x 4 Basic Black

2 x 4-1/4 Basic Black tag diecut

3/4 x 1-3/4 Basic Black tag die hole reinforcer

5-1/2 x 4-1/4 Daffodil Delight layer to diecut

1 x 1-1/4 Basic White greeting

2 x 4-1/4 Basic White tag diecut


    Assemble Card:

  1. Adhere Basic Black layer to card front

  2. Diecut Daffodil Delight with largest Deckled Rectangle die

  3. Use cardstock stencil and Blending Brush to make two flowers on Daffodil Delight layer, then adhere to card front.

  4. Place 2 x 4-1/4 white cs in Stamparatus. Ink with Daffodil Delight, then sponge the leaves with Pear Pizzazz ink. Use the Blender pen to apply green in small areas.

  5. Stamp text at bottom of tag in Smoky Slate ink.

  6. Diecut tags with the largest fancy top tag die, one in white and one in black

  7. Diecut circle hole reinforcer from black, and adhere to white tag.

  8. Insert checked ribbon in holes of both tags and tie with Bakers' Twine. Offset the black tag so that it shows behind the left side of stamped white tag, adhere to card front.

  9. Stamp Hello in Daffodil Delight ink and diecut using the small rectangle die from Ranunculus Dies. Adhere to card front with Stampin' Dimensionals.

  10. Stamp inside and envelope any way you like, an example is shown using Smoky Slate, Basic Gray, Pear Pizzazz and Daffodil Delight inks.
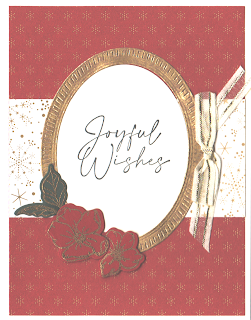
Materials:

Framed Florets stamp set

Joyful Flurry stamp set

Framed Florets Dies

Lights Aglow DSP

Cardstocks: Very Vanilla Thick, Cherry Cobbler, Evening Evergreen, Distressed Gold

Inks: VersaMark, Memento Tuxedo Black, Cherry Cobbler

Gold Satin Edged Ribbon

Heat Tool

Gold Emboss Powder

Embossing Additions Took Kit

Red and Green Adhesive Backed Pearls


Preparations:

8-1/2 x 5-1/2 scored @ 4-1/4 Thick Very Vanilla card base

4 x 5-1/4 DSP layer

1-1/4 x 1-1/2 Evening Evergreen

2 x 4 DSP card front

4 x 5 Very Vanilla large oval diecut

3 x 4 Distressed Gold oval diecut

3 x 4 Very Vanilla oval diecut

1-1/2 x 2-1/2 Cherry Cobbler flowers


Assemble Card:

  1. Adhere red print DSP to card front

  2. Adhere gold & vanilla DSP in center of previous layer on card front

  3. Using the Large Oval die, cut one from 3 x 4 Very Vanilla (use center) and one from 3 x 4 Distressed Gold (use outside frame piece)

  4. Stamp greeting in Tuxedo Black on the Vanilla oval, then adhere it on the center of the DSP, with gold frame on the outside

  5. Stamp one large and one small flower in VersaMark ink onto 1-1/2 x 2-1/2 Cherry Cobbler cs

  6. Stamp the two leaflet cluster in Versamark ink onto 1-1/4 x 1-1/2 Evening Evergreen cs

  7. Heat emboss the flowers and the leaf cluster with gold emboss powder, then diecut

  8. Adhere flowers and leaf cluster on one side of the gold frame

  9. Tie bow and attach with glue dot on the other side of the gold frame

  10. Attach pearl to center of flowers.

  11. Inside stamp sentiment in Memento Tuxedo Black and adhere vanilla frame around it. Stamp floral cluster in Cherry Cobbler. On envelope stamp floral spray in Cherry Cobbler


Materials:

Nature's Prints stamp set

Natural Prints Dies

Peaceful Moments stamp set

Quiet Meadow stamp set

Stylish Shapes Dies

Cardstocks: Basic White

Sun Prints DSP

Inks: Starry Sky

Fern Embossing Folder

In Color Matte Decorative Dots

Stampin' Dimensionals


Preparations:

Thick Basic White 5-1/2 x 8-1/2 score @ 4-1/4 for cardbase

Basic White: 4 x 5-1/4 embossed layer

1/2 x 3-3/4 DSP

2-1/2 x 2-1/2 Basic White circle diecut

2-3/4 x 3-3/4 Basic White stamped/dicut fern

Assemble Card:

  1. Basic White layer 4 x 5-1/4 emboss with fern embossing folder.

  2. Adhere embossed layer to card base

  3. Stamp fern in Starry Sky ink on 2-3/4 x 3-3/4 Basic White, then diecut. Attach a couple dots.

  4. Stamp greeting in Starry Sky ink on 2-1/2 x 2-1/2 Basic White Dicut, then diecut with 3rd largest circle

  5. Adhere fern to card front, then layering DSP on top. Adhere greeting circle with Stampin' Dimensionals.

  6. Inside stamp sentiment from Quiet Meadow stamp set and small fern.

  7. Envelope – stamp branch


Christmas Fun Fold and Calendars

 Today I have a couple of things to share with you, a fun fold and a couple of calendar designs. This fun fold would be a great one to add to your collection of fun fold templates. The calendars were part of  two baskets I made for the Silent Auction at our church Apple Fest. We also had baked goods, trash to treasure, collectibles, frozen dinners etc. for sale to benefit three local charites. For the baskets, I made decorative boxes with occasion dividers for 35 greeting cards, calendars, perpetual birthday calendars etc. The boxes I made were like those in this poste: https://scmagnolia.blogspot.com/2022/03/bespoke-card-set-box.html


All measurements in inches

Card Base: 4-1/4 x 11 score @5-1/2

White Cardstock Mechanism: 3 x 10 scored @ 2-1/2, 5, 7-1/2

(4) DSP Panels: 2-1/4 x 2-3/4

(2) White Panels 2 x 2-1/2


Sunday, November 13, 2022


Create more by spending less during the Seasonal Sale! Between 15 and 18 November 2022, select products from the 2022–2023 Annual Catalog will be on sale with the following discounts:

  • 10% off all punches

  • 15% of all stamps (Host stamp sets are not included in this sale)

  • 20% off all dies

  • 20% off all embossing folders

  • 20% off all non-specialty Designer Series Paper

With the season of giving upon us, this is a great opportunity to buy gifts for your fellow crafting enthusiasts, or to stock up on supplies for all your upcoming handmade projects. Remember to act quickly because the sale is four days only and items are available only while supplies last. Don’t miss out!


ORDER DEADLINES

Phone: 18 November 2022, 6:59 p.m. (MT) 

Online: 18 November 2022, 11:59 p.m. (MT)

For Product List Click Here

Tuesday, October 11, 2022

October Stamp Class

These three cards were such fun to make! The last one is a sneak peek of the new product suite coming out next month.


Materials:

Betwitching stamp set

Witch Builder punch

Very Best Trio punch

Black & White Designs DSP

  • Stampin' Dimensionals

  • In Color Matte Decorative Dots, Red & Green Pearls or In Color Opal Rounds

  • Stampin' Blends: Parakeet Party, Orchid Oasis, Crushed Curry OR Granny Apple Green, Highland Heather, Daffodil Delight

  • Cardstock: Basic White, Parakeet Party, Orchid Oasis

  • Ink Pads: Orchid Oasis, Tuxedo Black Memento

  • Computer Generated greeting and sentiment


Preparations:

  • Parakeet Party card base: cut 8-1/2 x 5-1/2 score at 4-1/4.

    • Cut off 1-1/8 inch from each side from the score line to the open edge.

  • DSP (2) 1 x 4

  • Basic White cs (2) 3 x 4

  • 2-1/2 x 3 Basic White for stamping hat

  • 1-1/2 x 3 Parakeet Party for punching stars

  • Print Computer Generated greeting and sentiment on Orchid Oasis cs


Assemble Card:

  1. Adhere the strips of DSP to the sides of the card front, leaving a border

  2. 2-1/2 x 3-1/2 Basic White: stamp Witchypoo's hat in Tuxedo Black, color purple and green then punch out image. You will need to trim corners of paper so that it will fit properly into the punch.

  3. 3 x 4 Basic White: use Stamparatus to stamp Witchypoo's feet at the bottom. One side is angled so that she looks happy. Color stocking stripes purple and buckles yellow. You will need to ink up image more than once to get a good coverage with no white spots.

  4. Dry fit hat to card front to determine placement of spider, then stamp in black.

  5. Adhere hat and computer generated greeting to card front with dimensionals.

  6. Punch out stars from 1 x 3 Parakeet Party cs, and adhere to card front, with an adhesive dot on each one.

  7. 3 x 4 Basic White use stamparatus to stamp feet at the top, color with markers.

  8. Punch corners of computer generated sentiment with Very Best Trio punch, then adhere below feet. Adhere panel to inside of card.


Materials:

Soft Seedlings stamp set

Leaf Falling embossing folder

Cardstock: Thick Very Vanilla, Merry Merlot

Ink Pads: Merry Merlot, Crushed Curry

Linen Thread

Gold Glitter Enamel Dots

Sponge Dauber

Stampin' Dimensionals


Preparations:

  1. Thick Very Vanilla card base: cut 8-1/2 x 5-1/2 score at 4-1/4

  2. 2 x 5-1/2 Merry Merlot

  3. 3/4 x 2 Very Vanilla

Assemble Card:

  1. Emboss Merry Merlot cs with Leaf Falling embossing folder (place diagonally in folder so that you get leaves all over entire piece).

  2. On the right side of card front, ink the leaf stamp in Crushed Curry then use a Sponge Dauber apply Merry Merlot in a few places. Huff on the stamp and stamp again 2nd generation. Then huff on the stamp again, and stamp 3rd generation on the inside.

  3. 3/4 x 2 Very Vanilla stamp greeting in Merry Merlot ink and adhere to card front with dimensionals.

  4. Tie bow from Linen Thread and adhere with glue dot.

  5. Apply three gold enamel dots.

  6. Stamp maple seed wingy things on the envelope.


Tuesday, October 4, 2022

NEW Product Suite Coming Soon!!


Add just the right touch of elegance to any occasion, including Christmas and seasonal celebrations, with the sweet Fitting Florets collection. From color schemes to sentiments and embellishments to dies, these unique products blend together so that your cards and crafts fit whatever occasion you might need. Send birthday wishes, express your gratitude, or spread Christmas cheer - with so many options to mix and match you'll be set no matter the celebration all year.

Starting November 1, 2022, you can order items from the Fitting Florets Collection. All items in the collection can be ordered separately.

The following exclusive products are only available while supplies last:

  • Framed & Festive Cling Stamp Set (item 160888)

  • Fitting Florets Designer Series Paper (item 161814)

  • Gold Adhesive-Backed Swirls (item 161822)


The following will be available for purchase in the Mini Catalog starting January 2023:

  • Framed Florets Bundle (item 162407)

  • Framed Florets Photopolymer Stamp Set (item 161815)

  • Framed Florets Dies (item 160623)


ITEM

DESCRIPTION

PRICE

163129

FITTING FLORETS COLLECTION

The Fitting Florets Collection includes:

  • Framed Florets Bundle - 10% off 

  • Framed & Festive Cling Stamp Set

  • Fitting Florets 12" x 12" Designer Series Paper

  • Gold Adhesive-Backed Swirls

Available for a limited time only and while supplies last.


$97.50

161815

FRAMED FLORETS STAMP SET 

13 photopolymer stamps 
(suggested clear blocks: a, b, d)

Coordinates with Framed Florets Dies

Available in the Mini Catalog starting January 2023.


$23.00

160623

FRAMED FLORETS DIES

13 dies. Largest die: 4-5/8" X 3-11/16"

Available in the Mini Catalog starting January 2023.


$37.00

162407

FRAMED FLORETS BUNDLE

Photopolymer

Framed Florets Stamp Set + Framed Florets Dies

Available in the Mini Catalog starting January 2023.


$54.00

161822

GOLD ADHESIVE-BACKED SWIRLS

75 pieces. 5 mm. 

Available for a limited time only and while supplies last.


$8.50

160888

FRAMED & FESTIVE STAMP SET

8 cling stamps
(suggested clear blocks: c, g)

Coordinates with Framed Florets Dies

Available for a limited time only and while supplies last.


$23.00

161814

FITTING FLORETS 12" X 12" DESIGNER SERIES PAPER

12 sheets; 2 each of 6 double-sided designs.

Acid free, lignin free. Balmy Blue, Blushing Bride, Crushed Curry, Evening Evergreen, Night of Navy, Polished Pink, Soft Succulent.

Available for a limited time only and while supplies last.


$12.00


Exploding Gate Fold

 This is type of Gate Fold using the Hues of Happiness DSP and the flowers from the Perfect Pomegranate stamp set. It's a Host set that you can earn for FREE.


Monday, September 19, 2022

Boo!

 I had the most fun making this card!! I'm going to make three of them for my great nieces and nephew. This uses the Betwitching Bundle. I used Pumpkin Pie, Basic White cardstocks, and the Black & White Designs DSP, and Gigham embossing folder.I bought some black tulle at the Dollar Store for the witch's skirt. The stockings were colored with Stampin' Blends. For the skirt, I punched out a witch hat and cut off the top. Then I used Tear and Tape to attach a piece of tulle that gathered as I stuck it down on the tape.


Check out this cute Haunted House full of "potion bottles"! I found the bottles in the dollar sale section at Target and immediately fell in love with them. Then I needed something to put them in or on.... so I looked around and found this wooden Haunted House for $5. SOLD. This will make a great table decoration for my October stamping class, Card Ministry and Bible Study. If you had some cut small bottles, you make your own labels. Jut fill the bottles with sequins, glitter, confetti etc. Picture here are Zombie Skin, Dragon Scales, Venomous Spiders, Rotten Pumpkins, Full Moon Magic, and Ghost's Breath. I added a tag from the Tailor Made Dies, and alphabet dies.


Wednesday, September 14, 2022

24 Hour Sale


On 15 September 2022, you can get those sets you’ve been wanting at a 15% discount. This is a deal you do not want to miss out on! The 24-Hour Stamp Sale will only last for one day, so make sure you are ready to shop ‘til you drop! Sales Period: 15 September 2022 12:00am to 11:59 p.m. (MT) Stamp sets available while supplies last! We’ll have a category in the online store titled “Stamp Sale” that lists every stamp set that qualifies for the 15% discount during the 24-Hour Stamp Sale. 

Almost every stamp set from the 2022–2023 Annual Catalog is included, but just to make it easier, here is a link to a list:

https://su-media.s3.amazonaws.com/media/Promotions/2022/09_24_Hour_Stamp_Sale/MKTL_PRODUCT_FLYER_US_0922_24_HOUR_STAMP_SALE.pdf


Tuesday, September 13, 2022

Fun Folds!

 Here are a few fun folds to get your creative juices flowing. I've naming the fun folds I come across with a rather unsual method... the aviation alphabet. Have you ever heard of it? 

In the world of Aviation, there is a different of learning your ABC's. The Aviation Alphabet uses the same 26 letters many of us learned in kindergarten. Each letter has a corresponding word used to identify aircraft, often called the tail number, and taxiways. The Phonetic Alphabet is not only used by the military, but also by Pilots, Air Traffic Controllers, and Customer Service Agents within the airlines. It is a great way to make sure you are understood, since a B, P, T, and V sound hauntingly similar when spoken. 

In the card making world, there can be many names for the same fold, which can get confusing. This a great way to identify my fun folds, as it is very different, thus easier to remember!  Sooo... why aren't mine in order - Alpha, Bravo, Charlie etc.??? Well, that's a good question and if you know me in person, you'd see that makes perfect sense lol!


Bravo:

Stamps

Ranunculus Romance

Paper

Blushing Bride, Basic White, Awash in Beauty DSP

Ink

Blushing Bride, Flirty Flamingo, Mossy Meadow, Balmy Blue, Basic Gray, Sahara Sand


Delta:

Stamps

Soft Seedlings

Paper

Pretty Prints DSP, Very Vanilla, Cajun Craze, Calypso Coral

Ink

Mango Melody, Cajun Craze, Old Olive, Calypso Coral

Embellishments

Linen Thread, In Color Opal Rounds

Tools

Leaf Falling Embossing Folder


Golf:

Stamps

Peaceful Moments, Painted Poppies

Paper

Basic White, Pool Party, Basic White, Mossy Meadow, Old Olive, Soft Sea Foam, So Saffron, Hues of Happiness DSP

Ink

Pool Party, So Saffron, Soft Sea Foam, Versamark

Embellishments

White Emboss Powder

Tools

Poppy Moments Dies, Painted Labels Dies, Heat Tool


Hotel:

Stamps

Plentiful Plants

Paper

Garden Green, Basic White, Gray Granite, Basic Black, Merry Merlot, Cajun Craze, Evening Evergreen, Old OliveBloom Where You're Planted DSP (retired)

Ink

Mossy Meadow, Old Olive, Pear Pizzazz, Starry Sky, Basic Gray

Embellishments


Tools

Perfect Plants Dies


Juliet:

Stamps

True Beauty

Paper

Wash in Beauty DSP, Balmy Blue, Basic White, Merry Merlot, Mossy Meadow

Ink

Polished Pink, Merry Merlot, Pear Pizzazz, Balmy Blue, So Saffron, Mango Melody, Calypso Coral

Embellishments


Tools

Organic Beauty Dies, Sponge Daubers


Foxtrot:

Stamps

Cup of Tea, Leaves of Holly, For Unto Us (retired)

Paper

Garden Green, Real Red, Basic White, Painted Christmas DSP, Peaceful Christmas DSP (retired)

Ink

Real Red, Garden Green

Embellishments

Festive Pearls

Tools

Teacup Dies


Sunday, September 11, 2022

Flowers, Halloween and a Gift Bag

 I have three projects to show you today.

The first card is a fun fold done with the Ranunculus Romance bundle. The base and front flap are Rich Razzleberry. The script paper you see is the Vellum Layering Designs found in the annual catalog. I embossed the front flap with the Painted Texture embossing folder. The leaf dies were cut from Soft Succulent cardstock and painted with a bit of shimmer paint which is sadly retired. The ranunculus was stamped twice, once in Rich Razzleberry ink and once in Soft Succulent ink.  I snipped off the flower heads and glued them to the Soft Succulent ranunculus.

The second card was done with the Bewitching bundle. I used black and Granny Apple Green. A piece of Black & White Designs DSP from the July to Dec. Mini Catalog. The sentiment on the front was computer generated as I didn't have any Halloween sentiments.

The third project is a treat/gift holder made from one of the pretty printed envelopes offered during SALE-A-BRATION. You cut the ends, score and fold to make gussets. Then close it with adhesive. I made a gift card with one of the cards in the set and decorated the outside with ribbon and embellishments.


Saturday, September 3, 2022

Weekly Deals!!!


Every week in the month of September we’re offering a selection of discounted products. Discounts and product selection will vary from week to week.

  • New products added each week on 1, 8, 15, and 22 September. Promotion ends 28 September.

  • Product options and discounts vary based on inventory availability.

  • Get the most up-to-date product information on my online store

Check out this weeks sale: https://www.stampinup.com/categories/sales-specials/september-weekly-deals


CHECK OUT THIS WEEK'S DEALS!


Perfect Partners


1–30 September 2022

Some things are Perfect Partners! Check out these new die sets and their coordinating stamp sets to see six incredible combos.

You can order these fun and festive dies and/or bundles. Dies coordinate with stamp sets from the 2022–2023 Annual Catalog and the July–December 2022 Mini Catalog. These six new dies sets are only available for a limited time. Save 10% off when purchasing the bundle.

Items available during this promotion can be added to demonstrator, customer, workshop, and online orders.

Dies are exclusive to this promotion and are only available while supplies last. No quantity limits apply during the customer sales period. Qualifying orders qualify for Stampin’ Rewards.  


Flyer with details 

Friday, September 2, 2022

Noteably Noble Nature's Prints

 I'm back from vacation and busy stamping away! I've been working on fun folds primarily, and making some cards using new stamp sets that came in the mail this week. I've been making fun folds up in template fashion with retired papers. This is a great way to remember a fold without directions as all the measurements are written on the template, plus it provides visual in a way that written directions can't. My next class will be making templates and I'm excited about sharing them with my friends!

These two cards use the Nature's Prints bundle. The first one uses some absolutely awesome DSP that retired in June. I wish I'd bought more of it!! 

The second one uses a technique called partial diecutting. You stamp an image on the right side of the card front, and a strip of DSP on the left side. Next you cut two pieces of cardstock, layering the slightly smaller one on top.  To determine the placement of the partial die cutting, you lay the panel overtop of the stamped image on the card front. Then while holding it in place, you align the die with the stamped image and hold it in place with repositionable tape. Run the panel through the die cutting machine, then adhere the now cut panel on the card front. I learned how to do this from Lisa Curcio, who has a video:    https://youtu.be/jIQXj86vMnE


Nature's Prints bundle
Waves of the Ocean DSP (retired)
Basic White and Evening Evergreen cardstocks.
Vermuda Bay, coastal Cabana, Granny Apple Green inks.
Linen Thread and Stampin' Dimensionals

Nature's Prints bundle
Sun Prints DSP
Starry Sky, Night of Navy, Basic White cardstocks
VersaMark, Starry Sky, Night of Navy inks
White Emboss Powder, Stampin' Dimensionals, Starry Sky Metallic Woven Ribbon, Oval Rounds
Layering Circle Dies
Fern 3D Embossing Folder