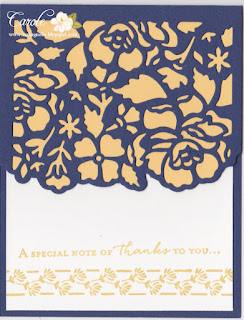
I made this slider card using Dawn Griffith's tutorial. You can find it here. If you're like me, you like to have some of the directions written as you watch a video. I jotted down the basics to use while watching the video, you can see them below.
- cut two pieces of card stock 4 ¼ x 5½
- cut card stock 3 ¼ x 4 ¾
- line cardstock up on cutter at 3 ½ using the cutting blade; using the cutting arm to cut from ¾ to 4 ¾
- cut the other side the same way, (line card stock up on cutter at 3 ½ using the cutting blade, using the cutting arm to cut from ¾ to 4 ¾)
- lide one end (bottom) at ¾ and cut to connect the cut lines already made
- line card stock up at 1 ¼ on the cutter and score between the two cut lines
- slide card stock down to 3 inches and score between cut lines
- slide card stock down to ¾ and score between cut lines
- apply Tear & Peel Tape to bottom area where you scored at 1 ¼
- line your slider piece onto the tape trying to keep it centered between the cut lines.
- use one inch circle punch to punch a half of a circle out on the top of the pumpkin pie only
- line the front and back piece up to punch the back layer. Punching out the back piece with 1 inch circle punch
Product List


