background

Saturday, January 9, 2021

More Calendars with Art Gallery Bundle

 Boy, I sure am having fun with the Art Gallery Bundle! The DSP was made by photographing oil paint applied to canvas with a palette knife. I've been busy making calendars for friends and family. The directions to this type of calendar is here.

The calendar below has a Petal Pink Base, Night of Navy mat and a topper of Fine Art Floral DSP. There is a rectangle of Vellum behind the flower to give it some umph. The flower is stamped in Rococo Rose and Merry Merlot ink, while the leaves were done in Mossy Meadow. The Greeting is stamped in Night of Navy and diecut with a label from the bundle. To finish off I added some Rhinestones and a bow of Linen Thread.

The base on this calendar is Mossy Meadow, with layers of Mossy, and Basic White. The DSP is Fine Art Floral again. The white layer has been embossed with the new Painted Texture 3D Embossing Folder. It is so deep and looks just like oil paint applied with a palette knife. The flower is inked with Petal Pink, Flirty Flamingo and Mossy Meadow. I added some Braided Burlap Trim and Mossy Meadow Braided Linen Trim.
The last calendar has a base of Merry Merlot, the Fine Art Floral DSP, and Basic White are the other layers. The flower is stamped in So Saffron and Bumblebee with Mossy Meadow leaves. More Rhinestones add a bit of bling.

Product List

Art Gallery Bundle

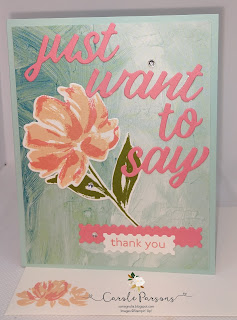
This was a pretty easy card to make. The card base is Pool Party with a layer of Fine Art Floral Designer Series Paper. The text diecuts were made from Flirty Flamingo cardstock. I stamped the flower in Petal Pink and Flirty Flamingo Ink, while the leaves were stamped in Mossy Meadow. For a bit of bling, I added some Rhinestone Basic Jewels.


Product List

Ten Ways to Use Gilded Leafing

 Gilded Leafing needs an adhesive to make it stick. My favorites are VersaMark and Heat & Stick Powder, although Mono All Purpose Glue works too. Below are 10 ways to use and apply this beautiful gold embellishment. Here is a printable format.


Tips:

  • Make sure your fingers are dry

  • Don't have any open ink pads nearby

  • You may want to put it in a larger container as it expands once you open it.

  • Experiment on scrap paper when first using Heat & Stick Powder if you overheat, it will not be sticky. Just a few seconds until powder disappears.

  • You need a tool to get excess leafing off, like an old paint brush or a stencil brush.

  • Brush excess leafing back into container

Stamp: stamp an image, apply Heat & Stick Powder like you would embossing powder. Use a heat tool to activate the powder. Be careful not to overheat or it will not be sticky. Just a few seconds until powder disappears. If you'd like leafing on just a part of an image, you can sponge VersaMark on just a portion of the stamp.   

Tear & Tape: apply tape to cardstock, remove backing and apply gilded leafing, brush off excess.

Die Cut: apply adhesive sheets to BOTH sides of cardstock, Remove the backing from the top/right side of the die. Apply leafing, brush away excess with a paint brush. When ready to put on a project, remove the backing from the wrong/back side of die and stick it on.

Multipurpose Liquid Glue: Apply glue where you'd like, allow to dry and because it stays tacky, you can then apply gilded leafing over top and brush it off.


Glue Dots: Apply glue dots to your cardstock and rub leafing over top. After brushing it off you have round flecks of gold on your project.


Punches and Adhesive Sheet: Apply adhesive sheet to cardstock, punch out design, then rub leafing over top, brush off to turn a punched image into a gilded work of art!


Foam Adhesive Sheets & Die Cuts: For a 3D look, die cut words or images from our foam adhesive sheets. Apply leafing for a gilded 3D effect on your card.


Decorative Masks: Use our Basic Pattern Decorative Masks to create a bit of texture on your background. Simply place the mask on your cardstock and sponge VersaMark ink over the top in the area desired. Sprinkle Heat & Stick powder, use heat tool to activate the adhesive. Rub the leafing and brush off the extra.


Ribbon Application: You can gild more that just cardstock and paper. Apply a small bit of multipurpose glue to ribbon to create a touch of gold.


Embellishment & Other 3D Objects Application: You can add leafing to embellishments such as the In Good Taste wood accents! You can use multipurpose glue on many surfaces, let dry then rub on leafing. Try Picture frames, charms, buttons etc. It can be applied to almost anything and leaves a beautiful gold finish behind.


tams# 54771

Thursday, January 7, 2021

3D Art Gallery Card

I've shown y'all this gorgeous bundle (Art Gallery) and the coordinating Designer Series Paper. Well there's more to the story than just pretty stuff. Just look at what they can DO!

First of all, two sheets of the Golden Garden Designer Speciality Acetate have the same pattern (lines up with) as two of the DSP sheets. When you line them up, the cards are truely lovely!


Now Here it is stepped up a bit further.


I made this card kind of 3D using Foam Strips. It's kind of like a shaker card with no shakers. Who needs shakers when you have this gorgeous paper! The effect is perfectly STUNNING!

  • I lined up the actate with the DSP, then cut with Stitched Rectangle Dies. 
  • I adhered to Petal Pink card base. 
  • I then cut a frame from Flirty Flamingo with Rectangles. 
  • I used foam strips to adhere the acetate to the top of the DSP. 
  •  Finally, I used Tear & Tape to attach the frame on top of the acetate.


Tuesday, January 5, 2021

Create Any Color of Pearlescent Paper!

This is the coolest, easiest technique!!
In the first picture below you'll see on the right the new Pearlescent Specialty Paper from the new Jan.-June Mini Catalog. It's simply gorgeous, for anything but has been showcased with the Sand & Sea Suite on pages 40-42. It comes in a pearly off white..... BUT you can make your own Pearlescent paper with any color of our cardstock!! All you need is some Frost White Shimmer Paint and one of the new Blending Brushes. 

You simply pour out a dime size amount of paint on your Silicone Craft Sheet (or waxed paper if you don't have one). Pick up a bit on your blending brush and apply to any color cardstock. Use a circular motion and continue until covered. Allow to dry a couple minutes. That's it! It is THAT SIMPLE. 

In the samples below, I then embossed my newly created Pearlescent papers with the new Seashells 3D Embossing Folder.  These pieces are just waiting to be used to create a card!


New Catalog Time!

Catalog Overview


Sand and Sea Suite

Floating and Fluttering Bundle

Love You Always Suite