background

Friday, April 27, 2012

Painting With Embossing Powers Tutorial

Fred Mullet calls his class Dancing Rubber Fish. The technique is not difficult and can be used with other images, but of course the nature print stamps that Fred sells offer amazing results. I'm anxious to try it with real plant leaves.

I didn't know that some embossing inks are translucent and others are opaque. That does make a difference as the translucent powders allow the color of cardstock and ink to show through, while the color of an opaque powder is that color no mater what. I have many different colors of embossing powders, but I bought a pack of Fred's powders because I knew they were translucent. Many stores sell Fred Mullet stamps, but they are also available online: Fred Mullet
I had the smaller fish print stamps and bought the larger one after taking Fred's class. I think I can make an underwater scene with these making a larger, frameable piece of art.
Materials
rubber stamps
black and white pigment inkpads
a range of embossing powders
watercolor paints
brushes
cocktail straw with the end cut on an angle
tee tiny spoon (like the type used to taste ice cream)
2 cups of water, one clean and one for washing out brushes
cardstock
 embossing gun
box to catch embossing powders in
paper towel or TP, which Fred calls '"technique paper"
porous sponge car washing sponge or a sea sponge

Before you begin stamping, decide which colors of embossing powders you want to use.  You need a smooth matte cardstock, not glossy. This can be white, tan, or other pale colors. Later you may want to experiment with darker colors and bleach.

Begin by inking your stamp. For a fish, use black ink beginning just above the fish's lateral line on the stamp. Then stamp the bottom portion of the fish with wihite ink. For a plant/flower you can yoose black towards the middle and white towards the edges.
Now  in the section where white and black meet, take your sponge and pounce with a zigzaging motion - on the white then on the black, then back on white etc. This blends or eases the transition from black to white.
Next, the spot application of embossing powers which Fred says is sort of like painting with plastic.Use your fancy applicator to deliver a small amount of embossing powder in specific ares of your stamped image. Use one color possibly 2-3 but don't get carried away, because you have lovely watercolors to provide additional soft colors. Hold the straw close to the paper and very gently shake out powder.
See where the darker yellow/orange is towards the top of the fish? Its lateral line is just below that and appears as a gap in the stamped image. Above that you want more interesting colors and below that lighter or less interesting. That way it mimics real fish. They are lighter on the undersides so that they blend with sunlight coming through the water. This makes them less visible to predators swimming below. To predators swimming above them, the darker color blends with the ocean floor which is darker.
 Use a translucent/very light color of embossing powder over the white ink and some of the black as well. Use your tee tiny spoon and hold it up away from the paper, gently shake so that the powder floats to the paper.

This the part that is called the 'dance.' Hold your cardstock in one hand over the box and with the other hand, gently tap the underside so that the powders dance on the surface and mingle into other areas a bit.  Tap off the excess, then emboss. If you hold your paper up even with your line of sight, you can more easily see just when the powder melts, then move on to another area. That way you don't overheat/burn your powder or miss areas causing them not to be embossed at all.

The last step involves water colors! We used paint in class, as did I in the samples in this tutorial. However, you could use watercolor markers and a blending pen if you like. Don't over-wet your paper or it will buckle, but at the same time do add water to your paint before adding to the cardstock so that it will have that watercolor look.
For these flowers, I chose to place my darker areas towards the center and the lighter areas towards the edges.
On these samples, I used green embossing powder on the stem, but you could use watercolor there as well.
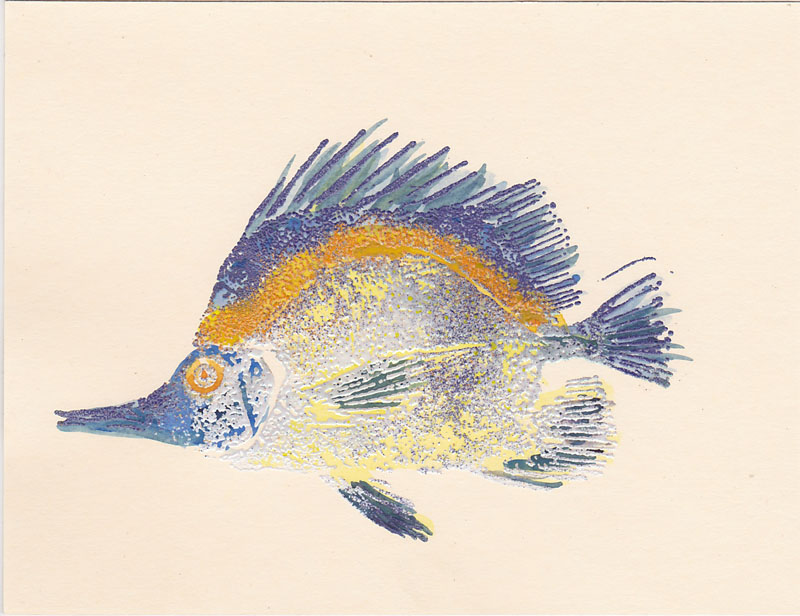
Be sure to leave or add a touch of white in the eye for more realism.
There you have it. I hope you will try this technique on stamps you have, or pick up some of Fred Mullet's nature stamps. He sells them in small sizes and in very large sizes. All the examples above are large, so I'm going to mat and frame some of them. I also plan to do an underwater fishy scene on an even larger sheet of paper to mat and frame. I think a school of fish some done with multiple stampings off the same ink application to give ghost images. That would provide some nice depth for a school of fish don't you think?

Thursday, April 26, 2012

Rainbow Row

I really do love Beaufort, but Charleston, South Carolina is my favorite city. While at Carolina Stamper, an amazing store, I was thrilled to find many South Carolina stamp images. There was the ubiquitous palmetto, our state tree in many forms. Lighthouses, our state flag and St. Michaels steeple. Then I saw it. Rainbow Row. I have a beautiful painting of it hanging in my studio that my Mom left me. It was the last one left on the shelf, so I quickly snatched it up, determined to give it a loving new home:) This is the first card I made with it. I used Stampin' up cardstock, and patterned paper. The brass charm is from Fancifuls and the image was colored with Prismacolor pencils.

Does anyone remember reading a blog tutorial on how to make an envelope? It was in the last month, and I can't find it. Great directions, much easier than others I've seen. I even commented to her on what a great tutorial it was, but for the life of me, I can't remember who it was. I know what you're thinking, but old age doesn't make me forgetful; having way too many stupid things to remember does! lol

Monday, April 23, 2012

Dancing Rubber Fish

Bet that title got your attention didn't it? That was the title of the class my friend Pam and I took from Fred Mullet at Carolina Stamper. What an amazing store! If you are in the area, stop by and I promise you will not be sorry. Janet, the owner, has an amazing inventory of the coolest toys for rubber stamp art and scrapbooking. She's knowledgeable and friendly making a visit to her store a real treat. I can't wait to go back:)

I've wanted to take a class from Fred ever since he wrote an article on Gyotaku in Somerset Studio magazine.  A follow up article on his rubber stamp company appeared in that same issue, titled "Nature Prints" May/June 1997. Over the years I have continued to see his stamps and cards made with them in stores, and in magazines. I never dreamed he would come to my little corner of the world.The class was everything I'd hoped it would be and more. We learned about "the spot application of color," or painting with little pieces of plastic. This technique involves using transparent as well as opaque embossing powders and watercolor paints. Fred came armed with an arsenal of specialized tools like technical paper, otherwise known as TP or toilet paper. We learned the proper use of precision thermography powder application devices, also known as cocktail straws, and we were instructed in the art of using tactilely interactive vulcanized tools for the replication of graphic imagery. Now these technologically advanced tools are in the studios of most paper artists.  You surely have them as well. Have you guessed yet? That's right rubber stamps! Fred is a terrific teacher and extremely entertaining as well.

We also received a lesson in color theory, learned how to make our own custom colors of transparent embossing powders. I learned how to use this technique to produce amazing works of art. Now, I'm not saying I have mastered the technique, yet. I've got some practicing to do.  I can look at all the examples I created below and tell how I could have made them better, or what I would do next time. I plan on getting a little practice in tomorrow. Yeah, it will be such hard work lol! Seriously, this technique is loads of fun. I wish you could see the examples in person. Photographs can't adequately show the depth that is produced using this method. Nor can you see the pearlescent sheen or the iridescence that makes these images dance. Oh the title of the class? We made the fish 'dance' as we tapped the paper in order to disperse the various thermographic powders across the surface of our papers.

If you ever get a chance to take one of Fred's classes, I can promise an experience you won't soon forget.  Check out the Fred Mullet website. Below are scans of what I produced in class and a few photos from Pam's phone. Would you believe I forgot my camera!!


Fred delivering some fishy instruction.


Saturday, April 21, 2012

Beautiful Beaufort, South Carolina

Hello Everyone!
This weekend my friend Pam and I going to Carolina Stamper to take a class from Fred Mullet. Fred is an immensely talented artist who excels at nature printing. I've been a fan of his for years, and never dreamed I'd be able to take one of his classes.

Carolina Stamper is in Beaufort, a truly lovely city. I've been there many times. We often go crabbing on Hunting Island, and I've been there just to take pictures as well. One of the best things about this charming city is the growing art scene. Last summer while taking pictures and browsing galleries I came across artist Hank Herring. This soft-spoken former marine and I  struck up a wonderful conversation and he shared a lot of his work with me. I loved hearing the stories that put various pieces of his art in context.The fact that he works with rescued materials may explain the versatile quality of his work. I have one of his hand carved wood stamps. It's a Celtic image and I dearly love it. Hank has been to Ireland and so it has naturally influenced his work.

Horse drawn tours are such fun, but there's another type of tour you can take in Beaufort.... a ghost tour! Complete with a guide dressed in period costume who tells the most marvelous stories... AFTER DARK of course.

Old Sheldon Church is one of my favorites haunts, literally. Amidst the eerie serenity of the church yard there are graves dating all the way back to the 1700's, where one can just feel the presence of the souls who used to walk here.  Guns and ammunition were actually hidden in the Bull family vault during the Revolutionary war. Surrounded by iron gates, the ruins are always open to the public.  There's even an old hand-operated water pump near the gate that still works. Oh, I didn't get a picture of that! There's another reason to go back.

I'll take more pictures this weekend and post them on Monday:)


Friday, April 20, 2012

Flower Power Challenge

For the Challenge at Impression Obsession I had an idea in my head and as is often the case everything went in several directions. First, the entry is shown below. It's not the original idea I had in my head. The stamps used were Art of God C5055 and Peach Blossom F12006. The paper is from Stampin' Up; Rose Red and Baja Breeze. The border punch is Martha Steward, the ribbon is from my stash. I stamped the peach blossom in Memento Tuxedo Black and colored with Prismacolor pencils. I used Distress Inks around the edges of both images and in the background of the sentiment as well as the verse itself.
This is my favorite and my entry for the challenge.
Below are various versions of the original idea that was 'stuck in my head.'
I liked this but the white seemed funny somehow...
So, I added blue. eh
I liked this one, but I also had another idea, which turned out better I think. It's the challenge entry shown first.


Thursday, April 19, 2012

Beautiful palm tree, but I'm stumped.

Remember that humongous stamp that I unmounted and cut apart a couple weeks ago? Here on this post.
This card is just not done. It needs something. I looked in my stash of charms and found this great palm tree, but it's kind of big. Then I found these fibers that I really love. The colors are perfect for this and I even designed a tassel of sorts. Then I couldn't figure out where to put both or either of them! arrg!!
Here's the card so far.
Here's the charm and the tassel, but they are not to scale.... hmmm...
Okay, now you can see the scale. I just set them on here, they aren't glued on or anything.
Got any ideas? It seems as if the embellishments disturb the shape of the die cut. Hey, it's raining for the second day in a row and my mind must be cloudy! lol

Monday, April 16, 2012

Craft Ideas to Try

I've have a collection of things I want to make and I thought I'd share them with y'all in case you'd like to make any of them. If you do, please show them to me:)
First, I've got to show you these mason jar candles. I found them at The Green Head website. These are sooooo cool, but I want to make my own. I'm thinking of other than Christmas. From the description I understand that they are oil candles with pine cones and holly berries sealed up inside mason jars.It also says they have fiberglass wicks that never need replacing, and use paraffin liquid which is smokeless.So I'm thinking of what to use in making them. Back in the day (19...mumble mumble) we made oil candles with colored water, and Crisco oil on the top. We had some floating wick thingy and that was it. I've been reading online and you can use olive oil and a wick can be made from rolled up paper towel. I'm not so sure how I feel about using paper towel as a wick though. Ohhhh you know what would be cool inside one? Sea shells or bamboo! Of course flowers, but they would surely have to be fake. (You know all those pretty teacups you always see at thrift stores? If there is a design inside the cup, those would be pretty with just the oil in them! Oh and scent the oil with something wonderful.)  Okay, for the mason jars, I'm thinking there are probably wicks for sale at Hobby Lobby, and I think it would be good to stick them to the bottom of the jar. Here are some good directions. I wonder if you could put greenery in the water portion and it would keep? The candles featured for sale below appear to have all oil inside that kind of preserves the berries and greens maybe???

As you can tell, this idea is pretty much in the thinking stage. Do you have any ideas or suggestions? What do you think? What do you know? Please share  your thoughts.
 
This picture is from the Green Head website and what gave me the idea.
These ideas don't require any thinking, the directions are all there and ready to be made.

Fabric Storage Bins

DIY Twist Ties pretty

Photos in a Bottle

Shaped Cakes

Button Paper Clips

Button Heart Canvas

Button Cupcake tag

Braided Ribbon

Ribbon Paperclips

Flower Fairys

Melted Crayon Art

Corks

Cord Covers

Paper and Wire Wrapped Beads

Paper Bead Bookmark

Twig Vase

Mason Jar Soap Dispenser

Fabric Wrapped Spring Containers

Sunday, April 15, 2012

Cut out Directions

Did you ever wonder how people used a die cut and left part of the stamped image outside the die cut shape? I found a tutorial called "The Box Within" on Split Coast Stampers. After several attempts I have tweaked this method so that it works better for me.

This is the step in the tutorial on Split Coast Stampers where I had problems:

Step 3
Remove the die. With a pair of sharp scissors, cut from the edge of your paper up to the line you drew, cutting along the lines of the image. Then cut around the section that will pop out.
I could not make it work like this because if you cut to the line made from marking the edge of the die, the cut portion will be inside that line. Look at a die...the outside edge is NOT the blade where the cut will be made. The cut will be made INSIDE. Therefore you must cut past the outside edge of the die so that there is room to lift that section and pop it out so that it lays above the die.
The tutorial says to draw a partial line here on the outside of the die.
But look at the cutting line... it's inside where you traced a line.

If you cut just to that line, you can't get the image over top of the die and have it cut in the right place.
My solution is to cut beyond the line that you traced just a bit.
Now, there's room for me to put the fish's nose over the die, so it won't cut his nose off. Blue painter's tape holds everything together while  you are cutting and won't tear your cardstock.

Here is what it looks like from the back.
All finished, with the nose hanging out, as if the fish is swimming out of a bubble.

On a totally separate subject, you've got to check out these great directions for decorating cakes for people who don't do decorated cakes. Great Cakes