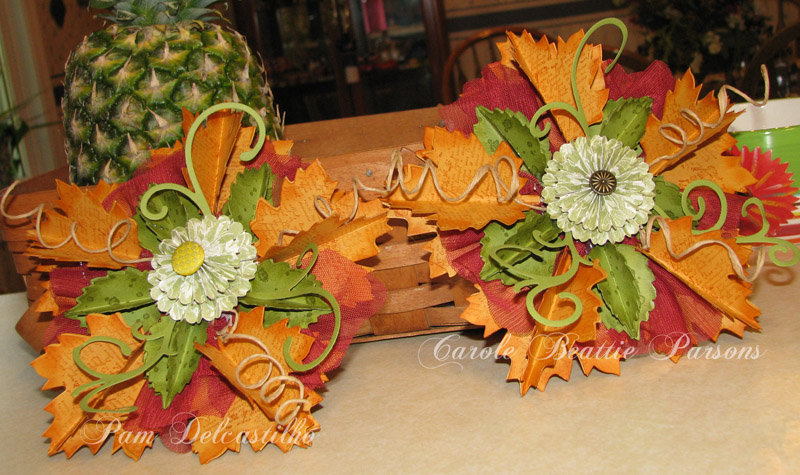
background

Friday, September 28, 2012

Kids Dream of a White Christmas...

so they can go sledding! I saw this gorgeous 3D sled that Melanie Schulenberg constructed as a 3D stand alone ornament. I have searched and searched her blog and I'll be darned if I can find it. I'm pretty sure it was the illustration of a pattern for purchase. This woman is amazingly talented by the way. You've GOT to go visit her web site. Anyway, Melanie used the Bird Builder punch on her 3D model so I decided to make a flat version and put it on a card. I drew the sled, then needed that woodgrain stamp, which I don't have yet. <big gasp!> So I had this distressing pattern thing and used that instead. Our woodgrain stamp would be much better!! I punched out the bird, and found a couple of brads and some twine and there it went. I really love this card, although it isn't anywhere near as cool as Melanie's 3D ornament.

After drawing the sled on Soft Suede, use the Wood Grain stamp in Early Espresso (I used this old distressing thing). The runners are Riding Hood Red, The card is Cherry Cobbler with an Old Olive layer which was embossed with Northern Flurry embossing folder then sponged with some white ink. I can't remember if Melanie's bird was red with a tan wing or tan with a red wing, but I choose River Rock for the bird and Cherry Cobbler for the wing. I sponged the bird and the sled around the edges to give it depth and used dimensionals to add a bit of a 3D look.

I really like this card and I hope it does justice to Melanie's ornament. I've got to go type to her and find it!


Wheat & Lavender

This is for the Color Me Beautiful challenge blog that my friend AnnMarie and I developed. I'm so fortunate to have such a good friend to work on something like this. AnnMarie is creative and fun with lots of energy. She's such a delight, I sure wish we lived closer. I keep telling her she is and I must be twins separated at birth because we are SO much alike. We both have amazing mothers though... maybe THEY were twins separated at birth!  lol


Project Details
Stamps
Papillon Potpourri
Cardstock & Papers
Wisteria Wonder, Elegant, Eggplant, River Rock and Sahara Sand
Ink
Basic Black
Accessories
Dazzling Diamonds
Tools
Argyle embossing folder, Apothecary Accents framelits, butterfly punch

Thursday, September 27, 2012

It's Beginning To Look a Lot Like Christmas!

I've been workin' away at craft show stuff. I wanted to get pictures up, but I don't have time to chat. I'm supposed to be at a restaurant to have lunch with Rachael in one hour yikes!! I'll come back later and put up the recipes, but I wanted Pam to see the bird and snowman. The knot in the snowman's scarf is too big, I need a 1/2 inch punch before I make any more. Oh and the carrot nose is too big, I forgot Shana said to use the bird builder punch! Geeze. I got the idea for the snowman from Shana Gaff.The bird card is one I saw Kittie Caracciolo do and just loved it! 


Monday, September 24, 2012

Fall, Halloween, and Christmas


Project Details
Stamps
French Foliage
Cardstock & Papers
Old Olive, Midnight Muse, Very Vanilla
Ink
Old Olive, Midnight Muse, Cajun Craze, Summer Starfruit, Rich Razzleberry, Early Espresso, Crumb Cake
Accessories

Tools
Autumn Accents Bigz die
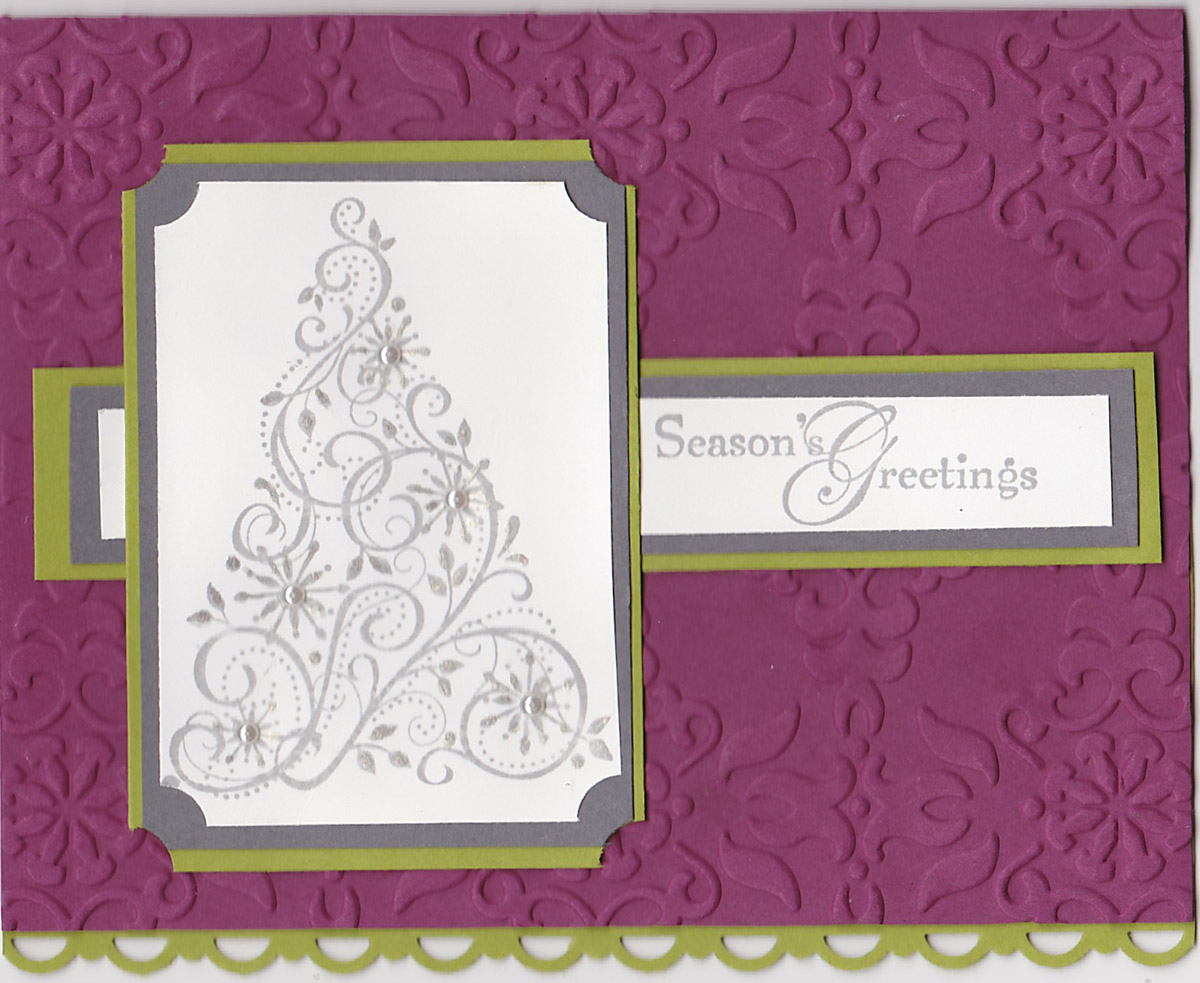

Project Details
Stamps
none
Cardstock & Papers
Basic Black, Old Olive
Ink
Basic Black
Accessories
Sharpie marker
Tools
Top Note die, Keepsake ornament die, ½  inch circle punch, ¾ inch circle punch, tab punch


Gift Card Holder
Cut two stockings in card stock and use designer series paper for the heel, toe and top cuff. You also need to cut two of the top cuff. Embossing stocking (I used Houndstooth)

Make the opening for the gift card in the front stocking with the word window punch. Place it about 1/4" down in the middle of the top of the stocking, then extend the opening on either side to accommodate the size of the gift card.

Use sticky tape to adhere the two stockings together, leaving a space for the gift card. Attach presents, ornaments, or other punch shapes like teddy bear or candy cane would be nice. I just cut presents on paper cutter and attached ribbon. Glue the second cuff on the back to cover up the backs and any adhesive from the ornaments and presents.

Determine placement of the cuff from the front so that it will cover the gift card. Insert a decorative paper fastener or brad. (I punched a tiny hole first so that the layers of card stock wouldn’t get all bent and crinkled.

You could attach a ribbon to hang from the corner if you like. Ohhh I just had a brain sparkle! Lace ribbon would be so pretty on the first one, with one of the Antique brads that I don't have yet!! Okay, THAT will be on my next order!
I sponged the Northern Flurry embossing folder with Crumb Cake ink.

Project Details
Stamps
Keepsake Ornaments
Cardstock & Papers
Be of Good Cheer dsp, Gumball Green
Ink

Accessories
Cherry Cobbler seam binding ribbon, Gumball Green stitched satin ribbon
Tools
Keepsake Ornaments die, Houndstooth embossing folder, word window punch, Holiday Stocking die

Sunday, September 23, 2012

The Scoop on the Poop


       I posted my snowman soup the other day. For the craft shows I'm also making Reindeer Poop and Elf Poop. The reindeer poop will be chocolate covered raisins or chocolate covered peanuts. The elf poop will be red and green M & M's. I'll use the Stampin' Up! ornament punch to make the elf head. The reindeer head below was made with the SU owl punch and the antlers are the leaves from the bird punch.
           
 Reindeer Poop
I woke up with such a scare when I heard Santa call...
"Now dash away, dash away, dash away all!
I ran to the lawn and in the snowy white drifts,
those nasty reindeer had left "little gifts".
I got an old shovel and started to scoop
neat little piles of gourmet reindeer poop!
But to throw them away, seemed such a waste,
So I saved them, thinking ~ you might like a taste!
Merry Christmas to you from the reindeer and me!
Elf Poop
The elves were so sick they couldn't make toys
And Santa had to fill all those stockings
He gathered the only thing the elves could make -
Here are your Elfin Droppings


Saturday, September 22, 2012

More Craft Show Stuff!

I've been a busy little bee! I made a couple easel calendars and a gift tag holder.
tags inside the holder
Old Olive, Rich Razzleberry, Island Indigo, Tea Shoppe, Elegant Lines embossing folder
French Foliage, Old Olive, Island Indigo, Rich Razzleberry.

Friday, September 21, 2012

Fall Ornament

My friend, and Upline Pam, came over today and we had the most fun making this gorgeous fall ornament. We also had a few mishaps with the hot glue gun. I bet you think it was me who got bitten by the bad ole' glue gun huh? Probably you're remembering all those attacks of Lucy-itis I've had in the past? Well it was not me this time. Poor Pam's fingers kept getting in the way! She's such a trooper, she wouldn't even let me apply first aid. We got the directions from Margaret Murray, a very talented Stampin' Up! Demo from Scotland. We're very happy with our creations and think they would look great on a grape vine swag or wreath. Take a look, can you see some of Pam's skin on one of them? lol kidding, just kidding.


Color Challenge

This week's color challenge at Color Me Beautiful, has a beautiful color palette called Tuscan Rise.

Here is my contribution using the French Foliage stamp set, wood grain embossing folder, and the inks and card stock colors found in the palette.

Wednesday, September 19, 2012

Flutterby

I don't know why we call them 'butterflies.' Where is the butter???  And just what are they doing when you see them hmm?  Fluttering by, right? We should rename Flutterbies! I just got this stamp set and the coordinating punch. I'm having such fun playing with them!

Project Details
Stamps
Papillon Potpourri
Cardstock & Papers
Whisper White, Primrose Petals
Ink
Primrose Petals, Summer Starfruit, Midnight Muse, Gumball Green
Accessories
Stampin’ Dimensionals, Basic Pearls Jewels,
Tools
Scallop Trim border punch, Houndstooth embossing folder


Project Details
Stamps
Papillon Potpourri
Cardstock & Papers
Whisper White, Midnight Muse
Ink
Midnight Muse
Accessories
Midnight Muse Stitched Satin ribbon
Tools
Victorian Wallpaper embossing folder

Tuesday, September 18, 2012

Swirls and Flourishes

I have something old and something new. No, I'm not getting married again! lol I've been married to my HS sweetheart for 32 years this November:) The first one is a bookmark card that I just finished. I was waiting on my order to come in yesterday with all that free ribbon in it!! There is a diagram showing dimensions for making it just under the project details. Click to enlarge.

The second one is the old card, well a week old. It's for our Color Me Beautiful Challenge, but my selection of ink pad colors was limited, so I originally used Basic Gray on the tree. Now I have lots more ink pad colors, so I revised the top layers and stamped the tree in Lucky Limeade instead. The original card is the last one. Which do you like best? Please come play along with us on the Color Me Beautiful Challenge Blog.

Project Details
Stamps
Flowering Flourishes, Happiest Birthday Wishes
Cardstock & Papers
Whipser White, Midnight Muse, Baja Breeze, Paisley Petals dsp
Ink
Midnight Muse
Accessories
Pearl Basic Jewels, Midnight Muse Stitched Satin ribbon, Linen Thread
Tools
Scallop Trim border punch, Houndstooth embossing folder

Project Details
Stamps
Snow Swirled
Cardstock & Papers
Lucky Limeade, Rich Razzleberry and Basic Gray
Ink
Lucky Limeade
Accessories
Rhinestone Basic Jewels
Tools
Scallop Trim border punch, Vintage Wallpaper embossing folder


Sunday, September 16, 2012

More Snowmen!

I made these cute little guys last year to give to neighbors and friends. This year I'm making them for craft shows. I'm super excited, because I haven't seen anything like them at craft shows around here. I hope that means I'll sell a lot, so I can support my hobby$$ I scored on the fleece and flannel while at Hobby Lobby a few weeks ago. They had some on the remnant table:)

Canned Snowman

I already made some snowman soup in styrofoam cups, and packaged them in carriers. Then I started thinking about other ways to package it instead of in a cup. I thought this idea was cuter, and it's cheaper to make. Even if I did spend hours designing the label and getting the poem and heaven message to fit on a sheet of card stock so that punches would fit. I designed the label on Print Shop. Free download. The poem is available HERE. In the bag, I put instant hot chocolate mix, a small candy cane, a couple of Hershey kisses, and some freeze dried snowballs. That would be mini marshmallows.  I'm soooo tickled with how this turned out!!!! I'll sell them at the craft show for 2-3 dollars. 9-29-2012 I changed the label to read "North Pole's Condensed."
.

And a quick card I put together using Flowering Flourishes stamp set, Cherry Cobbler and Very Vanilla.
I made this at my Upline's stamp club. Isn't it cute? I really like the leaf diecuts and that box diecut... I can see tons of uses for that too! See the veins on the leaves? That's made with the spider web embossing folder. I love Pam's ideas, she always comes  up with the coolest things for us to make!

Saturday, September 8, 2012

I'll Have a Blue Christmas Without You...

I'll be soooo blue thinkin' a ah about you. Are you channeling your inner Elvis?


Project Details
Stamps
Snow Swirled
Cardstock & Papers
Bashful Blue, Whisper White, Marina Mist
Ink
Bashful Blue
Accessories
Rhinestone Basic Jewels
Tools
Houndstooth and Vintage Wallpaper embossing folders, Apothecary Accents framelits


Just to keep you from feeling too blue and I made one in red and green too!

Project Details
Stamps
Snow Swirled
Cardstock & Papers
Cherry Cobbler, Whisper White, Old Olive
Ink
Cherry Cobbler
Accessories
Rhinestone Basic Jewels, Cherry Cobbler Seam Binding Ribbon
Tools
Houndstooth and Vintage Wallpaper embossing folders, Apothecary Accents framelits
 

Friday, September 7, 2012

Color Me Beautiful Blog Challenge #2

This palette is called "Red Blossom." I just love this stamp set. The more I use it, the better I like it! I always have such fun using my colored pencils. Please visit the Color Me Beautiful Challenge blog and play along with us using Stampin' Up colors and stamps!


Project Details
Stamps
Apothecary Art
Cardstock & Papers
Always Artichoke, More Mustard, Very Vanilla, Razzleberry Ripple
Ink
Basic Black and Razzleberry Ripple
Accessories
Pearl Basic Jewels
Tools
Perfect Polka Dots and Vintage Wallpaper embossing folders, Labels Collection framelits, Word Window and Modern Label, and Itty Bitty Shapes, punches

Monday, September 3, 2012

It's Back to Spool Time!

For the month of September, get a free package of '3/8 "Stitched Satin Ribbon- and $8.95 value for every $40 you spend! Promotions Link

You've bought all the back-to-school clothes and supplies and sent those adorable kids on their way; now it's time to do something for YOU! First on your list? Taking advantage of Stampin' Up!'s 'back to spool' promotion during September. Get a FREE package of 3/8 inch Stitched Satin Ribbon with every $40 purchase--choose your favorite new In Color or earn all five!

Want some great ideas on what to do with your free ribbon? Check out this video Will It Embellish?