background

Monday, May 30, 2022

The Most Amazing Card Layout Ever

 This layout is so easy to make and so very versatile! You could make scads of cards with this layout, different DSP and stamps, and they'd look so different! Look at the three samples below, the two on the left have angled cuts made from DSP, while the one on the right has angle cuts made from embossed card stock. Then look at the centers of the card fronts, embossed cardstock on the left, diecut in the center, and DSP on the right. 

Bundles Left to right: Nature's Prints, True Beauty, Cup of Tea 

All measurements in inches

  1. Card Base: cut 5-1/2 x 8-1/2 score at 4-1/4

  2. Cardstock Layer: 5-1/4 x 4

  3. DSP or embossed cardstock 5 x 2-1/2, place on the trimmer on the short side. Place one corner of the paper on the 1” mark and the other corner on the 1-1/2” mark and cut.
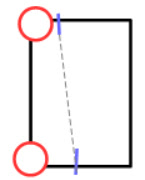
  1. Place Dimensionals on the paper used in step one so that the angles are popped up. Apply to layering piece making sure to put the opposites across from each other (skinny to fat).

5.     A 5 x 2-1/4 layering piece to go behind the angle cuts. This should be either DSP or cardstock, the opposite of the paper used for the angle cuts.

6.     The building of the card is: card base, 5-1/1 x 4 layer, then the 5 x 3-3/4 layer, and finally the two angle cuts on Dimensionals.

7.     For embellishment, you can stamp a greeting, place die cuts, or ribbon etc.


Saturday, May 28, 2022

True Beauty Bundle

 For this fun fold, I used the True Beauty Bundle and the Awash in Beauty DSP, along with Basic White and Merry Merlot cardstock, Granny Apple Green, Mossy Meadow, Polished Pink, So Saffron and Merlot ink pads. The ribbon is White Crinkled Seam Binding, colored with a light Mossy Meadow Stampin' Blend Marker.

  1. Begin with the standard  5-1/2 x 8-1/2 inch card based scored at 4-1/4, then cut off 1-1/4 inch from the bottom front.
  2. DSP for card front: 2-3/4 x 5-1/4
  3. Cut Merry Merlot 2-1/4 x 3-1/2 for the flap on the front, then layer 2 x 3-1/4 Basic White on top. Adhere only the top portion to the card front.
  4. Ink the flower stamp in Polished Pink in and use Sponge Dauber to apply a bit of Merry Merlot ink in the center and on the edges.
  5. Ink the leaf stamp in Granny Apple Green and apply a bit of Mossy Meadow ink with Sponge Dauber.
  6. Diecut floral branch from Mossy Meadow.
  7. On the bottom inside, adhere a piece of coordinating DSP 1-1/2 x 5-1/4.


Book Binding Fold

 Book Binding Fold

This card was created using the True Beauty Bundle and the Awash in Beauty DSP. I used the White Crinkled Seam Binding ribbon, colored with a Stampin' Blend to coordinate with the DSP. Old Olive and Blushing Bride ink.

All measurements in inches

  1. Card Base 4-1/4 x 11, socre @ 4-1/4 and 5-1/2

  2. 4 x 4 DSP

  3. DSP 1 x 4 for the spine on the card front

  4. 6 x 6 DSP for the explosion mechanism. Fold in half, the rotate and fold in half the other way. Flip it over and fold corner to corner.

  5. Basic White 2-7/8 x 2-7/8 for the inside, in the explosion mechanism.

  6. Adhere ribbon along the spine, with the ends on the inside where you will glue it shut just on that 1 inch section. With another piece of ribbon, thread it through the first ribbon and tie a knot.

  7. Glue the DSP mechanism in a diamond shape (point to point) with the opening facing out.


You can do two versions of this card, one in landscape and one in portrait.

Alternate Size Book Binding Fold

  1. Card Base 5-1/2 x 8-1/2 score at 3, 4-1/4. This size provides a more rectangular card front.

  2. 2-3/4 x 5-1/4 DSP for the card front

  3. 1 x 5-1/4 DSP for the spine on the card front

  4. Basic White for the inside 2-3/4 x 5-1/4

You can do two versions of this one as well, one in landscape and one in portrait.

Friday, May 27, 2022

Last Chance Sale from Jan. to June Mini Catalog


The January–June 2022 Mini Catalog will be retiring soon! It’s always bittersweet to see a classic Stampin’ Up! catalog take a trip to retirement. But, we’re looking forward to all the new products on their way—and we hope you are, too!

With every retiring catalog comes a spectacular sale: the Last Chance Products promotion! With this sale, you can stock up on your favorite products before they’re gone for good. Save up to 50% on essential craft supplies starting 1 June 2022!  Here's the List

  • Discounts are not always available with the Retiring List.

  • All products are available while supplies last, and there are no purchase limits.

  • Only orders opened and closed during the promotion period apply 

  • Stamp Sets are not guaranteed during this promotion and are while supplies last


SALES PERIOD

  • Starts: 1 June 2022 at 12:00 AM (MT)

  • Ends: 30 June 2022 at 11:50 PM (MT)

ORDER DEADLINES

  • Phone: 30 June 2022 at 6:50 PM (MT)

  • Online: 30 June 2022 at 11:50 PM (MT)


Thursday, May 26, 2022

Fun Folds!!

 These are easy fun folds! The first fold has been floating around the internet for quite a while. I got it from fellow Demo Tara Carpenter, who got it from someone on Pinterest. Isn't it just the cutest thing? Both cards use the Tea Boutique Designer Series Paper and the Cup of Tea Bundle


All measurements in inches.

  1. For the base, cut a piece of Sweet Sorbet cardstock 5-1/4 x 5 1/2" scored at 1.”  Adhere a piece of Stampin' Up Tea Boutique DSP to the small flap.  

  2. Cut a piece of Basic White cardstock at 3 x 7 then score on the short side at 3, 3-1/2 and 4.”  Fold it in half, then fold the top scored line back. Adhere it to the small flap of the card base with Stampin' Up Tear & Tape. 

  3. After stamping the following, die cut all the pieces with Stampin' Up Teacup Dies.

    • Stamp the teacup on Blushing Bride card stock with Sweet Sorbet ink.  

    • Stamp the leaves with Garden Green ink on a piece of Parakeet Party card stock.  

    • Stamp flowers on Basic White cardstock with Crushed Curry and Sweet Sorbet ink.  

    • Stamp teabag tag on Basic White cardstock with Tuxedo Black ink.

  1. Attach a piece of Baker's Twine to the back of the teabag tag, and then behind the teacup with glue dots.

  2. Adhere the tea bag tag to the front of the teacup with Stampin' Dimensionals.

  3. Adhere the flowers and teacup to the 3 x 7 White card front with liquid adhesive. 

  4. Embellish the front with enamel dots.  

  5. Apply Tear & Taper to the top of the 3 x 7 card front (between the score line and the folded edge. Then apply it to the back of the flap on the Sweet Sorbet Card Base, making sure to center it and allow room to open the white folded card.

  6. To attach a piece of DSP 5-1/2 x 4 behind the 3 x 7 mini card, apply a piece of
    Tear & Tape on the back of the the 3 x 7 mini card. Next center the DSP with the Sweet Sorbet cardbase, close the flap and adhere.

  7. Stamp the sentiment with Starry Sky ink on the inside of the small white panel.  

  8. Die cut a piece of So Saffron and DSP (with an adhesive sheet on it) to create a lemon wedge.  Adhere the lemon to the inside.

  9. A piece of Basic White 4 x 5-1/4 a sentiment with Sweet Sorbet ink is used for the inside of the card.  Adhere a strip of DSP toward the bottom.

Dimensions:

    Sweet Sorbet: 5-1/2 x 5-1/4 scored at 4-1/4

    Parakeet Party: 2 x 3

    Basic White: 5-3/8 x 4-1/8

3 x 7 scored at 3, 3-1/2 and 4 

    DSP : 5-3/8 x 7/8 (2) and 5-1/2 x 4


All measurements in inches.

  1. Card Base: Orchid Oasis 8 x 5-3/4 score on the long side @ 2-1/8, 4-1/4

  2. Starry Sky 5-7/8 x 3 score on the long side @ 1-3/4, and 3-7/8. Accordion fold this piece and you will have three sections.

  • To attach this piece, put adhesive along about an inch of the back of the first section of card stock and adhere it to the DSP front flap.

  • Put adhesive on the entire back of the last section and close the card to adhere it to the inside .

  1. Cut two pieces of Basic White 2-3/4 x 1-7/8 and 2-3/4 x 1-3/4. Use the largest piece on the center section.

  2. Cut DSP 5-1/2 x 1-7/8

  3. Basic White for teacup detail

  4. In Color Glimmer Paper can be used for teacup die. I don't have any yet, so I used white glimmer paper and colored it with ink and a sponge brayer.


Sunday, May 15, 2022

The Blues

 Feeling Blue today. Don't you just love this designer series paper?


Saturday, May 14, 2022

My Foray into Jewelry Making


bracelets

stilettoes, otherwise know as "poky tools"


scissors charm

key chain