background

Saturday, July 14, 2012

Great Recipe

This is for my friend Maggie, who always finds the best recipes:)

Bacon Swiss Penne
12 oz. uncooked penne pasta
13 bacon strips
1 1/2 lbs. boneless skinless chicken breasts, cut into 1-inch cubes
3 Tbsp. butter
6 green onions, chopped
3 Tbsp. all purpose flour
4 cups milk (I use 1%)
3 cups (12 oz.) shredded cheddar cheese
1 1/2 cups shredded Swiss cheese
3/4 tsp. pepper
1/2 tsp. dried thyme

TOPPING:
3/4 cup dry bread crumbs
2 Tbsp. butter, melted

  1. Cook penne according to the package directions.
  2. Meanwhile, in a large skillet, cook bacon in batches over medium heat until crisp. Remove to paper towels; drain, reserving 4 tsp. drippings. Crumble bacon and set aside.
  3. Saute chicken in butter and drippings until no longer pink. Add onions; cook 1 minute longer. Stir in flour until blended; gradually add milk. Bring to a boil; cook and stir 2 minutes or until thickened. Stir in cheeses, pepper, thyme and bacon.
  4. Drain penne; add to chicken mixture and toss to coat. Transfer to a greased 13-in. x 9-in. baking dish. In a small bowl, combine bread crumbs and butter; sprinkle over th top. Bake uncovered, at 350 degrees for 30-35 minutes or until golden brown.

Thursday, July 12, 2012

I'm Now a Stampin' Up! Demo!

I'm so excited!! I signed up with Stampin' Up! today.
I was going for a whimsical look, picturing Grandma's cups stacked haphazardly on open shelves. 
The teacups are from the Tea Shoppe stamp set.
cardstock: Certainly Celery, So Saffron and white

Tuesday, July 10, 2012

Snowman Soup

I've used the Snowman Soup poem for years and given it to fellow teachers at Christmas. I thought it would be a great product for the craft fair in some cute container. When I saw Chris Twing's take on a cup carrier, I knew I had to made some. There are lots of ideas for containers and I wouldn't want to make all the same type, cause what would be the fun in that?
UPDATE Here are a couple versions of the poem and the ingredients.
When the weather outside is frightful,
Snowman Soup can be delightful.
May it warm your spirit and your soul.
Let it snow, let it snow, let it snow!
When you feel a chill or are saying "brrrr,"
Use the candy cane stick to stir.
Add hot water and sip it slow.
Let it snow, let it snow, let it snow!

Was told that you've been good this year 
Always Glad to hear it.
With freezing weather drawing near
You'll need to warm the spirit. 
So here's a little Snowman Soup
Complete with stirring stick.
Add hot water, stir it slow
It's sure to do the trick!

Ingredients for Snowman Soup
  • Hot Chocolate Mix
  • Marshmallows
  • Candy Cane
  • Hershey Kisses

Calendars and Notepads

So why have I been making all these Christmas things in July? My friend, Pam, and I are planning to do a craft show. This is our first, so wish us luck:) The first project idea came from Pam and I just adore it! You can run off the calendar from various online sources. I used the freeware from Red Castle: http://www.red-castle.com/software/software.htm. The stamp set is a retired set from Stampin' Up! but you could use any of their tree stamps. I never would have looked at this set and imaged what a tiny bit of coloring with markers could do to make it so adorable on a punched shape! I just used designer paper from my stash and 3 colors of cardstock, Early Expresso, Wild Wasabi and Baja Breeze. These would make great gifts and I'm making a few of them!! You just make a card, then on the inside you put two of the seasons (winter and spring) after 6 months, you just untie the bow, turn it inside out and  you have calendars for the next 6 months. Isn't that a clever design?
Pam has lots of buttons, so she sorted through and found these really cute ones for the matchbook notepads. I have about 8 more to make and I'll be finished:)
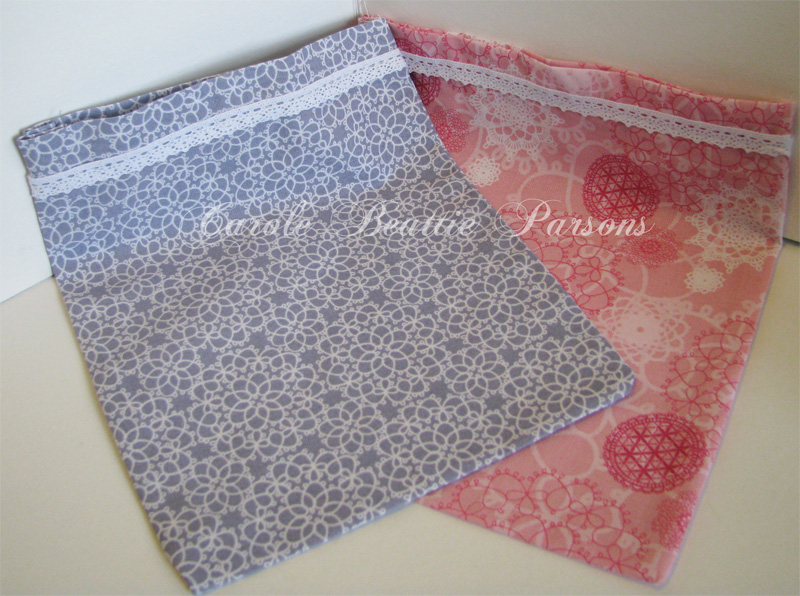
These are a couple of the bags I've sewn using the fabric set called "Flirtatious" from Stampin' Up!" We're going to make card sets to go in them. We thought the "Delicate Doilies"stamp set and the doily die cut would coordinate beautifully with the fabric.

Clear Case Notebook Gift


I first saw this gorgeous project on Pinterest. At thiswebsite. After adding this to my list of projects I must figure out how to do, I found some free directions on LeeAnn Greff’s website. I thought this was the most gorgeous thing I’d seen!!! Then I realized it is practical too. As LeeAnn pointed out, you can keep your notebook in your purse and it doesn't get all raggedy on the edges. 
Materials
  • Stampin' Up!  DVD cases (4 for $5.95) 
  • Designer Series Paper 3 coordinating pieces: (case liner: 10 5/8" x 7") (notebook top: 5" x 2)         (inside pocket: 8 1/2" x 3")
  • Circle or oval punch
  • Sticky strip
  • Thin pen (RSVP pens are too fat)
1.       The junior legal size note pads will need to have 1 1/16 inch cut off the bottom. If you don’t have a paper cutter that will do this, the office stores do this for you for a small fee.
2.       Leave the notebook loose instead of adhering it to the case so the user could remove it for easier writing and to replace when the tablet is gone. The notebook topper is 5" x 2" and can be secured with sticky strip. This can be embellished with a die cut strip or ribbon if you like.
3.       Before placing the 10 5/8 by 7-inch dsp inside the case, consider the pattern on your paper to determine if you’d like ribbon, die cut or some other embellishments on the cover. Adhere those then simply slide in the case.
4.       To make a pocket to hold receipts etc. cut a coordinating piece of dsp 8 1/2" x 3.  Fold it in thirds and secure it in the back and on the bottom with Sticky Strip. Use a circle or oval punch on the front edge in the center so you can reach inside the envelope more easily.  Depending on the designer paper you select you may want to embellish this pocket with a die cut or ribbon before adhering it to the inside of the case.
edited 7/30/2012

Hey Pam, I got mine started:) 

Saturday, July 7, 2012

Christmas in July

I've started making things for Christmas!
 This calendar has a magnet on the back. Labels eight -Spellbinders, Mocha Morning dsp Stampin' Up.
Coaster from Outback Steakhouse covered with decorative paper from my stash, Spellbinders labels eight, ribbon from my stash. There is a magnet on the back too.
 This card set holder is made from a placemat. I folded it to the size I wanted, then folded a flap down, stitched the edges and down the center. I added some leather cord to tie it shut and those shiny thingys that remind me of southwestern bolo ties like my Grandpa used to wear.
 Inside the placemat holder. This one will hold southwestern/Indian designed card set, but you can choose any placemat to suit the theme you want; floral, Christmas, Ethnic etc.
This is the same gift tag holder I made before, just with different colors. Now I know what I'm doing cause I've made a few of them:) The lolly is made from a die cut by Tim Holtz. I love these, they have rounded edges and they lay flatter than the made-by-hand version
Paint Chips! My friend Pam showed me this one and I'm making a bunch!!


Aren't these cute? I got the directions from Lynda and you can get them here: http://stampingdoc.blogspot.com/search?q=santa+pants
My friend Pam and I went to Deborah's house and she showed us how to make these adorable boxes. We glued two pieces of dsp together with spray adhesive to make it thicker and more sturdy. Then constructed the box with coordinating patterns of papers, embellished them, then we made coordinating cards to go in the box! I like my box, but you should see Pam's box, I love the patterns she chose:)

Wednesday, July 4, 2012

Happy 4th

And are my projects in red, white and blue? No that would be the normal thing to do on the 4th of July and we all know I'm not quite normal lol!

Stampin' Up:  Paisley Petals dsp, pool party, not quite navy and baja breeze. Ribbon and lace from my stash.
 Stampin' Up: Mocha Morning dsp. I LOVE to make these with double sided paper, then the inside looks so pretty:) I used Heather's directions: http://stampwithheather.typepad.com/stamp_with_heather/2012/03/what-an-honour-easter-basket.html

Sunday, July 1, 2012

Paper Quilting

My first attempt at quilting with paper.  I think they turned out pretty well. All the papers are from Stampin' Up!  Not Quite Navy, Baja Breeze and the Paisley Petals designer series paper. I used a square punch (1 inch) then after using my new Glue Glinder Pro to adhere all the squares and 1/2 squares, I ran the whole thing through my Big Kicks with the diamonds embossing folder from Sizzix.
Paisley Petals designer series paper and Wild Wasabi from Stampin' Up! The two salmon pinks are from Hobby Lobby. Diamonds embossing folder from Sizzix, and Lacy Squares from Spellbinders. Ribbon and pearls from Hobby Lobby.
 Paisley Petals designer series paper from Stampin' Up! The two salmon pinks are from Hobby Lobby. Swiss Dots embossing folder from Cuttlebug. I used two Lacy Squares from Spellbinders and glued them together to form the star-like shape. Pearls from Hobby Lobby.
Not a planned project:
See I had all these printed sheets of directions and examples for a Craft Event/Sale that my friend Pam and I are planning so I decided to bind them all so that I could flip through the pages more easily and find what I'm looking for. I chose a color of cardstock that I rarely use. Well then I decided it just had to be decorated so I tried to find colors that would compliment..... so since this is an evolution instead of a planned thing it looks okay, but I would not have selected the maroon if I'd known what I was doing in the first place. But I was just playin' around and it's just for me/us and I/we don't care ... right Pam?  And then I cut off the right side while scanning and a storm is coming so I can't rescan, must shut down the computer. Bye y'all:)