background

Monday, July 30, 2012

Notepad Holders

Seriously, this is my new favorite thing to make!! It's just such a great idea and they look soooo cool:) Every time I pull it out of my purse to write in it, who ever sees it, wants one!! We're going to be making a bunch of these for the craft show! Quick, easy and you don't have a lot of cost involved. 1.25 for the case, one sheet of designer series paper and a junior notebook. I've been cutting mine down with my Fiskars rotary paper cutter just fine. My friend Deborah has a Carl rotary cutter that does an even better job! The beautiful double-sided papers are from the Mocha Morning set I'm so sad this pattern is retired and wish I had ordered more! just love love the way all the designs in the collection coordinate. The stamp is from the Apothecary Art stamp set.
I've tweaked the dimensions a bit and this is so wonderful it just bears repeating the directions!
  • Stampin' Up!  DVD cases (4 for $5.95) 
  • Designer Series Paper 3 coordinating pieces: (case liner: 10 5/8" x 7") (notebook top: 5" x 2)         (inside pocket: 8 1/2" x 3")
  • Circle or oval punch
  • Sticky strip
  • Thin pen (RSVP pens are too fat)
1.       The junior legal size note pads will need to be cut off the bottom. If you cut it to 7 inches, you'll have room for one of those cute little short pens on top!  If you don’t have a paper cutter that will do this, the office stores do this for you for a small fee.

2.       Leave the notebook loose instead of adhering it to the case so the user could remove it for easier writing and to replace when the tablet is gone. The notebook topper is 5" x 2" and can be secured with sticky strip. This can be embellished with a die cut strip or ribbon if you like.

3.       Before placing the 10 5/8 by 7-inch dsp inside the case, consider the pattern on your paper to determine if you’d like ribbon, die cut or some other embellishments on the cover. Adhere those then simply slide in the case.

4.       To make a pocket to hold receipts etc. cut a coordinating pieces of dsp 8 1/2" x 3.  Fold it in thirds and secure it in the back and on the bottom with Sticky Strip. Use a circle or oval punch on the front edge in the center so you can reach inside the envelope more easily.  Depending on the designer paper you select you may want to embellish this pocket with a die cut or ribbon before adhering it to the inside of the case. 
5.      A Thin pen can be included (RSVP pens are too fat) or one of those short mini pens will fit at the top of the notebook.

 Check out some more examples here: http://astampabove.typepad.com/my-blog/2011/02/hard-case-notebook.html.  and here: http://flowerbug.typepad.com/my_weblog/2012/06/clear-case-notebook-gift.html.

Saturday, July 28, 2012

Carry On Now Available!

For those of you that fell in love with Stampin' Up!'s "Carry On Stamp Set," I have some wonderful news! The Hostess stamp set is now available. Due to unforeseen legal issues, we had to halt the availability of this stamp set in early June. Our legal department has since reviewed these issues, and this set is available for ordering again!  


So how can you earn this stamp set for "FREE"? Call me today to schedule a workshop or place an order for $150 on your own and earn it!

Need a 'Reason to Smile?" You can still get this stamp set for a few more days... for only $5.00 with a $50.00 purchase. (See link on sidebar)


Wednesday, July 25, 2012

Mixed Bunch!

The more I work with this stamp set and punch, the more I like it. Well, that's not exactly correct. I did like it, now I love it! It's so much fun to use because you can make a thousand combinations. You can dress it up, or dress it down. It can be bright and modern or more subdued and classic. And I don't even have the Boho Blossom punch yet! It will be on my next order:)
                              
Mixed Bunch stamp set and Blossom punch

                                      
Circle punches and Boho Blossom punch
Here's the same card, after I "kicked it up a notch."
cardstock: pool party, crumb cake, early expresso
designer series paper: Mocha Morning
"Fancy Flower" punch
How about a Christmas Card? These stamps and punches are so versatile and fun!!

I almost forgot to tell you about my Pinterest Boards! I set some up to show a lot of different things you can do with various stamp sets from Stampin' UP! Check them out!! Just click on the little red Pinterest button over to the right:)


Monday, July 23, 2012

Flowers and Fur

Here is Cricket, one of our Aussies. She has shorter hair than Sydney and they look so different, yet they are both registered. Far be it from me to try and figure out the AKC right?  Cricket is the youngest and she thinks she is a lap dog - SERIOUSLY. Ever have a 40 pound dog jump in lap and smoother you with kisses? She is the sweetest dog and soooo smart!! She acts as a hearing dog for our other Aussie, who is 15 and can't hear well any more. When I want Sydney to come and she can't hear me, I just tell Cricket to "go get Sydney" and she does. How cool is that?
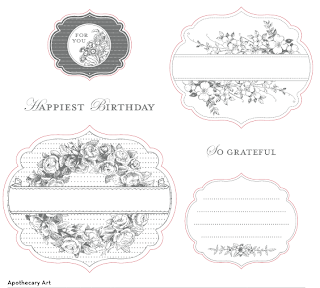
 Here is the first card made with the Apothecary Art stamp set and the Labels Collection framelits.  I really love the way my stamped image can be cut in the same shape as the stamp image! I can't wait to get some more stamp sets and coordinating dies or punches!! I used crumb cake, very vanilla and red rose card stocks and colored the flowers with my colored pencils. In my next order I'm going to get the In Color card stock and pad kit. It's a great bundle, all five ink pads and a package of card stock for 29.95. In other words, you get the pack of cardstock for free!! . I can't wait to try coloring with the ink and my paint brushes. My artist friend, Jessica, tells me I am going to LOVE painting with the inks:)
I LOVE purple and blue so this one is my fav!

Here is the same card after I kicked it up a notch:)
I think I like it better what about you?

Sunday, July 22, 2012

Christmas Baskets!!

I just love this type of basket!

I saw Heather Summers’ baskets http://stampwithheather.typepad.com/stamp_with_heather/2012/03/what-an-honour-easter-basket.html this spring and thought they were to die for!  Following her diagram below, I wrote out directions and experimented with some old paper first. When I had it written down in way that made sense to me, I made I followed Heather’s diagram to make the basket above.  I used a 9 x 9 sheet of cardstock to create my basket.  Each of the tabs (the long skinny rectangles) are 1 x 3 and the squares down the middle all measure 3x3.            

Larger Basket
9 x 9 square cardstock or designer paper
2 one x 9 inch strips of cardstock or designer paper
scoring tool
scissors
1" circle punch
corner rounder
4 brads
adhesive

 
1.      Score your 9 x 9 inch square at 3 inches and 6 inches
Turn and score again at 3 inches and 6 inches
The scored lines will look kind of like a tic-tac-toe board at this point

2.      Following the score lines cut 2 inches deep at the 3 inch line and 6 inch line. Do the same on the opposite side

3.      Cut the center flap into a triangle and both side flaps into thirds. To do this place your paper on your score board with the triangle cut outs on the right and left sides, just as it appears on the diagram above. Score at 1, 2, 7, and 8 0 score only to the blue lines NOT all the way across (see diagram). Turn the paper and score the same way on the other side. Now you should have 12 strips, 6 on the top and 6 on the bottom.

4.      Trim about 1 inch off of the 2nd and 3rd strips (counting from the outside edge)

5.      Start with the first and longest strip, bring the two side together and attach.
Then layer the next two and then the last two. Then attach the triangle flap on top of the flaps.
(I inked the edges of everything first to give it more depth)

6.      Punch two 1" circles. Attach them over the points of the triangle. (trim the point off before attaching the circle)

7.      Cut two 1" x 9" strips. Use a corner rounder on the ends. Attach about 3/4 inches from the end of the basket with brads.

8.      Voila! Decorate further any way you like. I chose to make double layer lollies with a jewel, brad or button in the center. Stampin’ Up makes a lolly die cut which is sooo much easier to make! It’s called Designer Rosette Bigz XL. They are on a long die (up to 10” diam.) so you use extended cutting pads to allow you to make these gorgeous lollies.


Did you know that Stampin" Up! makes a die for creating lollies? Using this Bigz die makes it soooo much easier to create a lolly! Plus the ends have patterned designs on them, aren't they cute? It's called "Designer Rosette Bigz XL" and it makes a strip for a lolly that is up to 10" diam., so you use extended cutting pads to allow you to make these pretty little things. I also love the fact that they don't stick out as far as the ones I made by hand and they are so nice and uniform.
 

Smaller Basket

You will need:
6x6 square carstock or designer paper
2 one half x 6 inch strips of cardstock or designer paper
scoring tool
scissors
1" circle punch
corner rounder
4 brads
adhesive

1.      Score your 6 x 6 inch square at 2 inches and 4 inches
Turn and score again at 2 inches and 4 inches
The scored lines will create something that looks like a tic-tac-toe board

2.      Following the score lines cut 2 inches deep at the 2 inch line and 4 inch line. Do the same on the opposite side

3.      Cut the center flap into a triangle and both side flaps into thirds.

4.      Trim 1/4 " off of the 2nd and 3rd strips (counting from the outside edge)

5.      Starting with the first and longest strip bring the two side together and attach.
Then layer the next two and then the last two. Then attach the triangle flap on top of the flaps.
(you can ink the edges of everything first to give it more depth)

6.      Punch two 1" circles. Attach them over the points of the triangle. (trim the point off before attaching the circle)

7.      Cut two 1/2" x 6" strips. Use a corner rounder on the ends. Attach about 3/4 inches from the end of the basket with brads.

8.      Decorate!

Friday, July 20, 2012

Coordinating Sets!

I just LOVE the way Stampin' Up coordinates stamps and punches or die cuts! It just makes the whole creative process of stamping even more fun:) You get such a nice crisp cut image instead of the raggedy edges that you often get with scissors. I just got the Apothecary Art stamp set and the Labels Collection Framelits yesterday, so I'm busy making some pretty things with them!

So my next order? I want the Mixed Bunch set. I have sooo many cool plans for them!! Obviously making cards will be fun; stamp the images in different colors, on different colors of card stock, layer the smaller round shapes using dimensional foam dots. What a terrific 3D effect! I want to make some flowers, then mount to bamboo skewers to make a 'real' bouquet. Then glue round candies (Rollos) in the center of the flower and put them in a vase of some sort. What a great gift for a friend, or a get well bouquet - or a welcome to the neighborhood for a new family. What fun this is going to be!! Oh and then there are those adorable butterflies:) I can see so many possibilities there too. Are you having trouble visualizing what I'm talking about? No worries, I'm all about visual aids! Take a look at my Pinterest page. I made boards for these sets with all kinds of gorgeous ideas that you can do with them! If you'd like to see them, just click on the Pinterest button on the right to go see all the pretty things I have marked for you. Well, for me too. Who doesn't need a little inspiration right?
There's even a paper piercing template that is in the shape of this die cut!! 


Mixed Bunch stamp set
Blossom punch
3/4 inch circle punch
1 inch circle punch 


I just have to have these flutterbys? That would be an item high on my wish list too!
Elegant Butterfly punch
These embosslits cut and emboss! How cool is that? 

Papillon Potpourri stamp set


Thursday, July 19, 2012

Card Sets in a Bag

Do  you remember the little bags that I made with SU fabric? Well, now I'm working on card sets to go in them.


What a versatile stamp set!

Monday, July 16, 2012

For the Birds

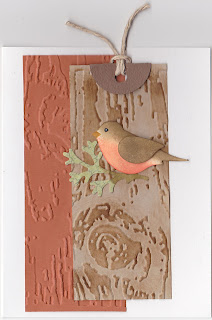
Do you realize how seriously addicted to Pinterest I am??  I found the coolest birds on there a couple weeks ago made from the "Bird Builder" punch from Stampin' Up.  I was completely enchanted by these gorgeous creations on Kirsten Moore's blog. I pinned them and immediately called my friend Pam to tell her about them. See Pam LOVES birds and I knew if I thought they were gorgeous, she would go nuts... and she did! From Kirsten's blog we learned that she got the directions from Lynn Pratt  or here. Well of course we simply had to buy them:) Today we sat down a made a few, ohhhh but we're not done yet. There are more birds to make and of course we need a birdhouse oooh and a bird feeder... and maybe a bird bath...maybe we need a tree - well not a real one of course. It could be made out of paper. I'm rambling, can you tell I'm excited???  See I mentioned that we could could put birds on the display board for the craft show, but Pam had the brilliant idea to have a whole bird theme, because, she said, "birds are really in right now." We could also use a peacock and the tail feathers could be all the "In Colors."  I mean peacocks can live in your yard here in the south. Back in the day, plantation owners used to have them to decorate their yards. Of course I use to want a couple to decorate our yard, but my husband said they are dirty and noisy. Why must he be so practical when I'm busy pretending to be Miss Scarlet on my plantation with peacocks?? lol

Pam and I played happily this morning building birds (no pun intended). It was really quite a challenge, even with the directions. I'm sure glad I had Pam, because she used to be an engineer and has that analytical left-brain goin' on that I do not have. We had such fun, I'm so thankful for good friends like her. She is such a treasure. Besides having a love of paper arts and crafting, she is so easy to be around, always pleasant and cheerful. She's very smart, but not a know-it-all and she's not competitive or snobby. I'm blessed to have some really great friends and Pam is one of them:) See, who needs a sister? I have such good friends like Pam, Barb, Susie, Rachael, Kitty and the other Suzie.
GASP!!  I was so excited to show these to y'all I forgot to put a grommet in the two I just put on cards! lol
Here are some more directions on making a cardinal: http://indulgy.com/post/2ceaRuNfD1/stampin-up-bird-punch-turns-into-a-cardinal

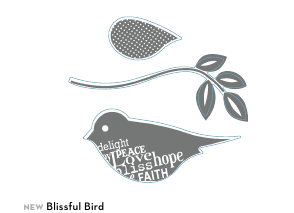
We only used the Bird Builder punch, but I want to get the Language of Friendship stamp set and the Boho Blossoms punch that coordinate too!! Hmmm now that I think about it, that Blissful Bird stamp set is pretty cool too:) You can order any of them here. 


Tea Shoppe

What is it about tea sets that appeal to us? For me it is my Mom and  Grandma. Mom collected demi tasse cups and some survived all our moves too. She gave them to me and when she died, I got her teacart. Grandma passed her love of tea to Mom and I along with the hand embroidered table cloths and sets she made for having tea.
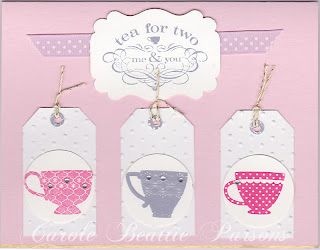
This stamp set called "Tea Shoppe," is from Stampin' Up. This set has such lovely images and the sentiments are so versatile. Here are a few cards I've made with it so far. I'll post more in the next couple of days.


Saturday, July 14, 2012

Great Recipe

This is for my friend Maggie, who always finds the best recipes:)

Bacon Swiss Penne
12 oz. uncooked penne pasta
13 bacon strips
1 1/2 lbs. boneless skinless chicken breasts, cut into 1-inch cubes
3 Tbsp. butter
6 green onions, chopped
3 Tbsp. all purpose flour
4 cups milk (I use 1%)
3 cups (12 oz.) shredded cheddar cheese
1 1/2 cups shredded Swiss cheese
3/4 tsp. pepper
1/2 tsp. dried thyme

TOPPING:
3/4 cup dry bread crumbs
2 Tbsp. butter, melted

  1. Cook penne according to the package directions.
  2. Meanwhile, in a large skillet, cook bacon in batches over medium heat until crisp. Remove to paper towels; drain, reserving 4 tsp. drippings. Crumble bacon and set aside.
  3. Saute chicken in butter and drippings until no longer pink. Add onions; cook 1 minute longer. Stir in flour until blended; gradually add milk. Bring to a boil; cook and stir 2 minutes or until thickened. Stir in cheeses, pepper, thyme and bacon.
  4. Drain penne; add to chicken mixture and toss to coat. Transfer to a greased 13-in. x 9-in. baking dish. In a small bowl, combine bread crumbs and butter; sprinkle over th top. Bake uncovered, at 350 degrees for 30-35 minutes or until golden brown.

Thursday, July 12, 2012

I'm Now a Stampin' Up! Demo!

I'm so excited!! I signed up with Stampin' Up! today.
I was going for a whimsical look, picturing Grandma's cups stacked haphazardly on open shelves. 
The teacups are from the Tea Shoppe stamp set.
cardstock: Certainly Celery, So Saffron and white

Tuesday, July 10, 2012

Snowman Soup

I've used the Snowman Soup poem for years and given it to fellow teachers at Christmas. I thought it would be a great product for the craft fair in some cute container. When I saw Chris Twing's take on a cup carrier, I knew I had to made some. There are lots of ideas for containers and I wouldn't want to make all the same type, cause what would be the fun in that?
UPDATE Here are a couple versions of the poem and the ingredients.
When the weather outside is frightful,
Snowman Soup can be delightful.
May it warm your spirit and your soul.
Let it snow, let it snow, let it snow!
When you feel a chill or are saying "brrrr,"
Use the candy cane stick to stir.
Add hot water and sip it slow.
Let it snow, let it snow, let it snow!

Was told that you've been good this year 
Always Glad to hear it.
With freezing weather drawing near
You'll need to warm the spirit. 
So here's a little Snowman Soup
Complete with stirring stick.
Add hot water, stir it slow
It's sure to do the trick!

Ingredients for Snowman Soup
  • Hot Chocolate Mix
  • Marshmallows
  • Candy Cane
  • Hershey Kisses