background

Wednesday, December 21, 2022

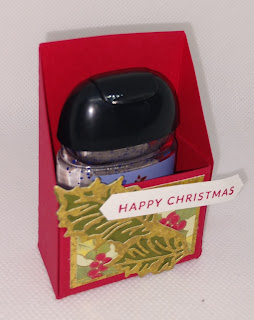
Hand Sanitizer Gift


Supplies:

 Cardstock cut 4 x 5-1/2

 Cardstock cut 1-3/4 x 1-1/4

 DSP 1-5/8 x 1-1/8

 Adhesive of your choice

 Scrap whisper white cardstock for sentiment

  Ribbon for decorating

  Cello bag for wrapping if desired

Instructions:

  1.  Take the 4 x 5-1/2 piece of cardstock on the short side and score it at 1 inch and 3 inches

  2.  On the long side of the cardstock score at 3 inches and 4 inches

  3.  Use a bone folder to fold the scored lines. 

  4.  Now take your cardstock and find the two horizontal score lines you will then take your scissors and cut some tabs. So there will be two square tabs on each side. Only cut the slits to score line that goes length wise.  

  5. Put adhesive on the two top tabs- on the outside of those tabs and attach the bottom to the outside to make a pocket for the hand sanitizer to sit.

  6. Now you will want to cut the sides in a angle. You can draw a line from the top corner all the way down to the lower corner at a angle if you want it to be perfect then cut it.  Or just cut at a angle on both sides. 

  7. Adhere the cardstock panel and the DSP panel to the front.

  8. You can decorate the front and add a sentiment. You can also then add a cellophane bag with ribbon to give it as a gift.

Sunday, December 11, 2022

Back To The Basics

EVEN IF YOU'VE BEEN STAMPING A WHILE. If you get those pesky halos around  your stamped image, you need this refresher. 

Demonstrators find that a lot of stampers like to use more ink than they actually need! 

So Let's get Back to the Basics:

  1. For the best results, turn your stamp over and hold the inkpad in your hand. This gives you more control over the amount of ink and where you lay it. Tap, tap, tap, lightly on the stamp with the inkpad a few times while moving around to cover the rubber completely.When printing your stamp, you'll find that steady, even pressure will give you the cleanest imprint.

  2. Tapping lightly on the stamp is key to avoid over-inking your stamp.

  3. If you take care not to put ink where you don't want it, it will make your life much easier. Rocking your stamp will give you edge prints, smudges or echo your print. Too  much pressure causes some of the same problems.

  4. For a much more crisp, clear image, use a Stampin' Pierce Mat when stamping with Photopolymer stamps.

Card Layering Templates

A great tool for measuring layers for cards.

https://scmagnolia.blogspot.com/2020/06/card-layering-templates.html


It's essential to have the right adhesive. You can't adhere ribbon to your card with liquid glue, however Glue Dots are perfect. Small embellishments can only be adhered to a card with Liquid Glue or Glue Dots. When making 3D items or a fancy fold card, you need extra hold, so Tear & Tape is the perfect choice. Using die cuts means you need a Fine Tip Glue Pen. Which of these should you have in your Tool Kit? All of them, because they each have uses that you will quickly see that you can't do without. If you are new to stamping, check the starred items in the list below for the must haves for when you are just starting out.


Stamping Tool Kit

Scissors

Adhesives:

  • Tape Runner

  • Glue Dots

  • Tear & Tape

  • Fine Tip Glue Bottle filled with Multipurpose Liquid Glue  

  • Dimensionals

Pencil

Bone Folder

Stampin' Pierce Mat

Paper-Piercing Tool (otherwise known as “pokey tool”

Baby Wipes

For your Stampin' Up! Shopping Convenience:

Item

Order Number

Price

Catalog Page

Paper Snips Scissors

103579

$11.00

155

Stampin' Seal tape runner

152813

$8.00

127

Mini Glue Dots

103683

$5.25

127

Tear & Tape

154031

$7.00

127

Multipurpose Liquid Glue

110755

$4.00

127

Stampin' Dimensionals

104430

$4.25

127

Bone Folder

102300

$7.00

155

Stampin' Pierce Mat

126199

$5.00

149

Take Your Pick Tool

144107

$10.00

155