background

Tuesday, April 30, 2019

Stitched Rectangle Framelits Are the Bomb!

I've been having the most fun!!! The stitched rectangle frameless are amazing if you don't have them you have to get them! At first I thought why do I need die cuts to cut out rectangles because I can just measure on my cutter and do it? Well duh... Because I can use them to make frames! Gasp! oh my goodness I can't believe I didn't realize that, and how much fun was I missing!  Creating just by using frames as a base is genius and it's so simple. This stamp set and coordinating Framelits will be in the new catalog. However, the DSP (designer series paper) is retiring, so you need to order it soon before it is all gone.

This is a simple formual for designing a card that anyone can do. To design your own cards with this formula, you need three things: a stamp set with coordinating thinlits, DSP, and the Stitched Rectangle Framelits.

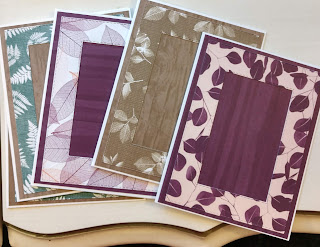
I pulled out a couple of patterns from the DSP,  decided what color base to use, and then the fun began! I cut a piece of DSP with a more plain pattern to serve as the background on my card, measuring 5 3/8 x 4 1/8 inches. Then I chose a coordinating pattern to cut a frame out of. I used the largest framelit, and then skipped 3 sizes to a smaller framelit that would allow a nice size 'framed' piece:) I glued these all together as shown below.
Next I stamped and die cut several of the images from the Rooted in Nature stamp set. I was sure to use the same ink colors that are found in the DSP. This coordination of colors is fun and so easy!

This is the most fun part! I simply grabbed some die cut piecs and laid them on the card until I had a design that I liked. I glued some of them and others I attached with Stampin' Dimensionals to give it some depth. Three completed cards are shown below. I have a stack of cards waiting to be assembled on my desk


Product List

Friday, April 26, 2019

Stamping Class!

What a great class today. Three projects shown below. For the origami frame, I told the people in class that I'd post pictures of the board so that you could see the steps at home. Rather than take one photo of the entire board, I photographed each step.

Stamps
Humming Along
Card Stock
Whisper White, Gold Foil, Shimmery White
Ink
Stampin' Blends, Versamark
Embellishments
Gold emboss powder
Tools
Embossing Buddy, Heat Tool, Hummingbird Framelits, Misti

  1. Whisper White card base: cut 8-1/2 x 5-1/2 score at 4-1/4
  2. Whisper White 3-1/2 x 2-1/2 stamp hibiscus in Versamark and heat emboss with gold
  3. Whisper White 3 x 3-1/2 stamp hummingbird in Versamark and heat emboss with gold
  4. Use Misti to stamp greeting in Versamark on card base, heat emboss with gold
  5. Color hummingbird and hibiscus with Stampin' Blends
  6. Cut out hummingbird with Framelit
  7. Gold Foil layer 3-3/4 x 2-3/4
Stamps
Beach Happy,
Card Stock
Whisper White, Lemon Lime Twist, Melon Mambo
Ink
Balmy Blue, Sahara Sand, Garden Green, Soft Suede, Melon Mambo, Blueberry Bushel
Embellishments

Tools
Sponge brayer, Stamparatus

  1. Lemon Lime Twist card base: cut 8-1/2 x 5-1/2 score at 4-1/4
  2. Melon Mambo 4 x 5-1/4
  3. Whisper White 3-3/4 x 5 stamped layer
  4. Use two brayers to apply Balmy Blue for sky, and Sahara Sand for beach
  5. On one plate, place tree trunk, chair/umbrella, and greeting- stamp with Soft Suede
  6. On second plate, place umbrella interior, and chair strips – stamp with Melon Mambo
  7. On back of one plate place tree top – stamp in Garden Green
  8. Stamp bag in Blueberry Bushel with blocks


Tuesday, April 23, 2019

Sea of Textures, Mistake Yikes!

These products will be carrying over to the new catalog in June! However, if you purchase before June 4, you can get the stamp set and the Thinlit dies as a bundle and save money. Once in the new catalog, they must be purchased separately.

Do as I say, not as I do. lol
Looking at the first image below, the card was turning out very nicely. Then, I had to add the text. I got out my handy dandy Stamparatus to make sure the text was not crooked. I got it stamped perfectly even, but I wanted to stamp again as it wasn't as crisp and dark as I would like it. Ordinarily this is quite a simple task with the Stamparatus, as the magnet holds the paper in the exact same place. Well, that is provided you actually USE the magnet!! I was in a hurry and thought, "oh it hasn't moved, I'll just give it another stamp. Noooooo it had moved ever so slightly, so I had a double image. Argh! My fix was to stamp on a separate piece of cardstock and glue it on top. Big sigh. Stupid self, stupid self:( It looks okay, but definately not as nice as it would have if I'd used the magnet.  Lesson learned.


Product List

Beachy

This stamp set and the embossing folder are available until May 31. Here is South Carolina, it is absolutely necessary to have a beach themed stamp set and this one fits the bill perfect! The little details like the hat, beach bag and coconut add such fun touches. When your stamping, don't forget the inside and the envelope to make a truely custom look.


Product List