background

Sunday, April 30, 2023

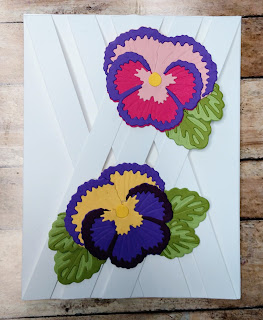
Lattice Card

 Here is the tutorial for the Lattice Technique. I love this technique! Thanks to BiBi Cameron who developed this technique. There are written directions below and a video tutorial as well.


Materials:

Stamps: Pansy Patch stamp set

Paper: Basic White, Thick Basic White

Ink: Melon Mambo

Tools: Pansy Dies, Washi Tape or other low tack tape


Preparation:

  • Thick Basic White 4-1/4 x 5-1/2 card base

  • Basic White 4-1/4 x 5-1/2

  • Basic White 8-1/2 x 1/2 six strips


Assemble Card:

  1. Dry fit first before gluing. Place one strip with the edge on the corner of the upper right of the 4-1/4 x 5-1/2 Basic White piece in a diagonal direction. Place the next strip with a gap in between the strips approximatly 1/2 inch-ish. The last strip should touch the bottom right corner. Adjust strips as needed, leaving ends out beyond the top and bottom of the 4-1/4 x 5-1/2 cs.

  2. Hold the strips in place with a clear block, then use washi tape or low tack tape to hold the strips in place. Then run adhesive across the back of the 4-1/4 x 5-1/2 cs. Fold the top strips back behind the large piece of cs and secure in place. Trim of any excess.

  3. Repeat step three using the remaining strips on the right hand side.

  4. Once all six strips are secured in place, trim the bottom pieces so they are flush with the bottom the larger cs.

  5. Adhere the 4-1/4 x 5-1/2 with the strips to a 4-1/4 x 5-1/2 THICK Basic White cs.

  6. Stamp and diecut for embellishment as desired.


Saturday, April 29, 2023

Mini Album Walk Through

 A mini album made for my niece. My great niece, who just turned 3, is obsessed with cows, so I thought this theme would be appropriate for them. I used patterned papers from Stampin' Up! and Doodlebug. All the cardstock is Stampin' Up!


Friday, April 28, 2023

Fence Technique

 We went to one of our local nurseries today (Grass Roots in Graniteville, SC) and wow! Loads of inspiration! Not only do they have greenhouses full of plants, one of them has tropical plants with parotts and other lovely birds, amongst the plants. They also have a koi pond and a river water feature. Oh and did I mention plants? Oh my gosh bazillions of plants. 

As we got home with our load of flowers to plant I thought of the fence and trellis cards with stamped or diecut flowers on them. This is a fence card. I'll do a tutorial for the Trellis card in the next couple days.


Materials:

Stamps: Quiet Meadow

Paper: Gorgeous Grape, Old Olive, Mossy Meadow, Thick Basic White

Ink: Gorgeous Grape

Tools: Meadow Dies, washi tape or low tack tape

Preparation:

  • Thick Basic White card base 4-1/4 x 11 scored @ 5-1/2

Assemble Card:

  1. From bottom of card front, trim off five 1/2" strips and two 3/8" strips.

  1. Trim the tops of the two 3/8" strips, which will be the fence posts then set aside.

  2. Add a strip of washi tape to just under front card flap, with sticky side up.

  3. Lay one of the half inch strips across the bottom of the card front, lining it up at the bottom edge over the tape.

  4. Add the additional four strips leaving space in between.


  1. Add a dot of liquid glue along the two sides of the card to attach the fence posts (as shown with pencil dots in photo above).

  2. Attach both 3/8" strips for the fence posts, and let dry. Trim the excess from the bottom. Then carefully remove the wasi tape.

  3. Decorate with any diecuts or stamped diecut pieces you wish.


Countryside Inn Suite

 This card was made with products from the new Countryside Inn Suite. Blue is my absolute most favorite color!! I've loved blue since I was a very little girl. And what color did my Mom ALWAYS make my room???? PINK. Three times of redecorating and I ended up with pink each time. When I was a teenager, my comforter was a print with lots of pink and some blue.... but I still had pink rugs, dust ruffles and curtains. big sigh. I love you Mom!

So as you can tell I'm beyond thrilled to have so many new blues in our color refresh this year, and this DSP is alllll blue yipee!!


Materials:

  • Countryside Corners Bundle

  • Lasting Joy stamp set

  • Countryside Inn DSP

  • Cardstocks: Boho Blue, Basic White regular and thick

  • Inks: Misty Moonlight, Night of Navy, Boho Blue, Crumb Cake


Preparation:

  • Thick Basic White 8-1/2 x 5-1/2 scored @ 4-1/4

  • Boho Blue 3-1/4 x 4-3/4

  • 3-7/8 x 5-1/8 dark DSP

  • 1-1/2 x 3-7/8 (cut 2) light DSP

  • Basic White 2-3/4 x 4-1/4

  • Basic White 1-1/4 x 2-3/4


Assemble Card:

  1. Thick Basic White card base

  2. Boho Blue 4 x 5-1/4 adhere to card base.

  3. Adhere 3-7/8 x 5-1/8 DSP onto Boho layer on card front, then adhere the two pieces of light DSP centered over top.

  4. Boho Blue 3-1/4 x 4-3/4: stamp with Misty Moonlight Ink then diecut using the second and third largest dies to make a frame, then adhere to card front on top of DSP.

  5. Basic White 2-3/4 x 4-1/4: cut with the third largest die then stamp greeting with Night of Navy ink, and leaf sprigs with Crumb Cake ink, then adhere to center of Boho frame on card front.

  6. 1-1/4 x 2-3/4 Basic White: stamp the flowers with Boho Blue Ink (stamped off once). Then fussy cut.

  7. Adhere flowers with Stampin' Dimensionals in between two leaf sprigs on top and bottom

  8. Apply Enamel Dots for the flower centers.

  9. Inside & envy: Adhere stamped diecut border, then stamp sentiment in Night of Navy ink, add flowers and leaf sprigs from Lasting Joy stamp set inside the border. Stamp flowers on envy.


Nature's Prints

 I've got a bit of this DSP left and I'm using it! I'm so glad the Nature's Prints stamp set and dies are carrying over to the new catalog! Here, I've used the Twisted Ribbon Technique to make this card. I'm going to teach this technique at my next stamping class.


This triangle fold card is too cute!
standing up for display

with it's coordinating envelope

side view


on the back


Magnetic Closure Tablet


open

back of tablet

I made these cute little note pads for customers.

  • 3 x 11 piece of cardstock, score on the long side @ 2-1/4," 2-1/2," 7-1/2," 7-3/4" fold and burnish all score lines
  • DSP needed to cover cardstock:
  • 3-1/8" x 2-7/8" bottom front
  • 2-1/8: x 2-7/8" cut two for top front flap
  • 2-7/8 x 4-7/8 back
  1. Attach small magnets with glue dots, and cover cardstock with DSP.
  2. Adhere DSP to cardstock
  3. Adhere tablet with Tear & Tape to cardstock back.
  4. Embellish

Friday, April 21, 2023

New Color Comparision Charts

 The new catalog is coming soon!


Here is a spreadsheet for keeping track of  your cardstocks and ink pads. https://app.box.com/s/1y6f944m8wt1m3jgcw82aio0uigksnis


New Core Colors


Returning Colors


Friday, April 14, 2023

Color, Cut, Paste With One Image

 For those who like to color, this is an amazing stamp. There are multiple images within one image, that are meant to be cut out and arranged in many different ways. The possibilities are practically endless, then when you add color, you add a whole different dimension. This stamp, called Tooling Around, debuted in the Spring Catalog this year. It is carrying over to the new Annual Catalog. With all the fresh new colors we'll have to play with, this stamp simply screams FUN!


Tuesday, April 11, 2023

The Best Way to Put Labels on Clear Mount Stamps

 This is my favorite way to put labels on my stamps. Thank you France Martin.


Step Up the Embossed Resist Card

 This is the same technique as the card we did in class, except there are 4 pieces of white instead of just one. The four pieces are adhered to the Starry Sky layer leaving a border, which really gives it a nice effect.

Materials:

Nature's Prints stamp set and dies

Cardstocks: Coastal Cabana, Basic White, Starry Sky

Ink Pads: Starry Sky, Pacific Point, Coastal Cabana, VersaMark

Gems

Embossing Buddy

Heat tool

White embossing powder

Blending brushes

Stampin' Dimensionals

Silver Twine


Preparation:

    • Coastal Cabana 8-1/2 x 5-1/2 score @ 4-1/4

    • Starry Sky 4-3/8 x 5-1/4

    • Basic White 4 x 5-1/4 for inside

    • Basic White 1-1/2 x 3 for greeting

    • Basic White 1-13/16 x 2-7/16 (cut 4)


Assemble Card:

  1. On white cardstock pieces, Rub embossing buddy over entire piece of cardstock.

  2. 1-13/16 x 2-7/16 (4) Basic White: stamp fern, flowers and splatters with Versamark ink pad

  3. Pour white embossing powder over stamped image, making sure everything's completely covered.

  4. Tap excess powder off.

  5. Heat powder with heat tool until it melts into a shiny cover. Let cool.

  6. Sponge/blending brush/dauber Starry Sky, Pacific Point, and Coastal Cabana, inks over the entire cardstock.

  7. Adhere stamped layers to 4-3/8 x 5-1/4 Starry Sky, then tie silver twine around in a knot.

  8. Adhere those layers to the Coastal Cabana card base.

  9. Stamp Greeting in Starry Sky on Basic White, then diecut, sponge around edges and adhere with dimensionals.

  10. Inside & Envy: 4 x 5-1/4 Basic White – stamp fern in Starry Sky ink, and sentiment in Pacific Point


April Stamping Class


Sunday, April 2, 2023

April Card Ministry


Materials:

  • Ocean Front Stamp Set

  • On the Horizon Stamp Set

  • Itty Bitty Birthdays Stamp Set

  • Horizon Dies

  • Stitched Rectangle Dies

  • Bark Embossing Folder

  • Christian Birthday Stamp Set

  • Ink Pads: Pear Pizzazz, Balmy Blue, Basic Gray, Crumb Cake, Soft Suede, Evening Evergreen, Sahara Sand.

  • Cardstocks: Basic White, Thick Basic White, Crumb Cake

  • Pebbles Enamel Dots

  • Stamping Mat

Preparation:

  • Thick Basic White card base 8-1/2 x 5-1/2 score @ 4-1/4

  • Basic White 4 x 5-1/4 (cut 2)

  • Sahara Sand 3-1/2 x 2

  • Basic White 1 x 3

Assemble Card:

  1. Emboss Basic White 4 x 5-1/4 and glue to card front

  2. Basic White 4 x 5-1/4 diecut 2nd from the largest Rectangle Die, then stamp the following with Stamping Mat underneath the cardstock:

    • towards the top stamp rectanglish sky in Balmy Blue ink

    • right below sky stamp ground touching sky in Pear Pizzazz ink (top is straight, bottom angled)

    • right below ground, stamp sand with hill on the left in Sahara Sand ink

    • on the left side of the sand, stamp rocks in Soft Suede ink

    • on the right side of the sand, stamp taller sea grass in Evening Evergreen ink

    • on top of the sand, on the left side, stamp two patches of sea grass in Pear Pizzazz ink so that the bottom of the sea grass touches the sand line

    • stamp sand splotches in Crumb Cake ink

  1. Diecut gate pieces from Sahara Sand cardstock, then stamp the wood grain stamp on top in Sahara Sand ink

  2. Inside stamp sentiment in Balmy Blue, rocks in Soft Suede and grasses in Evening Evergreen


Materials:

Art Gallery stamp set

Floral Gallery dies

Christian Birthdays stamp set

Cardstocks: Basic White, Soft Succulent, Mercury Glass

Ink Pads: Petal Pink, Blushing Bride, Mossy Meadow, Flirty Flamingo

Stylish Shapes Dies

Painted Texture embossing folder

Stamparatus

Sponge Daubers

Stampin' Dimensionals

Preparation:

  1. Thick Basic White 8-1/2 x 5-1/2 score @ 4-1/4

  2. Soft Succulent 4 x 5-1/4

  3. Basic White 3-7/8 x 5-1/8

  4. 3 x 3 Soft Succulent for circle diecut 2nd largest circle

  5. 2-3/4 x 3-1/4 Basic White for stamped and diecut flowers

  6. 1 x 3 Basic White for greeting

  7. Mercury Glass 5-1/4 x 1-1/4

Assemble Card:

  1. Adhere Soft Succulent layer to card base

  2. Emboss Whisper White 4 x 5-1/4 with Painted Texture folder, then adhere to Soft Succulent layer

  3. Circle diecut Soft Suculent 2nd to largest circle die.

  4. Glue Soft Succulent circle to card front bottom risght-ish section.

  5. Use tape to adhere Mercury Glass strip over center of circle.

  6. 2-3/4 x 3-1/4 Basic White place flower cluster stamp on Stamparatus and ink with Petal Pink ink, then use daubers to apply Blushing Bride ink on to berry-like portion and Mossy Meadow ink on the stem/leaves.

  7. Diecut floral image and adhere to circle with dimensionals

  8. Stamp Birthday in Soft Succulent ink on 1 x 3 White, then diecut. Adhere to card front with dimensionals.

  9. Stamp sentiment and flower on inside.


Materials:

  • Tech Support Stamp Set

  • Christian Birthday Stamp Set

  • Tailor Made Tags Dies

  • Waves of the Ocean Patterned Paper

  • Cardstocks: Basic White, Pacific Point, Night of Navy, Coastal Cabana

  • Inkpads: Coastal Cabana, Night of Navy, Bermuda Bay

  • Linen Thread


Preparation:

  • Pacific Point card base: 5-1/2 x 8-1/2 score @ 4-1/4

  • Patterned Paper: 4 x 5-1/4

  • Coastal Cabana 2-1/2 x 4

  • Night of Navy 1 x 3-1/2 cut at an angle

  • Bermuda Bay 1-7/8 x 2-1/8

  • Basic White 1-3/4 x 2

  • Basic White 1-1/2 x 3

  • Night of Navy scraps for tag reinforcement

  • Basic White 4 x 5-1/4

Assemble Card:

  1. Basic White 1-1/2 x 3 Diecut with the smallest tag diecut.

  2. Basic White 1-1/2 x 3 glue navy reinforcement over the hole, then stamp the card4u in Bermuda Bay ink. Tie Linen Thread into a bow through hole, and glue on the bottom portion of card front.

  3. Glue Patterned Paper to card base

  4. Coastal Cabana 2-1/2 x 4 stamp the 0's and 1's in Coastal Cabana ink beginning at the top and continuing to the bottom, creating a background (it's binary code that means "for you"). Glue to the card front about 1/2 inch from the right side.

  5. Cut Night of Navy strip at an angle on one end, then glue on top of the previous piece (stamped with 0's and 1's) about midway down from the top.

  6. Basic White 1-3/4 x 2 stamp Error text in Navy ink in the center, then use a sticky note to cover before stamping above and below in Bermuda Bay ink.

  7. Glue the error stamped white piece onto the Bermuda Bay 1-7/8 x 2-1/8 cardstock, then glue at an angle over the navy paper.

  8. Inside: Basic White 4 x 5-1/4 stamp sentiment in Navy ink and keyboard in Bermuda Bay.