background

Tuesday, December 21, 2021

Van Gogh Inspired

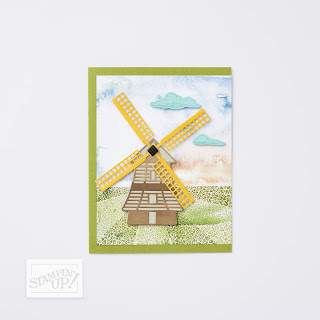
 While visiting my son this summer, he took me to the Van Gogh Interactive Art Exhibit. It was beyond anything I can describe, and the effects the experience left on me are lasting. This bundle was my first thought when placing my order in the New Mini Catalog. I had some ink smears on the second card, but was able to hide them with the tree and a couple extra clouds. Can you tell?

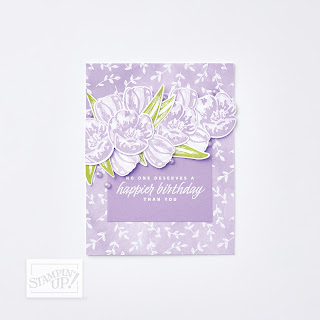
Flowering Tulips bundle


Monday, December 20, 2021

Abstract Beauty Suite

 Beginning on page 48 in the new Mini Catalog, you'll find the Abstract Beauty Suite.


Sweet Talk Suite

 For Valentines Day, the new Mini Catalog has the Sweet Talk Suite. You can find it beginning on page 8 of your catalog. Check out the cute treat holder on page 10.


Heart & Home Suite

Today I'm sharing more samples and inspirations from the new Mini Catalog. Below you'll find a technique video on using blending brushes, and some samples and a video showing the Heart & Home Suite. You can find it beginning on page 58 of your catalog.


Sunday, December 19, 2021

Flowering Fields Suite

 Such a fun different set of products! I was instantly drawn to the windmill. I've never had anything like it and I always love something new and different. Take a look at the short video below to see all the choices you have in this suite of Dutch inspired stamps, dies and papers. You can find this suite beginning on page 14 of your catalog. Oh, and take a look at the Flowering Rain Boots bundle on page 30. That would complement the Flowering Fields DSP.

How about a couple of samples? I've made a card copied from the cover of our catalog and some calendars which are such a fun gift. I have several family members and friends waiting for their annual calendars:) 


My card copied from the catalog cover

My latest calendars


Saturday, December 18, 2021

From the New Jan. - June Mini Catalog

This video shows the New Horizons Suite. The bundle and pebbles enamel shapes are amazing! But I'm sharing with you today is the New Horizons Designer Paper. In the samples below, I've used this gorgeous scene-building paper with the Grassy Grove bundle. This awesome paper is so much fun to use with both of these bundles. Take a look at the cards that are very similar, if you change the DSP it gives a subtle difference to the background. You'll find the New Horizons beginning on page 42 and the Grassy Grove bundle on page 47 of your catalog.


Wednesday, December 8, 2021

Monthly Stamping Class

This month's creations from Stamping Class.


Stamps

Beauty of Friendship, Art Gallery, In Your Words

Card Stock

Crumb Cake, Evening Evergreen, Merry Merlot, Soft Suede, Very Vanilla, Beauty of the Earth DSP

Ink

Early Espresso, Merry Merlot, Bumble Bee

Embellishments

In Color Jewels

Tools

Beautiful Trees dies, Bark Emb. Folder

  1. Crumb Cake card base: cut 8-1/2 x 5-1/2 score @ 4-1/4

  2. Evening Evergreen 4 x 5-1/4

  3. Merry Merlot 5 x 3-3/4 Emboss with the Brick & Mortar embossing folder.

  4. Die-cut the leaves out of the 3-3-1/2 DSP

  5. Die-cut the tree out of the 4-1/2 x 3-1/4 Soft Suede

  6. Adhere the tree and the leaves on top of the embossed card stock.

  7. Adhere to the Evening Evergreen cardstock then onto the Crumb Cake card base.

  8. Tear a strip off of a 1-1/2 x 4 piece of Soft Suede

  9. Stamp the greeting using Evening Evergreen ink.

  10. Adhere to the card front.

  11. Adhere 3 Gems onto the Soft Suede strip.

  12. Inside: Very Vanilla 5-1/4 x 4 stamp the tree trunk using Soft Suede ink and the leaves and greeting using Evening Evergreen ink.

Stamps

Artistically Inked

Card Stock

Expressions in Ink DSP

Ink

Evening Evergreen, Shaded Spruce

Embellishments

Gold Glitter Dots

Tools

Artistic Dies

  1. Card Base: Evening Evergreen 5-1/2 x 8-1/2 score at 4-1/4

  2. Cut one of the floral die cuts from the Artistic Dies in 4 x 4-1/2 Gold Foil

  3. Adhere this to the card using the Fine Tip Glue Pen. Position it so that about 2/3 of the die will be showing.

  4. Add a 2 x 5-1/4 strip of the DSP.

  5. Cut a ½ x 5-1/4 strip of Shaded Spruce cardstock and adhere that over the join of the DSP and card front.

  6. Stamp the greeting from Artistically Inked stamp set in black ink onto a strip of white cardstock. Cut slanted ends.

  7. Cut a Evening Evergreen piece 1/4 longer and 3/4 wide. Adhere the sentiment piece onto this, leaving a bit at the bottom and equal amounts each end

  8. Adhere this combined sentiment piece to the card using Stampin' Dimensionals.

  9. Add some Gilded Gems to finish the card.


Stamps

Prized Peony, Art Gallery

Paper

Ever Eden DSP, Soft Succulent, Basic White, Gold Foil, Crushed Curry

Ink

Evening Evergreen, Soft Succulent

Embellishments


Tools

Eden Dies, Peony Dies

  1. Basic White card base: cut 8-1/2 x 5-1/2 score at 4-1/4

  2. DSP 4 x 5-1/4

  3. Die-cut border from 4 x 5-1/4 Soft Succulent

  4. Die-cut sentiment banner from Basic White

  5. Die-cut leaves from Gold Foil

  6. Die-cut peony from Basic White and center from Crushed Curry


Tuesday, December 7, 2021

FREE Shipping


ORDERING INFORMATION:


  • Free shipping applies after the qualifying amount (per market) has been met.

  • The minimum qualifying amount to receive free shipping is $50 USD / $65 CAD or more (before tax).

  • Free shipping only applies during the 24-hour period the promotion is live in each market; this means that the order must be opened and closed on 8 December.

  • With the exception of month-to-month Paper Pumpkin subscriptions, all Stampin’ Up! products qualify for the promotion.

  • Prepaid Paper Pumpkin subscriptions are eligible for FREE shipping under the same rules as all other Stampin’ Up! items during the promotion.

  • Month-to-month Paper Pumpkin subscriptions are NOT eligible for free shipping. Subscriptions billed and shipped this month will be charged for the normal amount ($22 USD / $30 CAD shipping included) + tax.


Thursday, November 25, 2021

Christmas Card on Turkey Day

 My back is better! Yay!! Sooooo I'm back at it! Before I began work in the kitchen today, I made another Christmas Card. This is a Z fold using the Sparkle of the Season bundle and the Painted Prints DSP.


Stamps

Sparkle of the Season

Card Stock

Evening Evergreen, Cherry Cobbler, Basic White, Painted Christmas DSP

Ink

Cherry Cobbler, Evening Evergreen, Soft Succulent

Tools

Seasonal Swirls Dies


All measurements in inches

  1. Card Base: Evening Evergreen 4-1/4: x 11” scored at 5-1/2 and 2-3/4
    folded as shown

  2. Designer Series Paper: 3-1/4 x 2-1/4 for front and 3-3/4 x 2-3/4 for inside

  3. Basic White:                   4 x 5-1/4 for inside

          • 2-1/2 x 3-1/2 on Cherry Cobbler front flap

          • 2-1/2 x 4 front of card base

          • 1/2 x 3-1/2 for greeting

  1. Cherry Cobbler: 3-3/4 x 2-3/4 for front flap

  2. Use the holly wreath die to cut out one from Evening Evergreen and one from Soft Succulent both 4 x 4

  3. Diecut cherry cobbler holly berries

  4. Stamp “Merry Christmas” with Cherry Cobbler ink onto the Basic White strip.  Flag the ends or cut one end on an angle. 

  5. Lay the Evening Evergreen card base horizontally with the two scores to the left hand side.

  6. Adhere the 4 x 5-1/4 piece of Basic White cardstock to the right side of the Evening Evergreen card base, the side with no scoring. 

  7. Adhere the 3-3/4 x 2-3/4 piece of DSP to the far right of the basic white inside

  8. Layer the piece of 2-1/2 x 3-1/2 Basic White onto the Cherry Cobbler for the front flap.

  9. Layer the 2-1/4 x 3-3/4 DSP onto the 2-1/2 x 4 Basic White for the left side of Evening Evergreen card base front. The score line/fold should be next to this

  10. Using adhesive on only the left hand side of the Cherry Cobbler piece, adhere to the very front of the card when it is folded as shown.

  11. Layer both wreaths on top of each other & adhere to the left side of the front. 

  12. Use Stampin’ dimensionals to adhere the Merry Christmas banner

  13. Add the diecut holly berries with glue.

Saturday, November 20, 2021

Last Chance for July- Dec. Mini Catalog


The July–December 2021 Mini Catalog will be retiring soon! It’s always bittersweet to see a classic Stampin’ Up! catalog take a trip to retirement. But, we’re looking forward to all the new products on their way—and we hope you are, too!

Stock up on your favorite products before they’re gone for good! Save up to 50% on essential craft supplies. What are you waiting for? Start shopping! After all, this selection of Last Chance Products is only available while supplies last.

SALES PERIOD 

  • Starts: 1 December 2021 at 12:00 AM (MT)

  • Ends: 3 January 2022 at 11:50 PM (MT)


Tuesday, November 16, 2021

Last Christmas Card This Season

 I think this is my last Christmas Card this season. My back has me waaaay out of commission, so a scaled back Christmas card list will sadly become reality this year.

Paper

Basic White Thick, Crumb Cake, Garden Green, Soft Succulent, Painted Christmas DSP

Ink

Real Red, Soft Suede, Real Red Stampin' Blend marker

Embellishments

White Crinkled Seam Binding

Tools

Seasonal Swirls Dies, Poinsettia Dies, Forever Flourishing Dies, 2-1/2” Circle Punch

  1. Basic White card base: cut 8-1/2 x 5-1/2 score at 4-1/4

  2. 3-3/4 x 5-1/4 DSP

  3. Two 1/2 x 5-1/4 strips of coordinating DSP – adhere strips behind each side of the larger DSP

  4. Diecut Christmas wreath from Garden Green 3-1/4 x 3-1/4

  5. Punch circle from 3 x 3-1/4 Basic White, adhere wreath on top

  6. Stamp two pinecones in 1 x 1 Soft Suede on Crumb Cake cs then diecut

  7. Basic White Banner 1/2 x 3-1/4 stamp greeting in red ink

  8. Diecut two berry clusters from Poinsettia Dies 2 x 4-1/4 Real Red

  9. Diecut two leaf clusters 3 x 2-3/4 Soft Succulent from Forever Flourishing dies

  10. Color 9” of ribbon with Stampin' Blend, then tie in bow


Seasonal Sale

Seasonal Sale

Fold, snip, layer, and stamp! During the Seasonal Sale, you can stock up and save 10% on cardstock, 15% on ink pads, and 20% on dies.  Click Here for Sale Flyer

PROMOTION PERIOD: 16–18 NOVEMBER 2021

  • The sale will run for three days only.

  • The discount includes 10% off cardstock, 15% off ink pads (excluding ink pad bundles and third-party pads), and 20% off dies.

  • The discount applies to products featured in the 2021–2022 Annual Catalog only. Products from the July–December 2021 Mini Catalog are not included.

  • Please note that items available vary by market based on shipping constraints and product availability.


Saturday, November 13, 2021

Booze Boxes

 I just love these stocking stuffers! I learned how to make them from fellow Demo, Deseree Krumm.

Here are my directions: 

https://app.box.com/s/fj12wafp6twk3l6e2h93gbkz0ow04ya8

Deseree has a video if you'd like to see it here, although her measurements are different than mine because we used different types of mini bottles.

https://www.desereesdoodles.com/my-blog/2021/11/boxes-based-on-beverage.html


Thursday, October 7, 2021

Nature's Harvest

 I just love coneflowers, so I was so happy to see this stamp set in the Fall Holiday Catalog. With the bundle I got more dies of flower silhouettes which are so fun to use. The cork paper is amazing, I love the look and feel of it. It gives such a nice texture to a card. I'm going to have to order some more! I stamped the coneflowers in Memento Tuxedo Black ink and colored with Stampin' Blends. Cardstock colors are listed below each image. In the fourth sample, I used Pearls which I colored with a Bronze Stampin' Blend. In the fifth sample, I stamped the coneflower image in Blackberry Bliss ink on the Cork paper. Because the cork is so dense, the ink will NOT dry unless you heat set it.

Rich Razzleberry, Early Espresso, Basic White, Blackberry Beauty DSP

Highland Heather, Basic White, Crumb Cake, Granny Apple Green

Soft Succulent, Crumb Cake, Basic White, Misty Moonlight, Harvest Meadow DSP, Fine Art Ribbon  

Thick Basic White, Merry Merlot, Gray Granite, Bumblebee, Brushed Copper Foil

Rich Razzleberry, Basic White, Cork Paper, Petal Pink, Gold Foil, Genial Gems 

Thick Basic White, Opal rounds


Product List

Thursday, September 30, 2021

Blackberry Beauty Bliss!!

  I sure do love this Designer Series Paper!!! The colors are some of my favorites, plus the ephemera pack makes it so much fun to create card. If you are one of my customers, you receive a FREE tutorial for the first two cards.


Mosaic Card

  1. To make the mosaic cards, cut cardstock to 4 x 5-1/4, cover with adhesive sheet. 
  2. Use scraps of DSP to cover the adhesive, leaving spaces in between.
  3. Apply gold emboss powder to all the exposed adhesive, then set with heat tool.

Flip Flap Card


  1. Card base: 8-1/2 x 5-1/5 score @4-1/4 cardstock A. Do not attach the next cardstock and DSP layers until after you attach Flap #1

  • 4-1/8 x 5-1/8 cardstock B

  • 4 x 5-1/4 DSP

  1. Flap #1: cardstock B 6-1/2 x 3 score 1 inch from end, flag the other end, then adhere to top of card base

    • DSP to cover flap 2-7/8 x 4-1/8 flag ends

      • Square on top of Flap cardstock A: 3-1/4 x 2-3/4

      • cardstock B: 3-1/8 x 2-5/8

      • DSP: 3 x 2-1/2

    Attach DSP and cardstock layers from first step, they will overlap the Flap.

  1. Flap #2: cardstock B 8-1/8 x 3 score in half at 4-1/16. Adhere folded flap to the DSP on card front, lining up with the left hand side.

  2. Inside: Basic White 4 x 5-1/4


Product List