background

Sunday, February 27, 2022

Calming Camellia

 The Calming Camellia stamp set from the SALE-A-BRATION catalog is so lovely. You can earn it as a host set with any party or personal order of $300 or more. I have tried some different techniques on these two cards that you will love.

On this card, I stamped the floral image in Night of Navy ink onto Balmy Blue cardstock. I then colored the image with watercolor pencils and used a Blender Pen (p. 129 in the annual catalog) to apply just enough moisture to activate the watercolor pencils. I used white, Daffodil Delight, Granny Apple Green and Old Olive pencils. Such a fun technique and so easy too.

Stamps

Calming Camellia, Very Versailles

Paper

Night of Navy, Balmy Blue, Silver Foil, Basic White

Ink

Night of Navy, Balmy Blue

Embellishments

Glittered Organdy Ribbon, Watercolor Pencils

Tools

Tasteful Labels Dies, Blender Pen
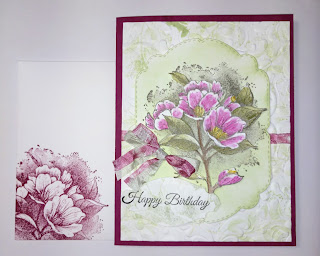

On the card below, I used the same technique with the Watercolor Pencils and Blender Pen AND did something fun with the White Crinkled Seam Binding Ribbon. I used two pieces of ribbon to make a double bow. On the first piece of ribbon, I used the dark Soft Seafoam Stampin' Blend marker to color the ribbon. It's so simple, you just use the brush end of the marker and run in over the ribbon one time on one side and voila, you have a ribbon of any color you like! For the other piece of ribbon, I stamped it! that's right, I used the leaf stamp in the set with Rich Razzleberry ink and stamped the ribbon for a patterned effect. I allowed it to dry for a few minutes and it was ready to go.  

On the white panel, I used the leaf stamp with Soft Seafoam ink (stamped off) to make a random pattern on the cardstock. Then I embossed with the Parisian Flourish embossing folder. 

The next layer is a diecut from the Celebration Labels Dies. I used a Blending Brush to apply some Soft Seafoam ink. The image was stamped in Basic Gray ink. 

I stamped the floral image on a second piece of Basic White cardstock and used Watercolor Pencils and a Blender Pen. I fussy cut the image and popped it up with Stampin' Dimensionals over the floral image on the Celebration Label. 

I really love how this card turned out, it's for my Sister In Law's birthday.

Stamps

Calming Camellia

Paper

Rich Razzleberry, Basic White

Ink

Soft Seafoam, Basic Gray, Rich Razzleberry, Memento Tuxedo Black. Dark Soft Seafoam Stampin' Blend marker

Embellishments

Crinkled Seam Binding Ribbon, Watercolor Pencils, Blender Pen, Stampin' Dimensionals

Tools

Parisian Flourish embossing folder


Friday, February 25, 2022

Stamping Class

Hidden Pop Up


Stamps

Pansy Patch

Card Stock

Thick Basic White, Soft Succulent, Basic White, Daffodil Delight, Pansy Petals DSP

Ink

Soft Succulent, Gorgeous Grape, Freesia, Pale Papaya,

Embellishments

Freesia Open Weave Ribbon

Tools

Pansy Dies, Hole Punch

(All measurements in inches)

Thick Basic White Card Base:

  • 5-1/4 x 9-5/8

  • long side across the top score @ 5-1/2 and 5-5/8

  • short side across the top score @ 3/8 and 1/2

  • rotate 180° then score the same way on the other side

  • trim off corners at the top


Score lines are shown in red dashes, the blue slashed lines indicate where you are to cut away. Notice the corners at the top are cut away as well. Reinforce all score lines with bone folder

Soft Succulent:

  • 3-3/4 x 3-3/4 for front of card

  • 3-3/4 x 4-1/4 score @ 1/2” on long side

  • 3-3/4 x 5-1/2 score @ 1/2” on long side

mechanism to allow for pop up:

  • 1-1/2 x 3-1/4 score @ 7/16, 1/2, 1”. In photo below the score lines are highlighted in blue pencil


  • rotate 180ยบ and score @ 1/2.” In photo above the score lines are highlighted in blue pencil

  • on score board, score at eight inch intervals between the 1/2” score line on one end and the third score line on the other as shown in the photo above.

Designer Series Paper:

  • 3-1/2 x 3-1/2 cut two

  • 2-1/4 x 5-1/2 envelope flap

Basic White cardstock:

  • cut two panels from Nature's Thoughts die 3-1/4 x 4-3/4

Diecuts etc:

  • window sheet 1/2 x 4-3/4

  • Basic White: two pansies, four petals, and one bell flower-both pieces

  • Gorgeous Grape: 1 x 1 one center beard

  • Fresh Freesia: 2-1/4 x 5-1/2 one pansy, two petals and two center beards


  • Daffodil Delight: 1-1/4 x 3/4 yellow centers


  • Soft Succulent: 4-3/4 x 2-1/4 one stem, two small and three large leaves


ALL PIECES NEEDED:


Friday, February 18, 2022

Windmill Art House

 Boy is there a story behind this creation. Fellow Demo, Jo Blackmon made one from a tutorial created by Alexandra Morein. Like Alexandra, Jo made a photo book for the drawer and photo sleeves that attach under the roof panels. I loved how Jo used the Tulip Fields dies and Flowering Fields DSP, but I keep thinking of what else I could use the house for besides photos? I have been lucky enough to grow up with a wonderful sister-in-law. She patiently encouraged me in developing my artistic nature despite the fact that ADHD made art difficult for me as a child. Barb, an art teacher and artist, married my big brother when I was 10, and was the best big sister! She introduced me to rubber stamp art many years ago as onset of adulthood lessened my ADHD symptoms. When I began painting, she encouraged me as always with gentle suggestions for improvement. All this lead me to think I would like to my windmill building into an Art House.

The storage compartment behind the windmill holds my drawing pencils and an eraser. The drawer holds a sketch book I got from Barb and covered with the tulip paper. The roof panels open to reveal two small paintings.


Scene Bulding

If you haven't given scene building a try, you must do so! It really is easy and soooo much fun! The first card was made with the Grassy Grove bundle and the New Horizons Designer Series paper.  The card base is Evening Evergreen, with the forest diecut twice from Night of Navy and Misty Moonlight cardstocks. By layering them, offset a bit, it really gives depth to the card, as does the placement of the deer; one behind the trees and two out in front. The sentiment was stamped in Night of Navy ink onto a part of the DSP cut off of the background, then punched with the Washi Label punch. Night of Navy Baker's Twine adds a bit of posh to the card.

The SALE-A-BRATION  stamp set Driving By, has a VW van in it that instantly reminded me of the one my big brother had when he was in college. I made this card for him, coloring the van in the same color as his. I used Blending Brushes to create sky in Balmy Blue, the lake in Misty Moonlight and the beach in Crumb Cake. I stamped grasses from the On The Horizon bundle in Old Olive and diecut more grass from Evening Evergreen. The gates were diecut from the wood pattern of In Good Taste DSP. The mountains were diecut from Evening Evergreen, Basic White and Soft Suede, while the birds were stamped in Basic Gray ink. The piรจce de rรฉsistance, in my point of view, is the application of enamel pebbles! Tre` realistic!!


Thursday, February 17, 2022

Corner Fold Tuck Card

I have a fun fold tutorial for you today. I used the Free As A Bird Stamp set and Flowering Fields Designer Series Paper to create this Corner Fold Tuck.


  1. Card base: Fresh Freesia 8 x 4-1/4 score @ 2-1/2

  2. Flowering Fields DSP 3 x 3 cut on paper trimmer from corner to corner. Use one triangle, glue to a triangle of cardstock; 3 x 3 cardstock (cut the same way), then adhere to top right of card base with Stampin' Dimensionals.

  3. DSP 1 x 4 adhere to left front flap, then tie ribbon around flap and secure into a knot.

  4. Stamped front panel: 3 x 3 Basic White, secured on the left side to the front flap so that the top right corner fits under the triangle.

  5. Inside: 2-3/4 x 2-3/4 Basic White, line up with the stamped front panel and secure to the inside panel, behind the front stamped panel.

  6. If coloring the stamped front panel with Stampin' Blends, it will bleed through, so you can cover it with DSP.


Wednesday, February 16, 2022

Art House

 Most people use 3D constructions to hold pictures, of course I have to be different. My building/house is for art. I have two small paintings under the roof flaps and instead of a mini photo album in the drawer, I made a sketch pad. I love Stampin' Up's Tulip Fields bundle and coordinating designer series paper.


Friday, February 4, 2022

Scene Building

 There are some amazing new scene building stamps in the January to June mini catalog. I had a play with some today to create this card. I used the oceanfront stamp set and on the horizon bundle.


Mountain Air Fun Fold

 Mountain Air is such a great stamp set for masculine cards. It can be found in our Annual Catalog on page 16.


Stamps

Mountain Air, (Approaching Perfection and Beautiful Friendship [retired])

Paper

Evening Evergreen, Basic White

Ink

Evening Evergreen, Gray Granite

Embellishments

Linen Thread

Tools

Mountain Dies

  1. Card Base: Evening Evergreen 4-1/8 x 11-1/12, Score in half and cut 2" off card front, to be used as flap

  2. The cut off flap needs to be scored to adhere to back of card base. Score @1/2” on one short side.

  3. Adhere the flap to the right side of the back of the card base, about ½ inch from the edge.

  4. Outside left card front: Basic White 3-1/4 x 4. Stamp greeting in Evening Evergreen, mountains and moon in Gray Granite. Adhere to card front.

  5. Diecut one tree and adhere to 1-3/4 x 3-1/2 Basic White. Wrap Linen Thread around bottom and tie in a bow. Then adhere to the front of the flap.

  6. Inside piece of Basic White 4 x 5-1/4, stamped with trees and greeting. I added the moon and birds to cover up ink splotches.

  7. Stamp trees on envelope


Thursday, February 3, 2022

Delft Inspired Center Step Card

 I collect Delft and blue and white porcelain, so this Designer Series Paper is the Bomb for me! This fun fold is called a Center Step card and the tutorial to make it is below.


Stamps

Tulip Fields Bundle

Paper

Night of Navy, Basic White, In Good Taste Designer Series Paper

Ink

Night of Navy

Embellishments

sequins

Tools

Tasteful Textile embossing folder, Tasteful Labels Dies

  1. Use Trimmer and 4-1/4 x 11 card stock for card base. You want to cut one inch from each side. To do this: place your cardstock in the trimmer lengthwise, with the 4-1/4 side across the top; the left edge of the card should be lined up at 3-1/4. Use the measurements on the cutting arm, cut from 4-1/2 to 10. Then with the left side on 1 inch, use measurements on the cutting arm, cut from 4-1/2 to 10 again.

  2. Use the diagram below and score along the dotted lines – on the center strip at 5 1/2″ and along the two outer strips at 1,″ 2,″ and 6 1/2.”

  3. For the large stamped section cut desired color cardstock to 1-7/8 x 4 1/4 then stamp

  4. Adhere the two strips of 3/4 x 4-1/2 Designer Series Paper to the outer sides of the card base

  5. Attach a 7/8 x 4-1/8 strip of any color cardstock or Designer Series Paper along the bottom front.

  6. Adhere 2 x 4-3/8 piece to center portion of card front. This can be stamped or embossed.

  7. For the inside cut 4 x 4-1/4 Vanilla or Basic White


Beachy Breezes

 When you look at what I've been creating lately, you'd think I had the beach on my mind. Actually, I don't mind South Carolina winters a bit. I do adore the beach though!

The first card uses the SALE-A-BRA-TIONS stamp set called Island Vibes, but I couldn't stop there I had to pull in other beachy products from our catalogs!

Stamps

Island Vibes, Oceanfront, On the Horizons, Friends Are Like Seashells

Paper

Thick Basic White, Evening Green

Ink

Balmy Blue, Pool Party, Evening Evergreen, So Saffron, Petal Pink, Basic Gray, Crumb Cake, Seaside Spray (retired)

Embellishments

Faux Seaglass Shapes, Wink of Stella Clear, Stampin Dimensionals

Tools

Seashells embossing folder


Stamps

Oceanfront

Paper

Pool Party, Balmy Blue, Basic White, In Good Taste DSP

Ink

Pool Party, Balmy Blue, Mossy Meadow, Crumb Cake, Basic Gray

Embellishments

Faux Seaglass Shapes

Tools

Horizon Dies