background

Thursday, March 31, 2022

Tags Tags and More Tags

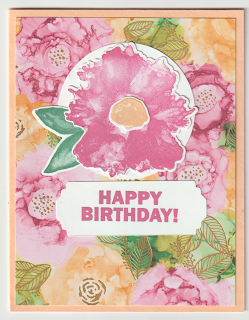
 I just got the Tailor Made Tags die set and wow! I can see hundreds of possibilities for using them. What a versatile purchase for only $22. Here are my first two cards using them but I have so many ideas buzzing around in my head, I'll be making more:)


Stamps

Free As A Bird, Very Versailles

Paper

Polished Pink, Very Vanilla, Crumb Cake, Pale Papaya, Pear Pizzazz, Layering Designs Vellum, Vellum Cardstock

Ink

Polished Pink, Pale Papaya, Crumb Cake, Rich Razzleberry

Embellishments

Polished Pink Open Weave Ribbon, Linen Thread, Gold Fine Art Ribbon, Very Vanilla Scalloped Lace Trim

Tools

Stampin' Blends Markers, Tailor Made Tags, Forever Flourishing Dies, Stitched Rectangles Dies


Stamps

Free As A Bird,

Paper

Soft Succulent, Basic White, Crumb Cake, Harvest Meadow DSP, Layering Designs Vellum, Vellum Cardstock

Ink

Tuxedo Black, Borgeous Grape, Highland Grape, Pale Papaya

Embellishments

Gorgeous Grape Mini Stripped Ribbon, Linen Thread, Gold Fine Art Ribbon, Very Vanilla Scalloped Lace Trim

Tools

Stampin' Blends Markers, Tailor Made Tags, Forever Flourishing Dies, Stitched Rectangles Dies


Friday, March 25, 2022

Bespoke Card Set Box

 I saw a box like this last week in a store. I thought it would make a great box for a set of cards. I came home, sketched a couple of views, then began playing with a ruler to assign measurements to each part. From there I made a prototype out of cardstock, and used scotch tape to secure the pieces together. With a few adjustments, I made a box! I love it when a plan comes together! This box was covered with the Simply Elegant Designer Series Paper.

I'm having a class in a couple weeks for friends/customers to make one of their own. Then a few of use will get together this summer and fall to make a few to sell at our church mission fundraiser. 


                                                              cardstock prototype

Thursday, March 24, 2022

Last Chance Products


The 2021–2022 Annual Catalog will be retiring soon! It’s always bittersweet to see a classic Stampin’ Up! catalog take a trip to retirement. But, we’re looking forward to all the new products on their way—and we hope you are, too!

Stock up on your favorite products before they’re gone for good! Save up to 50% on essential craft supplies. What are you waiting for? Start shopping! After all, this selection of Last Chance Products is only available while supplies last.

There is a Last Chance Products category in my online store where you can browse the retiring products and discounts using any device, anywhere. Simply click on the Order Stampin' Up! Online button at the right. OR Click Here for a short cut.

DETAILS

  • Discounts are not always available with the Retiring List. When they are, they will vary from one market to another depending on product performance.

  • All products are available while supplies last, and there are no purchase limits.

  • Stamp Sets are not guaranteed during this promotion and are while supplies last.


Monday, March 21, 2022

Card Set Gift

 I learned how to make this fun fold from fellow Canadian Demo, Mary Anne Cowan. I used the Elegantly Said Stamp set and coordinating Designer Series Paper which can be found on page 68 in the annual catalog. Four cards and envelopes packaged in an acetate box make a lovely gift!


Materials

Acetate Box p. 137 annual catalog

Ribbon

Linen thread

Pearls

Tag Punch or Tailor Made Tags Dies

Designer Series Paper

Cardstock

Vellum

Layered Circle Dies

Layered Squares Dies

Measurements:

  • Cardstock card base 5-1/2 x 11 scored at 1-1/4, 3-3/8, 7-5/8, 9-3/4

  • Cardstock for Belly Band 1 x 9-3/4

  • DSP 1-7/8 x 5-1/4 (2)

  • DSP 1 x 5-1/4 (2)

Belly Band Decor:

Square/Diamond

  • Vellum 2-1/2 x 2-1/2

  • Cardstock 2-1/4 x 2-1/4

  • Stamped layer 2 x 2

Circle

  • Vellum 3-1/4 x 3-1/4 use #7 Scalloped Circle Die

  • Stamped Layer 3 x 3 use #6 Circle Die

Envelope Flap Decor

DSP 6 x 2-3/8 adhere to envelope flap, then trim with scissors


Thursday, March 17, 2022

Florals

I simply adore flowers. I can not get enough of them, in real life, in stamping or on my canvases. I just hung another giant oriental poppy in the master bedroom. It hangs next to another giant poppy, making a pair of colorful florals inside the room. When we look out the window, we can see two large flower beds. 


Stamps

Prized Peony

Paper

Gray Granite, Basic White Thick

Ink

Gray Granite

Embellishments

Gray Granite Shimmer Ribbon

Tools

Parisian Flourish Embossing Folder, Peony Dies, Layering Squares Dies


Stamps

Art Gallery

Paper

Smoky Slate, Basic White, Basic Black

Ink

Real Red, Cherry Cobbler, Memento Tuxedo Black, VersaMark

Embellishments

Gray Granite Shimmer Ribbon, Simply Elegant Trim, White Emboss Powder

Tools

Floral Gallery Dies, Painted Texture Embossing Folder, Heat Tool


Stamps

Art Gallery

Paper

Basic Gray, Basic White, Flirty Flamingo, Gold Foil

Ink

Basic Gray, Smoky Slate, Poppy Parade, Flirty Flamingo, Old Olive, Cherry Cobbler, Memento Tuxedo Black

Embellishments

Gold Fine Art Ribbon, Genial Gems

Tools

Floral Gallery Dies, Basic Borders Dies, Poppy Moments Dies (leaves)


Gardening on Paper

Another card featuring Plentiful Plants. Our "False Spring" was interrupted this weekend with "Second Winter." The hard freeze zapped many of the flowers that were blooming. Stamping flowers and plants kind of makes up for the loss of our spring pretties.


Stamps

Plentiful Plants

Paper

Blackberry Bliss, Cinnamon Cider, Basic White

Ink

Blackberry Bliss, Cinnamon Cider, Old Olive, Garden Green, Mossy Meadow

Embellishments

Stampin Dimensionals

Tools

Perfect Plants Dies, Painted Texture Embossing Folder


Monday, March 14, 2022

Plenty of Plants

 I've been playing with the Plentiful Plants bundle. It is a type of scene building, as you are 'building' plant parts and different pots or a hanger. Then there is the coordinating Designer Series Paper, Bloom Where You're Planted. I bought the entire suite of products, the stamps, dies, DSP, and Paper Lattice. I do not have a green thumb, in fact I have a black thumb, but with this delightful suite of products, I can be a garden designer!


Stamps

Plentiful Plants

Paper

Basic White Thick, Crushed Curry, Sahara Sand, Bloom Where You're Planted DSP

Ink

Old Olive, Cinnamon Cider, Memento Tuxedo Black, Shaded Spruce

Embellishments

Linen Thread

Tools

Perfect Plants Dies, Sponges, Sponge Daubers, Layering Squares Dies (retired)


Stamps

Plentiful Plants

Paper

Basic White Thick,  Bloom Where You're Planted DSP

Ink

Old Olive, Pear Pizzazz, Balmy Blue, Misty Moonlight

Embellishments

Opal Rounds, White Baker's Twine, 

Tools

Perfect Plants Dies, Sponge Daubers, Blending Brushes, Stitched Rectangle Dies, Foam Adhesive Strips, Water Painters

Bumble Bee Trinkets or Brushed Brass Butterflies would be great for the closure and they are in stock. The Macrame Embossing Folder would be awesome on this card, but I don't have it... wah!


Stamps

Plentiful Plants

Paper

Basic White,  Sahara Sand, Bloom Where You're Planted DSP, Vellum Layering Designs, Rococo Rose (retired)

Ink

Old Olive, Cinnamon Cider, Shaded Spruce, Rococo Rose (retired)

Embellishments

Basic Jewels Pearls, Stampin' Dimensionals, Tropical Oasis Trinkets (retired)

Tools

Perfect Plants Dies, Stitched Rectangles Dies, Layering Circles Dies, Basic Borders Dies, Coastal Weave Embossing Folder (retired), Glue Dots to attach half of the brass trinket - the other half is for the flap to fold under.


Monday, March 7, 2022

Large Card Collection Box

  Large Card Collection Box

I've made many types of card set holders over the years and occasionally given larger collections of cards in a gift basket. I think this is the first time I've made a box to hold 25-35 cards and envelopes. I'm giving it to a friend at church is so faithfully sends out cards to many people. I know she will use these, so I'm blessed to be able to assist her in blessing others.

The box is made of black chip board and covered with Designer Series Paper. I chose Daffodil Afternoons from our recent SALE-A-BRATION catalog. The colors are cheerful and I feel sure that my friend will love the happy flowers. On the front, I adhered a brass charm that I found in my stash of things. You know, I think I may have gotten it in the late 90's at an Atlanta Paper Arts Convention. Inside I cut dividers from cardstock and used my Envelope Punch Board to create tabs. 

To make the box, I cut chip board to the sizes listed below and attached them together with construction strips. These are one inch strips of cardstock scored in half with Tear & Tape. If you've never made these before, I found a video that shows how it's done. https://youtu.be/IGlXwMAr_mc


Chipboard Box

Box:

6-1/4 x 5-1/4

(cut 2) 6-1/4 x 5-1/4

(cut 2) 5-1/4 x 5-1/4

Lid:

6-3/8 x 5-3/8

(cut 2) 6-3/8 x 1-1/2

(cut 2) 5-3/8 x 1-1/2

Designer Series Paper

Box:

(cut 2) 6-1/8 x 5-1/8

(cut 2) 5-1/8 x 5-1/8

Lid:

6-1/4 x 5-1/4

(cut 2) 6-1/4 x 1-3/8

(cut 2) 5-1/4 x 1-3/8


Cardstock Dividers:

6-1/8 x 5-1/4

Notch the top (long side) with Envelope Punch Board


Several Sympathy Cards

 I've been making bunches of sympathy cards for my stash, as there seems to always be just a few in there. 

Stamps

Positive Thoughts

Paper

Basic Gray, Basic White, Vellum Layering Designs

Ink

Gorgeous Grape, Basic Gray, Pear Pizzazz, Blushing Bride

Embellishments

Stampin' Dimensionals

Tools

Nature's Thoughts Dies, Stamparatus, Sponge Daubers


All the card below use the same stamp set, technique and colors.
 I do love using Stampin' Blends to color, but when making a dozen of the same card, I wanted to do something different, that was a bit quicker. So I got out my Stamparatus and Stamp Daubers to make a quick go of adding color to this beautiful stamped image. I began by placing Shimmery White cardstock on my Stamparatus, and stamped the Peony in Petal Pink ink. Then I used Sponge Daubers to apply Flirty Flamingo to a few places on the flower and bud. Next, I daubed Pear Pizzazz on the leaves, and finally Mossy Meadow on a few places of the leaves. I did not have to clean the stamp after each color addition and I did do a second application of Flirty Flamingo to get a deeper color. Quick and easy and oh so pretty! 

I created the 'frames' with the Stitched Rectangle Dies, then used the Tasteful Textile Embossing Folder. 

Stamps

Prized Peony, Very Versailles

Paper

Basic White, Petal Pink, Crumb Cake, Flirty Flamingo, Pale Papaya, Shimmery White,  Daffodil Afternoons (SAB)

Ink

Petal Pink, Flirty Flamingo, Crumb Cake, Pear Pizzazz, Mossy Meadow

Embellishments

Expressions In Ink Emphera, Square Vellum Doilies (retired)

Tools

Peony Dies, Tasteful Textile Embossing Folder, Stitched Rectangle Dies, Tasteful Labels Dies, Stamparatus, Sponge Daubers

The background text is from the Very Versailles stamp set, and the leaves on this card were done in Crumb Cake.


Tuesday, March 1, 2022

Card Ministry

 These are the cards we're creating for March. Our staff sends out birthday cards to the seniors in the congregation. We also keep a supply of thank you, sympathy and thinking of you for them to use.


Stamps

Wildlife Wonder

Card Stock

Evening Evergreen, Basic White, New Horizons Designer Paper,

Ink

Evening Evergreen, Basic Gray, Memento Tuxedo Black

Embellishments

Stampin' Dimensionals

Tools


  1. Evening Evergreen card base 8-1/2 x 5-1/2 score @ 4-1/4

  2. DSP 4-1/8 x 5-3/8 stamp greeting and shadow/grass in Evening Evergreen ink

  3. Basic White 2-3/4 x 3-3/4Stamp bear in Memento Tuxedo Black then ors

  4. Adhere bear to card front with Stampin' Dimensionals

  5. Inside, stamp wolf on inside with Basic Gray ink, plant in Evergreen ink


Stamps

Forever Fern, In Your Words

Card Stock

Just Jade, Pretty Peacock, Basic White

Ink

Pretty Peacock, Evening Evergreen, Pear Pizzazz

Embellishments


Tools

Forever Flourishing Dies, Story Label Punch

  1. Just Jade card base: 8-1/2 x 5-1/2 score @ 4-1/4

  2. DSP (multicolor greenery pattern) 4 x 5-1/4

  3. Pretty Peacock 2-3/4 x 4

  4. DSP (squiggly lines pattern) 2-1/2 x 3-3/4

  5. Basic White 2-1/4 x 3-1/4 stamp taller/full greenery in Pear Pizzazz ink then diecut

  6. Basic White 1-1/2 x 2-1/2 stamp cluster of berries in Pretty Peacock ink then diecut

  7. Basic White 2 x 3-1/2 stamp greeting in Evening Evergreen ink, small leaf cluster in Pear Pizzazz ink, then use punch to cut shape

  8. Inside 4 x 5-1/4 Basic White, stamp sentiment and any two greenery in Pear Pizzazz and Pretty Peacock ink


Stamps

Artistically Inked, Approaching Perfection

Card Stock

Pale Papaya, Basic White, Expressions in Ink Designer Paper

Ink

Pale Papaya, Polished Pink, Just Jade

Embellishments


Tools

2-1/2” Circle Punch, Lovely Labels Punch, Artistic Dies

  1. Pale Papaya Card Base: 5-1/2 X 8-1/2 score at 4-1/4

  2. Basic White 3-1/4 x 2-3/4 stamp large flowerish shape in Polished Pink ink stamp small flower shape in Pale Papaya ink, then diecut all pieces.

  3. On scrap Basic White stamp 5 more leaves in Just Jade ink and diecut

  4. Designer Paper: 4 x 5-1/4

  5. Basic White 3 x 3-1/2 Circle Punch

  6. Glue small flower onto center of larger flower, leaf sticking out behind, then glue to circle and finally to card front.

  7. Stamp Happy Birthday in Polished ink on 1 x 3 strip of Basic White, then punch each end with Lovely Labels Punch

  8. Inside: Basic White stamp sentiment in Just Jade, and flowers in Pale Papaya and Polished inks.