
Tuesday, May 30, 2023
Saturday, May 27, 2023
Earthern Textures
Earthern Elegance is such a beautiful product suite! I bought the entire suite: the Earthern Textures bundle, Earthern Elegance DSP and the Natural Wavy Trim.
Here again, I've made two cards with the same layout using different colors: Pebbled Path, Gray Granite, Misty Moonlight, and Moody Mauve.


Friday, May 26, 2023
Feverishly Creating
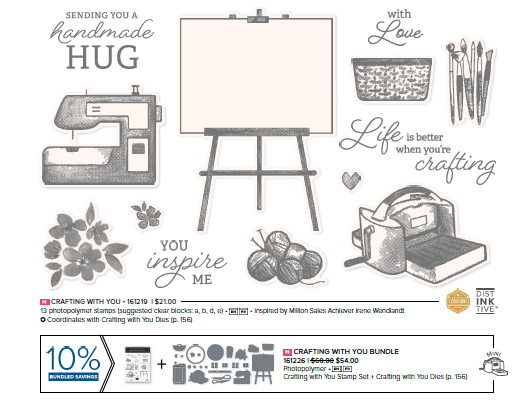
I took a break from the book I am writing and binding for my Great Niece, to do some stamping. After all, I must play with new things and I need some thank you cards.
The first two cards were made with the Crafting With You bundle and Masterfully Made DSP. I used the colors listed on the package and in the catalog for the DSP. There are tons of colors in that paper!! What a fun set! The dies and stamps allow you to create art on an easel, a paper trimmer, scissors, ruler, cut and emboss machine, spools of thread, yarn and an embroidery hoop.
With these two cards, I used the same basic layout, but with different colors. I popped the paper trimmer with Dimensionals and glued the rest.


This card is the same layout as one done in a previous post, but with different DSP. This time I used Masterfully Made DSP and the same Inked and Tiled stamp set.
Wednesday, May 24, 2023
Gorgeously Made
When I first looked at the Masterully Made DSP, I adored the colors, but the pattern is not my usual style. I loved the samples in the catalog and the more I looked at the DSP, the more I liked it. It's just fun!!
Here are two cards made exactly the same way except for the ribbon. I used my Stampin' Blends to add Crushed Curry to some white Crinkled Seam Binding and the other is some retired Pretty Peacock/Old Olive ribbon I had in my stash.
All the colors came from the list on the package of DSP: Pretty Peacock card base, Masterfully Made DSP, Basic White and Berry Burst die cut. The text on the white piece was stamped with Lost Lagoon and Pretty Peacock, then the top was cut from a die in the set. The greeting was stamped in Sweet Sorbet and diecut.


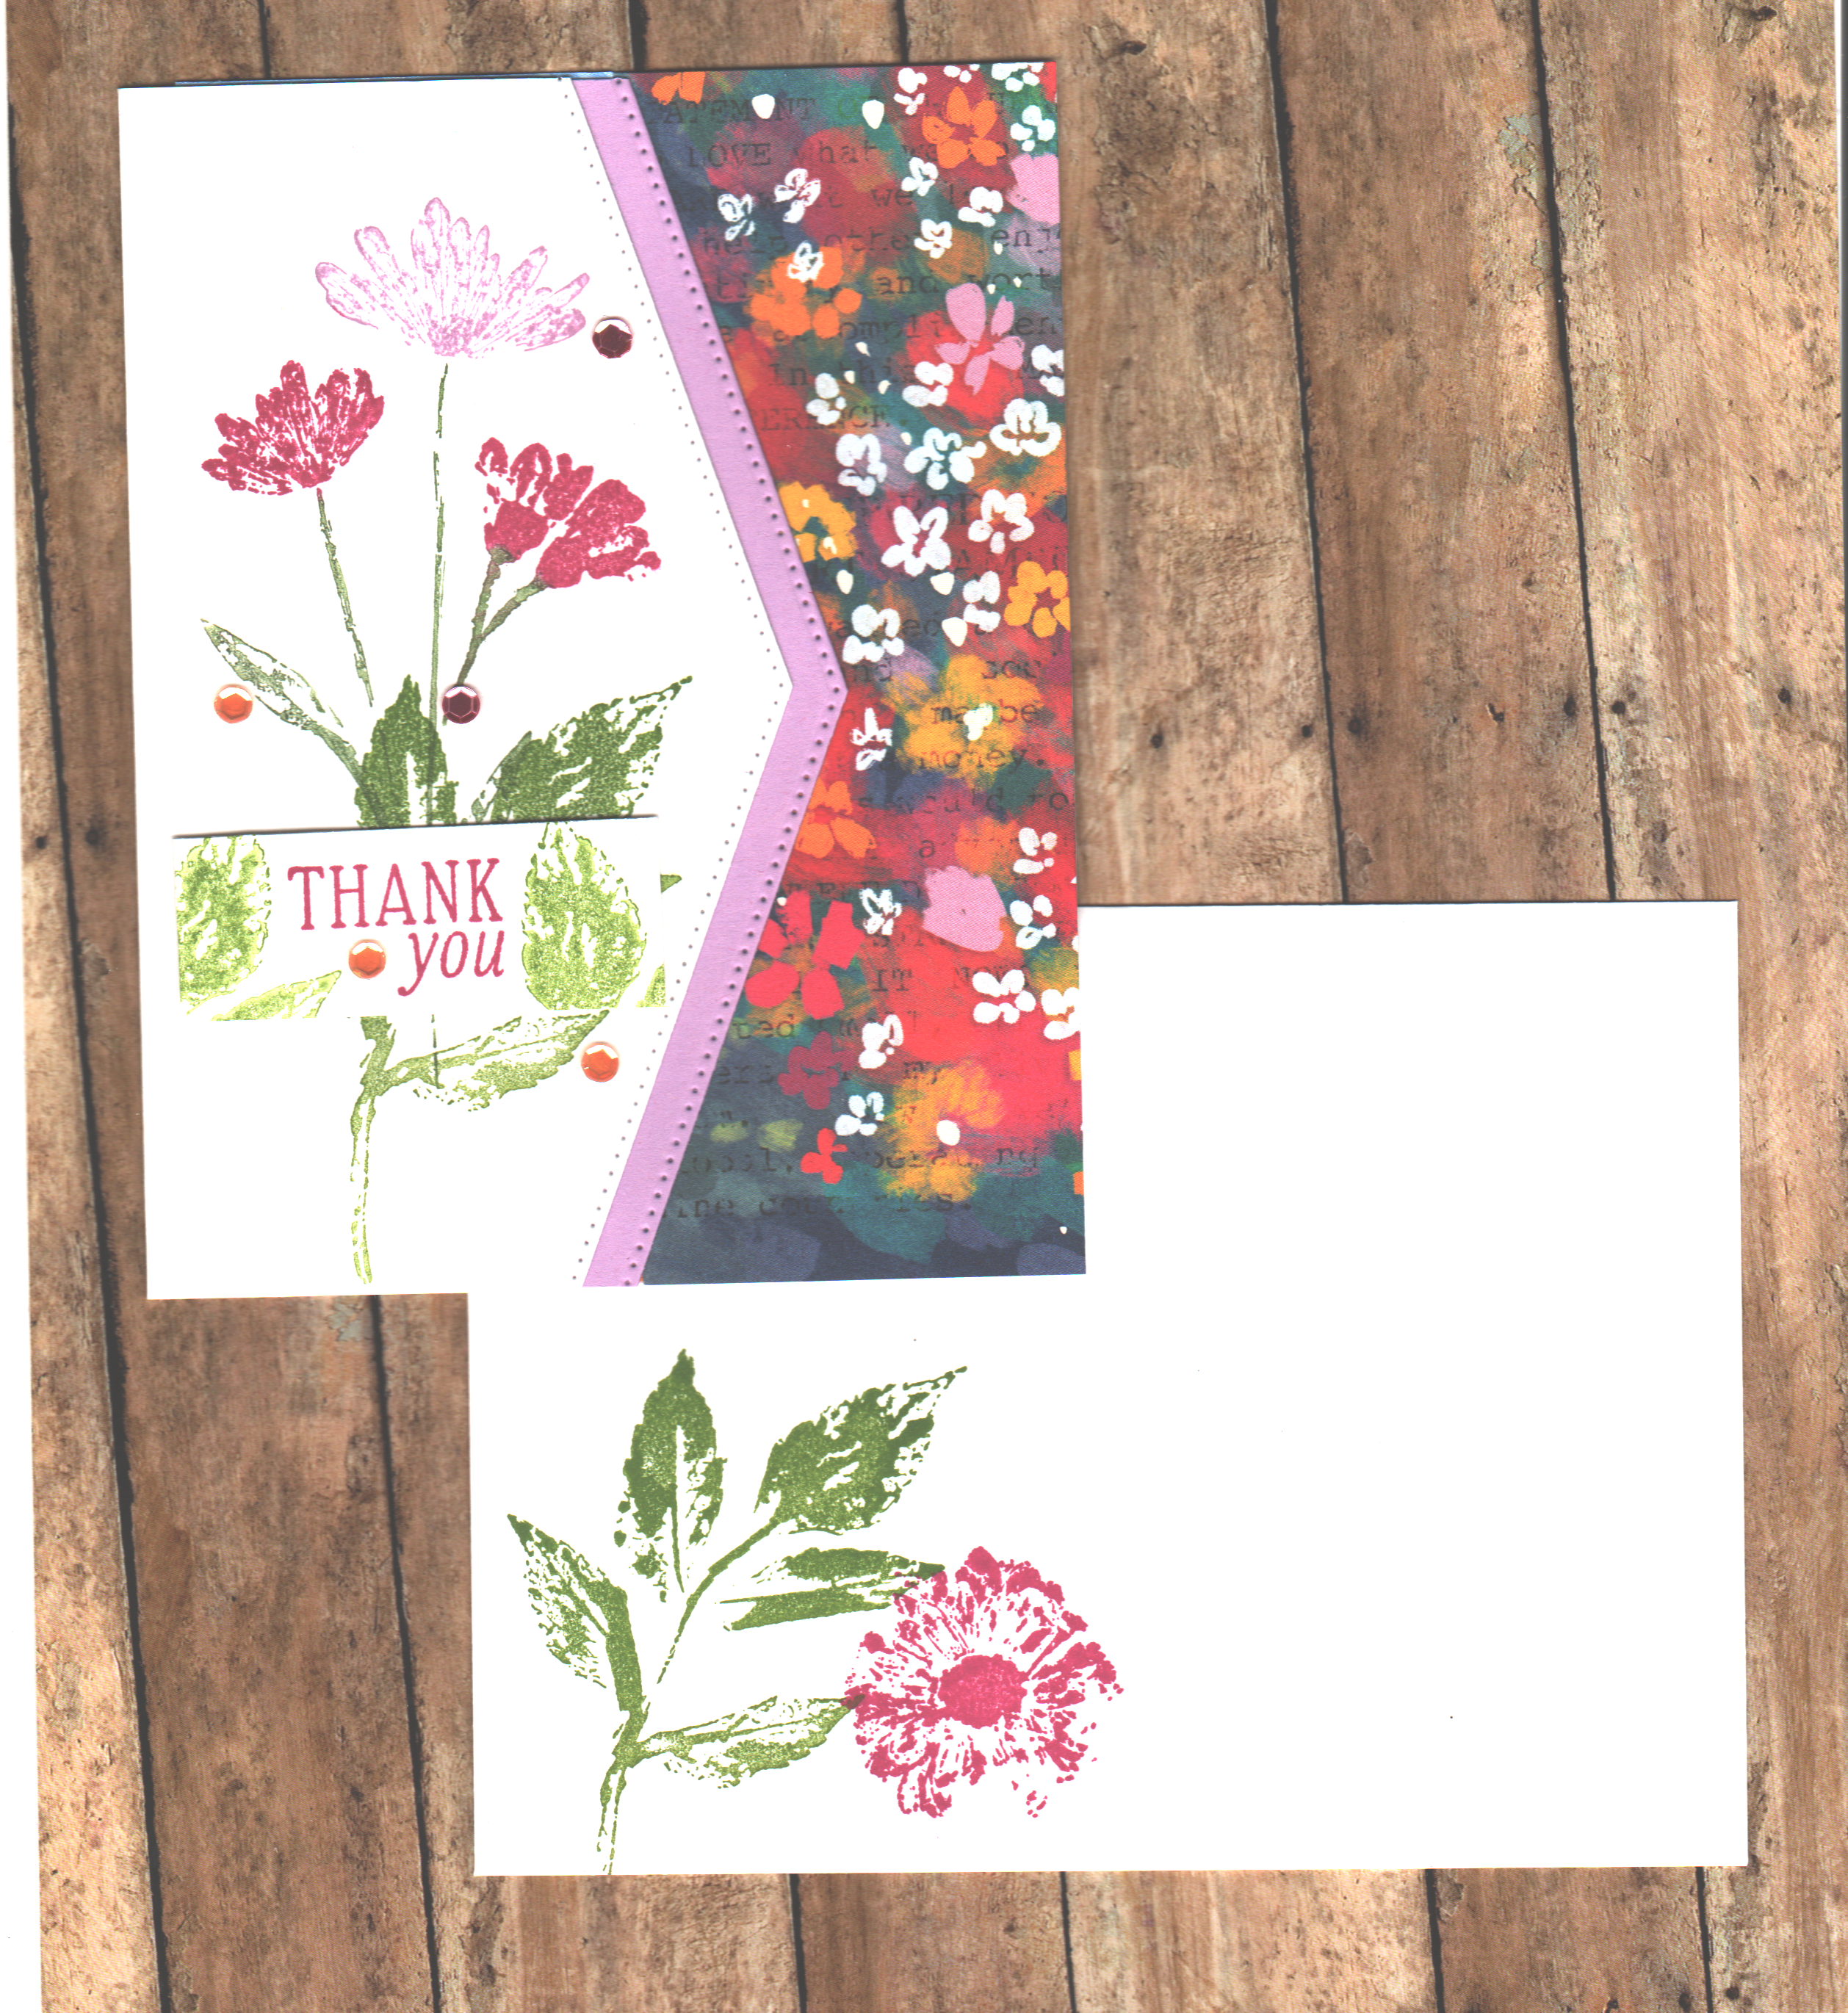
Inked and Tiled Stamp Set
Oh how I love the way these images stamp! It's like I made nature prints. The Inked and Tiled stamp set was one of my favorites when I first saw it in the new catalog. Here I used Berry Burst, Fresh Freshia, Old Olive and Granny Apple Green and Soft Seafoam ink pads. I've found the Naturally Gilded specialty paper to be stunning and quite versatile. You can use your blending brushes to apply color, and the flowers still show. Since they are metallic (gold, silver, copper) the ink doesn't stick to those areas. The angle cut was done with the Basic Borders Dies, the accent piece is Berry Burst cardstock.


Friday, May 19, 2023
Making Something Totally Different
Hello everyone Happy Friday! I'm making something totally different right now. I saw the new Vintage Library Collection from Stamperia and got totally wrapped up in the story that I thought all the pictures in the paper were telling. Boy dragons and castles and owls and magicians you got me This Harry Potter loving girl was sucked in right away. So I'm making a storybook for my great-niece, Isabella. My big brother, her grandpa, used to tell me the most amazing fractured fairy tales when I was little. When he told the three little pigs the Big Bad Wolf was teaching the three little pigs how to do the twist like Elvis and wearing blue suede shoes. When all of the other versions of fairy tail started coming on the children's literature market in the 1990s, I was so excited I bought them all and I do mean ALL! I want to share this with Isabella, So I'm making a mini album but not for pictures It will tell a story from the dragon's viewpoint, But instead of just turning pages like a regular book, it will have interactive elements like a mini album. You know the flip-ups and fold outs and belly bands with waterfall pages etc. I've got the character's named, some of the story written, and located some great illustrations of additional characters in the book. The book loving dragon who lives in a castle with the most enormous library you have ever seen, will tell about the other versions of the three little pigs and Cinderella and share his favorite books.
I made a super quick video just showing you the papers and other things I got and telling briefly some of the plans.
Thursday, May 11, 2023
Beachy Scene
I saw this card somewhere..... for the life of me I can not remember where. I loved the colors. Fresh Freesia card base, basic white, and Pale Papaya cardstocks. The stamp set is Oceanfront. Ink colors: Pale Papaya, Fresh Freesia, Bermuda Bay, Pool Party, Crushed Curry, Old Olive, Shaded Spruce, Gray Granite, Crumb Cake, and Basic Gray.

Lovely Diecut
I diecut this floral image from Artistic Dies on Basic White cardstock. Then I colored the flowers with Stampin' Blends. Some retired ribbon from my stash and a lovely sympathy card was complete. I always stamp a comforting scripture in my sympathy cards as well.

Rocking the Blues
Here are a couple more cards done with the Countryside Corners bundle.
 |
| Card base is Boho Blue, Misty Moonlight layer, Countryside Inn DSP. On Basic White cs, border designs were stamped in Misty Moonlight ink. Sentiment stamped in Boho Blue. |
 |
| Misty Moonlight cardbase, Countryside Inn DSP. Two-Tone Flora stamps and dies: stamped in Boho Blue, Misty Moonlight and Balmy Blue inks. Sentiment stamped in Misty Moonlight ink on diecut from retired Tasteful Labes. |
Wednesday, May 10, 2023
Two Toned Flora
I love flowers climbing on a lattice. We have wild roses that climb on then fence in our front pasture, which is pretty too, but there is something kind of enchanting about a lattice. I did a tutorial recently on how to make a lattice card, and here is another example. The flowers are from the Two Toned Flora stamp set and coordinating dies. I stamped them in Fresh Freesia/Orchid Oasis, Flirty Flamingo/Cherry Cobbler and Crushed Curry/Poppy Parade, the leaves were done in Old Olive ink.

This card uses the same stamp and die sets. The card base is Mossy Meadow, and the die cut background is Old Olive carestock. The same colors were used for the two tags cut from Tailor Made Tags dies, then embossed with Timeworn Type embossed folder. The sentiment is stamped in the retired Rich Razzleberry ink, as is the large flower - which was stamped off for the lighter background shade, and full strength for the detail stamp on top. The smaller flowers were stamped 1st and 2nd generation with Fresh Freesia ink, and the leaves were stamped in Old Olive ink. I used retired Crumb Cake ribbon for the bow.


Monday, May 8, 2023
May Card Ministry
Here are the three cards we'll be creating for St. John's Card Ministry this month.


Materials:
Artistically Inked stamp set
Artistic dies
Christian Birthdays stamp set
Inkpads: Misty Moonlight, Balmy Blue, Smoky Slate, Pear Pizzazz
Cardstocks: Misty Moonlight, Basic White
Painted Texture embossing folder
Stampin' Dimensionals
Preparation:
Basic White card base 5-1/2 x 8-1/2 scored @ 4-1/4
Misty Moonlight 3-1/2 x 4-1/4
White 3-1/2 x 4-1/4 emboss
1-3/4 x 2stamped greeting
White stamping flowers
Assemble Card:
Basic White:
Stamp three large roses in Misty Moonlight ink (stamped off for one flower)
Stamp cluster of three small flowers in Balmy Blue and Smoky Slate ink
Stamp leaves (two doubles and one single) in Pear Pizzazz Ink
Diecut all flowers and leaves
Basic White: 1-3/4 x 2 Stamp Happy Birthday in Misty Moonlight
Glue Misty Moonlight cs to Basic White card base angled to the left.
Emboss 3-1/2 x 4-1/4 White cs with embossing folder then adhere over top of the Moonlight layer, this time angled to the right.
Use glue and Stampin' Dimensionals to adhere flowers and leaves to the card front as shown, glue sentiment in bottom right area.
Inside: stamp sentiment in Misty Moonlight ink and swirly swishes in Balmy Blue ink.

Materials:
Grassy Grove stamp set
Grove dies
Christian Birthday stamp set
Stampin' Dimensionals
Inks: Old Olive, Soft Suede, Shaded Spruce
Papers: Sahara Sand, Soft Suede, Basic White, New Horizons DSP
Preparation:
Sahara Sand card base 5-1/2 x 8-1/2 scored @ 4-1/4
DSP 4-1/8 x 5-3/8
Basic White 3-1/2 x 2-3/8 stamped grass and trees
Basic White 2 x 2 stamped deer
Soft Suede 3-3/4 x 2-5/8
Assemble Card:
Stamp Happy Birthday in Soft Suede ink at the top of Basic White 3-1/2 x 2-3/8
Stamp Trees in Shaded Spruce ink
Stamp grass in Old Olive ink
Stamp deer in Soft Suede ink on 2 x 2 Basic White, then diecut
Glue stamped white layer to Soft Suede layer
Glue DSP to card front, then adhere deer diecut with two dimensionals
Inside: stamp sentiment from Christian stamp set in Soft Suede ink, grass in Old Olive, and trees in Shaded Spruce

Materials:
Nature's Prints stamp set
Natural Prints dies
Cardstocks: Calypso Coral, Very Vanilla, Pretty Prints DSP
Inks: Calypso Coral
Preparation:
Calypso Coral card base 5-1/2 x 8-1/2 scored @ 4-1/4
Very Vanilla inside 4 x 5-1/4
Very Vanilla 3-1/4 x 3-1/4
Very Vanilla stamped greeting 1-3/4 x 3
Very Vanilla stamped fern 2-3/4 x 3-3/4
DSP 3 x 3 outside layer
Assemble Card:
Stamp flower bunch in Calypso Coral ink on the edges of the card base.
Glue 3-1/4 x 3-1/4 Very Vanilla layer to card front top, glue 3 x 3 DSP on top.
Stamp fern on 2-3/4 x 3-3/4 Very Vanilla, and "Birthday Wishes" on 1-3/4 x 3 Very Vanilla
Diecut fern and birthday greeting
Glue greeting and fern diecuts to card front
Inside: stamp sentiment, flower and fern twice (one stamped off)
Tuesday, May 2, 2023
New Products from the New Catalog!!
First up is The Inked Botanicals suite, it features a beautiful stamp set that looks like flower printing. I can't wait to get my hands on it, it's going to be so much fun to play with all different colors of inks. I'm thinking spritzing with water on watercolor paper and so many other techniques. reminds me of gutoku, Japanese fish printing. When I was teaching gifted and talented, my fifth graders did fish printing. I can still remember the looks on their faces they were so enchanted with their creations.
Next up is the Fresh as a Daisy collection. This set is predicted to be a big seller. And the video you can see why the dies and stamp sets have been so beautifully formed, which makes being creative so easy.
Lastly, is the Stargazing suite, The designer series paper has the most beautiful night sky designs. Check it out!
Monday, May 1, 2023
Countryside Corners
The Countryside Corners bundle has proven to be very versatile. When paired with the Lasting Joy Stamp set, it's even better. I can't wait to get the embossing folder that coordinates with it as well. See the video below for some more detailed looks at this collection.


Subscribe to:
Posts (Atom)