background

Saturday, January 11, 2020

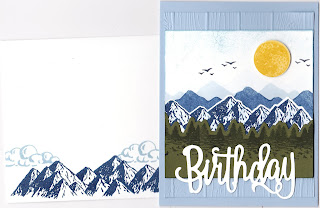
Mountain Air

The Mountain Air bundle is perfect for those who like to build scenes. It's become quite a trend lately, and these reversable stamps make it much easier. In a previous post, I included some step by step photos showing how to use the reversable stamps and a video. You can see that here if you missed it: http://scmagnolia.blogspot.com/2020/01/mountain-air-bundle.html 

Below are posters showing the elements included in the bundle and how they work together to build scenes.
Most are done left to read as normal when reading, but a couple a backwards due to a morning without coffee.


Watercolor Stamping Technique
  • First, cut a layer of watercolor paper and spritz it with water, or use an Aqua Painter to apply water.
  • Stamp the solid side of the mountains stamp with Balmy Blue ink (stamp off once 1st), the mountains again with Night of Navy (stamp off once 1st)
  • stamp the row of trees twice with Night of Navy ink (full strength.) The ink will bleed, which is the effect you want in watercolor. You may want to have some paper towels nearby to mop up the water and remove too much color.
  • While the paper was still damp, hand watercolor the sky using Lovely Lipstick, Terracotta Tile, and Grapefruit Grove ink with an Aqua Painter. Just “stamp” a small clear block in the ink and paint with Aqua Painter from that palette. You can also use an Aqua Painter to add some Balmy Blue ink to the lake portion on the bottom.
  • After the paper is fairly dry, stamp the detailed side of the stamps with both Balmy Blue and Night of Navy ink. You can use the Aqua Painter to soften the details and add brush strokes as you like.
  • When the paper is thoroughly dry, use an Embossing Buddy to remove the static, stamp over mountains in VersaMark and emboss in white.
  • Cut the larger trees out of watercolor paper first, then use an Aqua Painter to watercolor them with Night of Navy ink.
  • For the smaller tree and row of trees, spritz the watercolor paper, then stamp with the solid side (stamp off once 1st). When the paper is dry, stamp with the detail side. Then use the coordinating dies to cut them out.
  • Heat emboss the sentiment in white on Night of Navy Cardstock, cut out with Classic Label Punch, and finish off with a bit of Braided Linen Trim.
So grateful to fellow Demo, Tami Hewlett, whose design really helped me get my creative juices flowing. These techniques, of watercoloring with ink and Aqua Painter, stamping off, etc. are things many of us know to do. Pulling them out of your bag of tricks to use in building scenes with Mountain Air will be a blast! Use different colors, combos of stamps etc and create something entirely different.


Wednesday, January 8, 2020

Peaceful Moments Buckle Fold

The Peaceful Poppies Dies have lots of pieces to use in building your lovely creations. The card design came from fellow Demo, Cindy Brumbaugh.  Click Here for PDF Directions

These are all the things you can cut with the Peaceful Poppies dies

This shows how layer and build with the dies


Stamps
Peaceful Moments, Abstract Impressions
Paper
Poppy Parade, Flirty Flamingo, Basic Black, Whisper White, Pear Pizzazz, Old Olive, Peaceful Poppies DSP
Ink
Flirty Flamingo, Poppy Parade, Old Olive, Pear Pizzazz, Memento Tuxedo Black
Embellishments

Tools
Peaceful Moments dies, Classic Label Punch, 2” Circle Punch or Layered Circles dies.

Measurements For Buckle Fold Card
Card Base:4-1/4 x 8-1/2 scored at 5-1/2 on the 8-1/2 side
DSP: 2-3/4 x 4 on front of card
Belt strip 1-1/2 x 5-1/2″ scored at 5-1/4″ so there is a 1/4″ flap to attach to the card base
DSP for belt strip 5 x 1-1/4
Inside panel is 4 x 5-1/4

  1. Stamp background image onto 3 x 4 Whisper White Cardstock (cardstock is vertical)
  2. Samp sentiment and main image onto 2-3/4 x 4 Whisper White cardstock (cardstock is horizontal).
  3. Fold 4-1/4 x 8-3/4 Base cardstock on 5-1/2 score line, adhere stamped 3 x 4 Whisper White (background) to 3-1/4 x 4-1/4 panel.Tip: Only apply adhesive along edge of Whisper White cardstock to avoid having adhesive in center of panel which will be cut out with punch.
  4. Place Classic Label Punch upside down over panel with background images reaching in as far as punch will go. Line edge of punch to edge of Whisper White cardstock and punch.
  5. Slide to other end of panel and line punch up to edge of Whisper White cardstock and punch. Set aside.
  6. Fold 3 x 8-1/2 cardstock base on 4-1/4 score line, then adhere stamped 2-3/4 x 4 Whisper White cardstock to top panel with fold on right side and adhere other 2-3/4 x 4 Whisper White Cardstock to inside. Adhere to Accent color cardstock, then center on Cardbase panel and adhere with fold on right side (cardbase fold is on left side).
  7. Fold left panel of card closed, then insert top panel from right side into slot created with Classic Label Punch.


Card Ministry


Stamps
Peaceful Moments, Timeless Tropical
Card Stock
Basic Black, Whisper White, Real Red, Cherry Cobbler, Old Olive, Mossy Meadow
Ink
Memento Tuxedo Black, Real Red
Embellishments


Tool
Poppy Moments dies


  1. Basic Black card base 8-1/ x 5-1/2 score at 4-1/4
  2. Whisper White 4 x 5-1/4 die cut cluster of flowers in the top left
  3. Real Red for solid flowers 4-1/2 x 2-3/4 diecut
  4. Cherry Cobbler for outline of flowers 4-1/2 x 2-3/4 diecut
  5. Basic Black for flower centers 1 x 1-3/4 diecut
  6. Old Olive for solid leaves 2-1/2 x3-1/4 diecut
  7. Mossy Meadow for leaf details 2-1/2 x3-1/4 diecut
  8. Whisper White inside 4 x 5-1/4 stamp small flower from Tropical stamp set
Stamps
Lovely Lily Pad
Card Stock
Pretty Peacock, Highland Heather or Flirty Flamingo, Pool Party, Whisper White
Ink
Gorgeous Grape or Lovely Lipstick, Pool Party
Embellishments


Tools
Lily Pad dies
  1. Pretty Peacock Card Base: 5-1/2 X 8-1/2 score at 4-1/4
  2. Highland Heather border around DSP: 3-1/4 x 4-1/4 stamp and die cut the lilies from the middle
  3. Lily Impressions DSP: 3 x 4
  4. Pool Party 2-3/4 x 5-1/2 stamp lily pads then cut lilies and border die
  5. Vellum 2 x 2 square die cut detailed large lily
  6. Whisper White inside: 4 x 5-1/4

Stamps
Waterfront, Piece of Cake
Card Stock
Garden Lane DSP, Whisper White, Mossy Meadow
Ink
Mossy Meadow, Crushed Curry, Gray Granite, Sahara Sand
Embellishments

Tools
Stitched Rectangles
  1. Thick Whisper White card base: cut 8-1/2 x 5-1/2 score at 4-1/4
  2. DSP 4 x 5-1/4
  3. Mossy Meadow 3-1/2 x 4-3/4 stitched rectangles die cut #3
  4. Whisper White 4-1/2 x 3-1/4 stitched rectangles die cut #4
    • stamp 'ground' in Sahara Sand, 'mountain' in Gray Granite, 'sun' in Crushed Curry, and 'trees' and 'greeting' in Mossy Meadow
    • inside: 'birthday cake' in Crushed Curry, 'plate' in Sahara Sand, “Cut the Cake” and Enjoy Every Crumb” in Mossy Meadow
5. Inside stamp cake in Crushed Curry, plate in Sahara Sand and Cut the Cake, Enjoy Every Crumb
in Gray Granite

Monday, January 6, 2020

Paradisiac Poppies!

I know what you're thinking... did she make up that word Paradisac? Nope, it's a real word! It means befitting or relating to Paradise; idyllic or ideal; heavenly. I adore Popies! When I was a little girl, we lived on a farm in Indiana, where my Grandma had planted all kinds of flowers. She would walk me around the yard and tell me the names of each flower: peony, lily of the vally, buttecup, iris, tulip, dafodil, lilac and poppy. Lilacs, peonies, and poppies were my favorites. The lilacs smelled wonderful and I loved purple, the peony bush was so lush and full, but the poppies.... ahhhh. They just made me so happy!

Naturally, I swooned when I saw this die set in the Mini Catalog. It was the first thing on my order. The frist card design came into my head as I was falling asleep last night. Then there's the calendar that sits next to my computer. Who doesn't love black, white and red? Remember that old elementary school joke, What's black and white and red all over? lol

By the way, my Stamparatus saved my card as usual. Lining up text is a breeze with this tool that literally lives on my desktop. I's the BEST stamp positioning tool on the market bar none!

For this calendar I used the directions found here: https://scmagnolia.blogspot.com/2018/10/calendar-time.html                      I only changed the orientation of the base.


Product List

Parisian Blossoms Suite


Parisian Blooms Speciality Paper VIDEO

Birthday Bananza Suite


 VIDEO: Birthday Bonanza Designer Series Paper