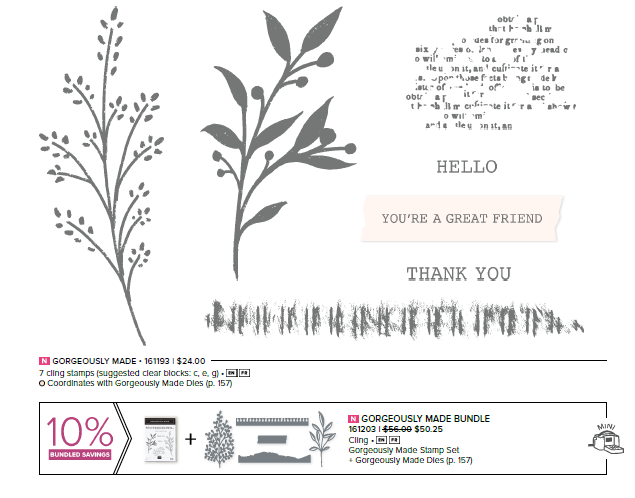
Inked and Tiled is such a pretty stamp set. Here the card base is Pebbled Path, along with Petal Pink, Basic Black and Basic White card stocks. I stamped the flowers in Petal Pink, then used a sponge dauber to add Calypso Coral ink to the base of the flower and Pebbled Path to the stems. Then I added Pebbled Path leaves stamped at the bottom. I didn't have any black enamel dots, so I used a Sharpie marker on some pearl Basic Jewels. I adhered the stamped layer to a Petal Pink layer. For the black trim I used the spiral notebook die from the Gorgeously Made bundle. To make the banners at the bottom, I used one inch strips of Petal Pink cardstock and embossed with three random embossing folders. Then I flagged the ends.
Thursday, August 31, 2023
Saturday, June 10, 2023
June Card Ministry
Materials:
Gorgeously Made stamp set
Gorgeously Made dies
Masterfully Made Designer Series Paper
Cardstock colors: Basic White, Bermuda Bay, Bubble Bath
Ink Pad colors: Bermuda Bay, Bubble Bath
Parakeet Party ribbon
Enamel Dots or Sequins
Glue Dots
Stampin' Dimensionals
Preparation:
Bermuda Bay card base 8-1/2 x 5-1/5 score @ 4-1/4 then cut 1-1/4 off the right (open side top)
DSP 1-11/16 x 5-1/2 for inside
Basic White 2-1/2 x 5-3/8 for inside
Parakeet Party 2-1/2 x 4-1/4 diecut
Bubble Bath 2-7/8 x 5-3/8 spiral diecut
Bermuda Bay scrap tear around edges for under greeting
Basic White 1 x 3 sentiment
Assemble Card:
Glue DSP to inside right of card base right up to edges.
Glue 2-1/2 x 5-3/8 Basic White inside to the right of DSP.
Diecut 2-1/2 x 5-3/8 Bubble Bath with spiral binding design on the left edge.
2-1/2 x 5-3/8 Bubble Bath: stamp text over all in Bubble Bath ink.
Stamp leaf in Bermuda Bay ink over top of stamped text.
Diecut leaf from 2-1/2 x 4-1/4 Parakeet Party.
Apply very small amount of glue on Parakeet Party leaf diecut and adhere over top of stamped leaf.
Stamp text on 1 x 3 Basic White, then stamp greeting in Bermuda Bay over top.
Diecut greeting.
Tear around edges of scrap Bermuda Bay and glue greeting on top. Adhere bow diagonally behind greeting layers with a glue dot. Attach to card front with Stampin' Dimensionals.
Affix three sequins to card front.
Inside stamp sentiment.
Materials:
Inked and Tiled stamp set
Christian Birthdays stamp set
Itty Bitty Birthdays stamp set
Cardstock colors: Basic White, Wild Wheat
Ink pad colors: Gray Granite, Moody Mauve
Classic Label Punch
Mini Stampin' Dimensionals
Enamel Dots
Linen Thread
Glue Dots
Preparation:
Basic White Thick card base 8-1/2 x 5-1/2 score @ 4-1/4
Wild Wheat 3-1/4 x 5-1/4
Top Basic White stamped layer 3-3/4 x 5
Basic White scrap for greeting
Assemble Card:
Glue Wild Wheat layer to card base leaving an even border on the left, top and bottom sides.
Basic White: stamp flowers in Moody Mauve ink, and leaf cluster in Wild Wheat ink towards the left side.
Glue stamped layer on top of Wild Wheat layer.
Scrap Basic White: stamp birthday greeting from Itty Bitty Birthdays stamp set, in Gray Granite ink then punch out.
Adhere greeting to card front with mini dimensionals. Attach bow under greeting with glue dot.
Apply jewels to card front
Inside: stamp sentiment in Gray Granite ink, and flower in Moody Mauve ink.
Wednesday, May 24, 2023
Gorgeously Made
When I first looked at the Masterully Made DSP, I adored the colors, but the pattern is not my usual style. I loved the samples in the catalog and the more I looked at the DSP, the more I liked it. It's just fun!!
Here are two cards made exactly the same way except for the ribbon. I used my Stampin' Blends to add Crushed Curry to some white Crinkled Seam Binding and the other is some retired Pretty Peacock/Old Olive ribbon I had in my stash.
All the colors came from the list on the package of DSP: Pretty Peacock card base, Masterfully Made DSP, Basic White and Berry Burst die cut. The text on the white piece was stamped with Lost Lagoon and Pretty Peacock, then the top was cut from a die in the set. The greeting was stamped in Sweet Sorbet and diecut.


